
Author: Jason Cipriani
Over a year ago, I undertook the task of redoing my brewing setup and opted for a 3 vessel propane system with 2 pumps and a gas controller for better temperature management. I was immediately in love with my miniature version of a professional brewery and ended up making some really good beer with it. However, I realized over time that the trade-off of such a cool looking system is that it comes with a bunch of moving parts that can hinder a relaxing brew day, plus constantly refilling propane tanks is a hassle and got to be expensive quick.
Eventually, I started looking into all-in-one electric brewing systems and, perhaps due to its existing international and growing US popularity, naturally spent a lot of time researching The Grainfather, a plug-and-play setup that offers users the ability to brew standard 5 gallon/21 liter batches of beer in a way that still feels like brewing. I wasn’t prepared to part ways with my cumbersome 3-tier system, for reasons of both financial investment and pride, so when the folks at Grainfather asked if I would be willing to give their new Grainfather Connect a fair shake, I was quick to take them up on the offer.

Soon after agreeing to the review, I had the pleasure of meeting some of the members of the Grainfather crew at GABF 2017, all of whom were obviously passionate about both their product and homebrewing. During our chat, I was informed the unit I’d be reviewing happened to be the demo they had on display at their booth.
The product reviewed for this article was provided by the manufacturer in exchange for an honest review; no other compensation was provided. The opinions expressed in the article are solely those of the author and a concerted effort was made to approach the review from an unbiased perspective.
A couple weeks after GABF, I received a box containing the Grainfather Connect, which despite being previously used as display, was packed securely and in great shape. I’ve watched plenty of unboxing videos and know that piecing a Grainfather together isn’t rocket science, but one bonus of receiving a demo unit is that it arrived fully assembled and ready for use.

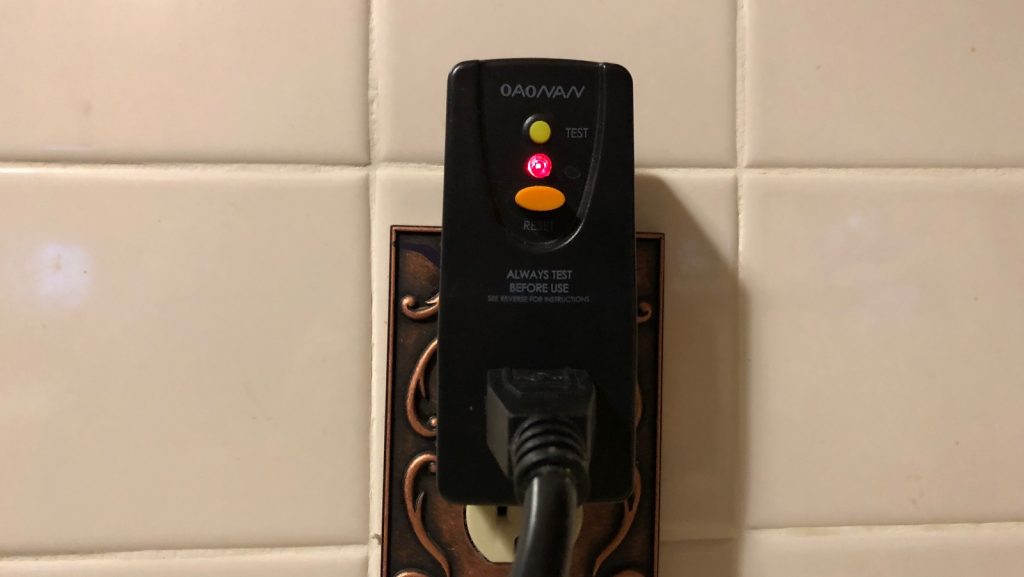
I immediately plugged the pump, heating element, and Connect in then placed the temperature probe in its housing near the pump. Since electricity and water don’t mix, I picked up a portable GFCI adapter and made sure to plug the unit into it for safety’s sake. This also makes it so that I brew on the Grainfather wherever there’s a standard outlet, like at Big Brew Day or on a sunny day in my backyard.
After a quick cleaning, the Grainfather was ready to make wort. That’s all I had to do to set it up.
It’s Electric!
Electric brewing setups are growing in popularity and Grainfather is leading the charge when it comes to all-in-one electric rigs. While international users have access to the powerful 220v model, US customers are currently limited to the 110v version equipped with dual 600w and 1600w elements for mashing and boiling, respectively. The nice thing about this is that it works wherever you can plug it into a standard outlet, but it’s not as beefy as the unit sold in other countries, meaning slightly longer heating times.

For my first brew with the Grainfather, I thought it’d be smart to start off by heating my entire water volume of 8.2 gallons/31 liters then transferring the sparge portion to an insulated water cooler for later use. This worked out really well, though it took about 90 minutes for the water to reach my 175˚F/79˚C target, not terrible but definitely longer than a powerful burner. In subsequent batches where I heated only the mash volume of water, it took approximately 45 minutes to reach strike temperatures. Again, not the quickest, but also not so far off from other heating options that it was bothersome.
After removing the spent grains from the sweet wort and turning the elements on, I’ve consistently been able to achieve a solid rolling boil in about 30 minutes. Coincidentally, this is just about the time it takes for me to sparge, so cranking the controller up immediately after the mash means the wort is boiling at just the right time.
Connect Controller
My day job is involves using and reviewing tech products. From the latest gaming laptops to the newest smartphones, I get to play with and geek out over all of it. Needless to say, I was excited and intrigued to test Grainfather’s Bluetooth capable Connect controller. Producing reliable hardware is a difficult task on its own, let alone with software interacting between two devices over Bluetooth.
The control box has a simple design. A single display shows any relevant information, such as current temperature, target temperature, the name of the brew session, and power level of the heating element. Pump and Heat buttons are also present, as are an up and down arrow for manual adjustments and a Set button.

The controller on its own is intuitive and simple to use, but the added Bluetooth functionality is key to the ease of use. Pairing an iOS or Android device to the controller is as easy as tapping “Scan for Devices.” Once connected, the app not only displays the current status of the pump, temperatures, and whether or not the element is heating, but it gives the user the ability to manually adjust pretty much every aspect of the Grainfather. Given the lower power of the US model, one of my favorite features is the delayed start function because it allows me to schedule when their Grainfather turns on. With just a little planning, I’m able to have hot water at the ready whenever I need it, eliminating the time spent waiting for strike water to heat.
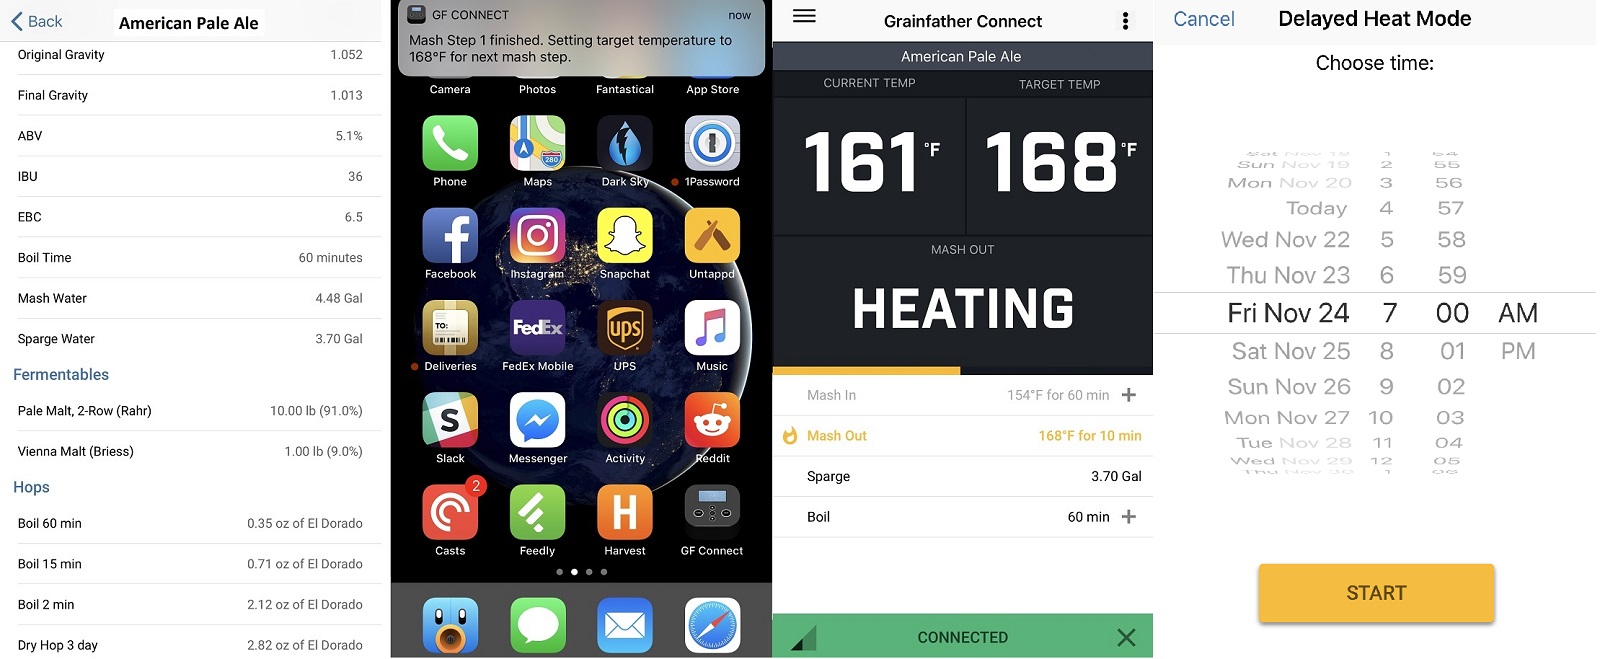
With the app and Connect controller together, one has only to load a recipe file (standard xml) then start a brew session, all of the information including mash steps, target temperatures, mash duration, boil length, and hop schedule are sent straight to the controller. Once the brew has begun, the app receives alerts when steps are completed and indicates what’s to be done next. For example, during the boil, I receive an alert on my app that also shows on the Connect when it’s time to make hop additions. Similarly, when strike temperature is reached, the Grainfather will maintain the temperature while it instructs you to add your grain. After each step, pressing Set on either the Connect or from within the app indicates completion. It’s like having a permanent brewing assistant who doesn’t talk back or drink all my beer!
Batch Size
One concern I’ve heard from fellow homebrewers about the Grainfather has to do with batch size, namely that it maxes out at 20 lbs/9 kg of grain with a capacity for about 8 gallons/30 liters of wort, just enough for a standard 5 gallon/19 liter batch. While this is certainly a limitation for those interested in brewing larger batch sizes, it’s a non-issue for the large majority of homebrewers who stick to making 5 gallon/19 liter batches.
While I’m personally okay with the 20 lbs/9 kg limit, higher OG beers can still be made by simply reducing the batch size a bit while maxing out the grain basket. I’m excited to push the Grainfather to the extremes on an upcoming batch with a 20 lbs/9 kg grain bill. The largest grain bill I’ve used so far was 16.5 pounds/7.5 kg, which left plenty of room in the grain basket and worked out as expected without any issues.

I’ve learned that paying close attention to the fineness of the grain crush is imperative when brewing recipes with larger grain bills. I keep my mill set to roughly 0.045″, which is a tad tighter than the gap of 0.055″ recommended by Grainfather. For a batch with an 11 lbs/5 kg grain bill, I had zero issues, hit all of my numbers, and sparged in 20 minutes. However, grain bills north of 15 lbs/6.8 kg at this fine of a crush have resulted in slightly longer sparge times and could increase the risk of a stuck sparge. I’ve since tweaked my mill gap to fit within the suggesting range and all has been good.
Having read about how fickle the Grainfather’s pump can be when it comes to recipes with a lot of hops, I was a bit hesitant to add pellets directly to the boil, but I did it. For science. At this point, I’ve tossed up to 4 oz/113 g of pellet hops directly into the boil and have yet to experience a single issue, the pump has handled it like a champ!

Chilling
Each Grainfather comes with a convoluted counterflow chiller (CFC) that rests conveniently atop the unit. All of the necessary adapters to connect the chiller to a kitchen sink or outdoor faucet are also included. Prior to using the Grainfather, I’d only ever used an immersion chiller and a plate chiller, so I was curious to see how this would compare. The Grainfather’s CFC is impressively efficient, restricted only by the speed of the pump and groundwater temperature. With every batch I’ve brewed so far, it only takes about 15 minutes to drop the wort from boiling to pitching temperature.

While Grainfather recommends recirculating hot wort through the CFC for 5 minutes after the boil is finished to sanitize it, I’ve opted to pump wort through it during the last 10 minutes of the boil and it has worked fine. If there’s one complaint I have about the chilling setup, it’s that the CFC being on top of the glass lid makes seeing how much wort volume is left difficult.

Granted, the Grainfather is designed to leave roughly 0.7 gallons/2.5 liters in the bottom of the kettle, but I’d prefer to have a bit more control over when to stop the transfer without having to remove the CFC and the lid just to take a peak.
Cleaning The Grainfather
Easily the worst part of homebrewing, a good cleaning regimen is a necessary annoyance to prolong the life of equipment and reduce the chances of future contamination issues. My 3-tier rig involved cleaning a mash tun, kettle, pump, among other various parts and required a good 20 minutes of manual labor after each brew day. The all-in-one aspect of the Grainfather not only reduces the cleaning time required post-brew, but it’s largely clean-in-place (CIP), meaning I don’t have to work as hard.
The first step is rinsing the grain basket after the mash, a 3 minute process I do at the beginning of the boil. Once the batch is done and the wort has been transferred to the fermentor, I walk the kettle over to my sink to dump the trub out before giving it a quick rinse. Next, I make a PBW solution directly in the kettle, set the Grainfather controller to 160°F/71°C, then recirculate the cleaner through the CFC back into the kettle for about 15 minutes. After that, the cleaning solution gets pumped down the drain and replaced with clean water that then gets pumped for another 15 minutes. Finally, I dump the water and make sure to scrub any remaining bits leftover after the cleaning cycle before leaving the Grainfather to dry.
Grainfather Community
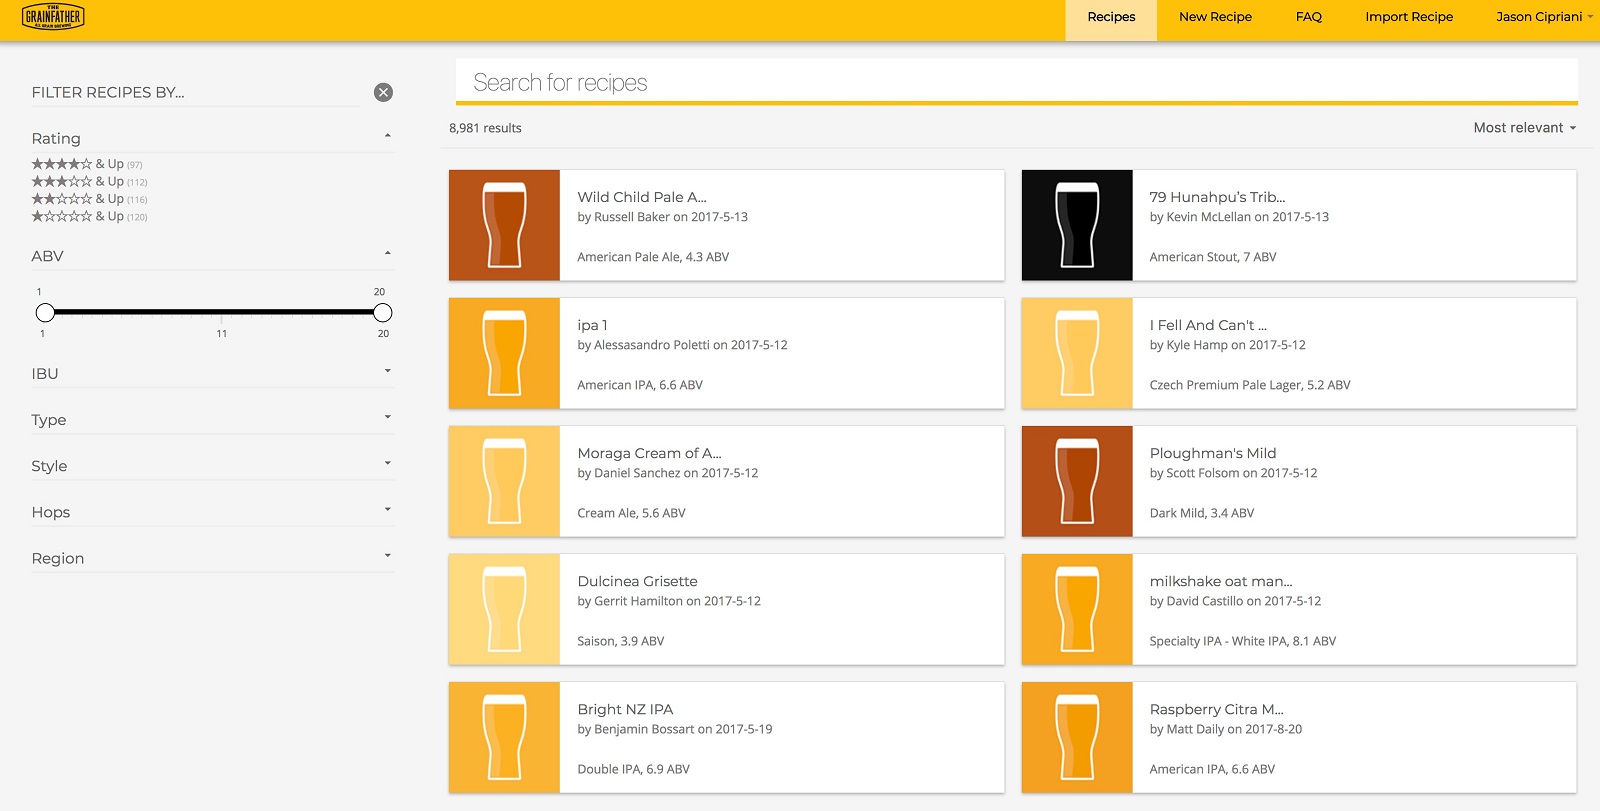
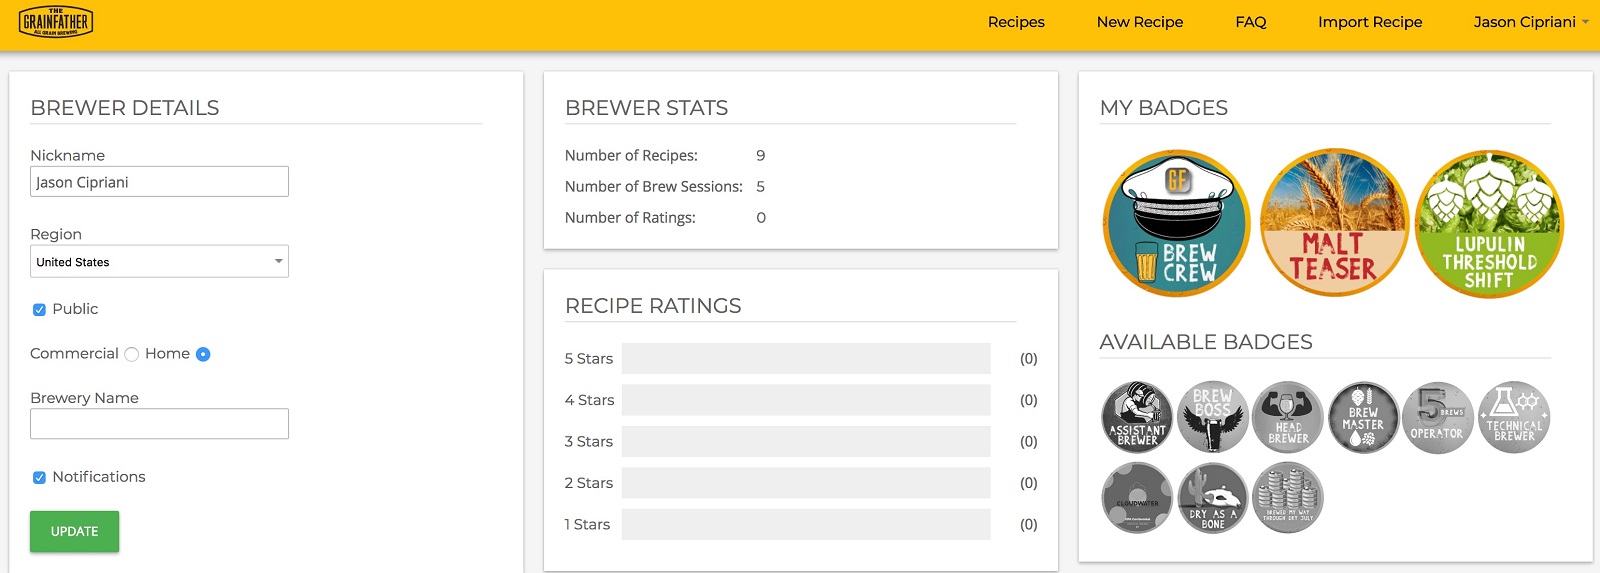
Each Grainfather user has their own Grainfather community account where they can create recipes, import existing BeerXML recipe files, add recipes from fellow members, share recipes with other members, and start or edit previous brew sessions.
There’s even a section where users can view badges earned for things like brewing the first Grainfather batch or brewing a hoppy beer. It may not make my beer better, but it does add a sort of flare where there once was none.
Overall, the website is easy to use and the community seems to have a healthy selection of recipes to pick from. However, there are a few things I’ve experienced so far that have room for improvement, such as the quantities not matching exactly when loading recipe XML files created in BeerSmith or the specificity of hop weight conversions and volumes– do I really need to know the boil volume should be 7.681746503674 gallons? Simply rounding the numbers off would save some time and some confusion, as I currently have to double-check my grain and hop amounts for each recipe I import. Also, it’d be nice to have the option to set my account to default to the 110v model of the Grainfather as well as imperial measurements, I currently have to change each with every new recipe or brew session.
Grainfather Hacks
The Grainfather is about as plug-and-play as any electric brewing system gets, simply provide it power, load up a recipe, and it’s off to the races. While good beer can certainly be made with the the unit right off the shelf, there are some hacks some might rely on to make for even faster, smoother brew day.
While the Grainfather has been the all around easiest system I’ve used to make beer, heating times on the 110v US model are a bit longer than I’d prefer. My workaround for this has been to run a supplemental heat stick on a separate circuit that, when used in conjunction with the Grainfather element, cut the time it takes to heat 8 gallons/30 liters of water to 160°F/71°C down to 39 minutes, less than half the time it took using the built-in element on its own. Another way the I’ve used the heat stick to save time is by using it to heat the sparge water in an insulated cooler, leaving the Grainfather to heat only the mash volume.

At the end of the mash step, the Connect controller turns off the pump, stops heating the wort, and displays the next step– sparging. Visible on the display is the amount of water needed for the sparge as well as directions to use the arrow buttons to keep tabs on the amount that’s been poured over the grains in the basket. One way I’ve found to hasten my brew day is to move past sparge step and immediately begin heating the wort to a boil by pressing the Set button. Of course, I don’t actually skip sparging, but rather do it while the wort is being heated rather maintaining mash out temperature. By the time I’m done, the wort is nearing a boil, ultimately shaving about 30 minutes off my brew day.
The Grainfather being a recirculating infusion mash system (RIMS), temperatures are held stable by wort being pumped continuously by a warm element. This works well, but in certain situations, such as brewing outside in cool weather, insulating the kettle can take some of the pressure off of the element. The Graincoat is an insulated jacket that fits snugly around the Grainfather and is designed to better maintain mash temperatures as well as produce a more vigorous boil. I don’t currently have a Graincoat but plan to pick one up soon.
There are two perforated plates that slide into the grain basket. Both have rubber gaskets to keep grain from flowing freely around the edges. The gaskets come loose rather easily when installing a plate. I’ve found that using some sanitizer on the inside of the basket and around the gasket has all but eliminated any accidental slippage. Although, a more permanent gasket-like solution for the plates would be preferred.
| THE VERDICT |
After multiple brew sessions with the Grainfather, I’m very pleased with my experience so far. Setup is incredibly simple, clean-up requires little effort, and it has a small enough footprint that I can get away with brewing in my kitchen on cool winter days, plus it’s easily stored. Best of all, it keeps me involved enough in the process to still feel like I’m actually brewing while also offering cool technological options such as being able to remotely monitor and make changes to my brew session.
Of course, nothing is perfect, there are some small issues I found with the Grainfather. I personally think they should offer the 220v model in the US for those with or willing to install such outlets. Supplementing with an independent heat stick has worked fantastic, but it’d be nice to have that kind of heating power built-in. For brewers used to the higher efficiency from a fine grain crush, it’s possible they’ll see a slight decrease due to widening their mill gap in order to avoid the possibility of a stuck sparge, though I haven’t found this to be much of a problem. The only other issues I have really are just minor annoyances, for example, imported recipes requiring tinkering due to very specific measurements.
The fact I’ve been able to hit all of my target numbers on the batches I’ve brewed on the Grainfather by simply following the instructions on the app is exciting for a process nerd like me. I’ve little doubt the level of precision offered by the Grainfather will improve any brewer’s ability to consistently reproduce recipes, and it has certainly afforded me a greater degree of control when brewing for exBEERiments. I’ve already begun recommending the Grainfather to curious friends and have zero hesitation doing the same to those who are in the market for an all-in-one electric brewing setup.
The Grainfather All Grain Brewing System can be purchased direct from the manufacturer as well as from the following retailers:
Amazon | MoreBeer | Adventures In Homebrewing | Brew Hardware
Love2brew | Great Fermentations | JaDeD Brewing
Support Brülosophy In Style!

All designs are available in various colors and sizes on Amazon!
Follow Brülosophy on:
FACEBOOK | TWITTER | INSTAGRAM

If you enjoy this stuff and feel compelled to support Brulosophy.com, please check out the Support Us page for details on how you can very easily do so. Thanks!


36 thoughts on “Product Review | Grainfather All Grain Brewing System With Connect Controller”
Can you do step mashes with the unit?
Yes, you can create as many steps as you want using the Grainfather recipe builder on their website or by using just the controller in manual mode. I’m pretty sure other tools like Beersmith and Brewer’s Friend can export mash steps too in the xml format.
Yes, you can. and randomdumping is right, they are exported from BeerSmith and added to the Grainfather community website when you import a recipe.
Jason, great review. I have been using the Grainfather now for about 5 batches and have great success. My biggest grain bill was around 14lbs and it does slow down the sparge but with a little patience it works fine. I would also mention that the bigger the grain bill the heavier the basket gets and can be hard to lift out. Plus they say to lift slowly so the grains don’t settle too fast leading to increased risk of stuck sparge. This is tough to do!
I would like to mention that there are a ton of videos on YouTube showing all the mods, tips and tricks. I have found these to be very helpful. The only other complaint I have is that coming up with accurate volumes continues to a challenge. There’s a lot of conflicting info that can be very confusing to new brewers like me!
Thanks again for the post and keep up the great work! You guys are awesome.
Kevin
Thank you! This was a fun review to work on.
Jason good review. As an owner for 2yrs now I’ve a few points to add. Put the CFC on a stool not on top of the GF when chilling. Makes no sense to be on top as you noted you can’t see the wort as well as it keeps in heat! I disagree that the GF intends to leave all that wort behind- users just tip the GF towards the pump and get all that wort. I’ve put up to 6.5g in my fermenter and am certain I can hit 7- though that would max out my Chronical! Never had a stuck sparge and if concerned I’d add some rice hulls.
My biggest concern is even heat distribution in the mash and avoiding wort going thru the overflow tube. I now open it up 2-3 times and give a good stir in the mash ala the old cooler MLT days! Adds to the hands-on brewing too 😃. And solves my concern that frankly would be with any setup that isn’t full volume mash. Brew on!
I place the grain basket and lid next to the GF and rest the CFC on top of that so I am able to see what’s going on inside the kettle.
It seems this is the way to go.
Indeed I have watched many videos myself. The stool is a solid idea. Thanks! I don’t mind leaving that wort behind, it keeps a lot of the trub and nasty bits outta my fermenter. Not that that’s necessarily a bad thing. 🙂
When I transfer I put a strainer bag over my fermenter to capture more trub, surprising how much is filtered again.
And yes not a bad thing the trub- I recall an xbeerment…! You guys are doing a great job on this site. Cheers!
I’ll echo Ken, just set the chiller on something beside the grainfather.
Have you ever used a brew boss? Or is Grainfather the only type of all in one that you tried
Correct, Grainfather is the only all in one I’ve used. Brew Boss looks interesting, though.
I’d be interested to see temperature measurements – how close is the actual mash temperature to the controller?
I’ve taken temp measurements on top of the grain bed, and it’s either matched the controller or been 1F under the controller. Close enough for me.
How is the sparge performed? Is it really an all-in-one system if you need a separate HLT? Finally, what kind of efficiencies do you get?
Thanks as always for you great work.
The basket is lifted and kept above the main housing with built in feet/bars, then water is poured over the grain. I see your point about all in one. It’s *close* to all in one 😉
Between 73-76%
Thanks! I’m curious what the max grain capacity would be if you use all the water at the start and skip the sparge. It seems other all-in-ones are designed this way but perhaps have bigger kettles to start.
I plan on testing no sparge soon. I’ll comment with results when I do.
I like the grainfather, but I still like my dual 5 gal batch system more as long as have a big garage and a place to brew. With two 10 gal brew pots on a camp chef 60Kx2 btu woodsman stove, dual mash tun coolers with brew bags and jaded chillers I can brew two different 5.5 gal batches of just about anything, or the same or Partigyle.
Nothing wrong with that!
How much of an issue is humidity?
Hey, just answered this on another comment. In open space like a kitchen, it’s not that big of a deal. I can see it being one in a smaller room.
Is the extra humidity indoors a noticeable, or potential problem? I am also anxious to hear about a no sparge brew day. This would make it a single vessel Ebiab . The only alteration I can see would be the need to adjust grain crush from BIAB tolerances…(I think.)
It’s maybe slightly more than boiling a pot of water to cook noodles, only due to duration of the boil.
I’m not sure you should go too fine with your crush, just because of the filter plates. Too fine and you’re going to have a lot of grain going into your boil.
The grainfather connect automatically switches to near boil mode as soon as the sparge starts (well, my one does)
Target temp is increased to 98c and heats through the sparge until you confirm the step is done and it sets the temp to 100c.
I was worried about it boiling before my sparge has finished, but thats on 240V supply.
Interesting. My unit requires me to skip Sparge to get full power to the heating element.
It should heat the wort to about 200-210F. I don’t remember the exact temp, but it’s supposed to stabilize the temperature before it hits boiling. This way if you have a long sparge it doesn’t accidently kick into boiling while you’re still sparging. Took me a little getting used to that since the previous model had a basic temp controller you had to manually set.
Hi there. I’ve been using GF for a year. Not the control model. I have a tea urn type water heater for the sparge water but i use this with a timer so i can wake up to a urn full of hot water to go into the GF for mash. Along with the hacks you’ve mentioned and clean as you go I can get an ale down in 4hours, and get some chores or darts in at the same time. I put the bottom plate with the silicon seal in the freezer for 5 mins before putting into basket, this shrinks the metal so it goes in much easier. Try it, it works.
Huh.. that’s an interesting idea. I’ll give it a shot.
Hi all. I sanitize the CFC for 5 mins at the beionning of the boil and before any hop additions. With a good whirlpool at the end of the boil, this will keep the CFC cleaner and reduce the risk of pump issues caused by large amount of hop additions (sorry for my bad english…)
Hi All. I have been using the original Grainfather for two years without a problem. A few comments are in order. First, the Pros: It has a small no-mess footprint and is very easy to use and gives completely reproducible and repeatable results with a given recipe. Second, the Cons – and this is where the non-scientific brewers tend to get lost! It is extremely difficult to bring the actual temperature in the MIDDLE of the mash up to that indicated on the controller, especially when one gets up to 7+ kg. Many Grainfather advocates are in self-denial of this fact, but I just suggest they shove a long temperature probe into the centre of the mash. One can partly alleviate this problem by bringing the water up to strike temperature before adding the grain, and also by mixing the grain bed a few times during the mash. Does it really matter is the mash temperature is a bit low? Probably not, going by early Brulosophy experiments! But it does cause one to roll ones eyes at all the complicating programming recipes with the newer controllers – what is on the display, is not what is in the centre of the mash!
Jason,
I have owned a GF connect for 2 years, and actually had an issue with it in the first year after about 12 brews. The Controller box became extremely hot and the rubber around the plugins to the box melted to the controller unit, after which the unit was unserviceable.
This could have been a huge disappointment for me, but GF proved that they really have a solid warranty and customer care. This issue took place on a Friday and after going through my trouble shooting steps with them via email over the weekend they sent me an entire new unit which I had by the following Wednesday. No shipping charges, no hassle. Couldn’t ask for a better experience.
Jason, I enjoyed your review of the Grainfather Connect brewing system. I’m currently home-brewing in France, where I’ve lived since 1990, and I am interested in moving beyond my propane-heated, 20L/5-gal kettle system, using a converted cooler for an infusion mash, to a 2-bbl electric nano-brewery system. I’ve been looking at electric systems, but I’m curious about your mention, at the beginning of your review of “a 3 vessel propane system with 2 pumps and a gas controller for better temperature management.”
Can you provide me with additional details about it, or even recommend systems that I can find in Europe, either here, as a reply to my comment, or as a direct message to tomfiorina[at]gmail.com? Thanks in advance.
Great review! I have a GF as well, but I have been struggling to hit my numbers and surprised that you have it dialed in so fast! I suspect my sparge step to be the culprit as I’ve measured my sparge runoff and the gravity is usually 1.020 or a little higher. Do you mind sharing your step by step process for mashing and sparging?
Here’s how I do it:
1) Mill is set to 0.036” and adjusted with feeler gauge.
2) SS screen on top of bottom plate of grain basket. This has greatly helped with leaving minimal amounts of grains in the wort after lifting the basket.
3) Dough in and adjust flow so that there’s about 1cm if wort above the top plate and just under the top of the overflow pipe.
4) Mash for 60 mins. Increase temp to 168. Once it reaches that temp, start 15 min timer for mashout
5) After mashout, slowly lift grain basket to drain
6) Once I hear the draining slow down to a trickle, I gently push the top plate down to flatten. (Maybe I need to push it down more to compact the grains some?)
7) Start sparging. Water is at 170° and I use a Pyrex to pour it over the top plate and try to keep about 1cm on top of the plate. Takes about 15-20 mins. Is it possible that I’m using too much rice hulls (8oz) and that’s making the sparge water flow too quickly through the grains?
I’m consistently getting 65% efficiency and I can’t figure out why! Sorry for the long post but hopefully this can help out others too.
Grainfather owner here as well. My process is pretty close to yours, but here are the differences:
Graincrush (according to them) should be 1.27 – 1.4 mm (0.05 – 0.055 “). As for rice hulls, I use them all of the time. Here is my latest brew:
https://www.brewersfriend.com/homebrew/recipe/view/765015/juicy-bits
For a 14 pound grainbill (15% being flaked) – I used just over 6 ounces. Granted, I just picked this up before the new year, I am only 3 brews in. I have hit or exceeded my points by 1 or 2 at most. I would say that I am, on average, right around 73% efficiency. I understand finer crush = better efficiency – but I wonder if it is somehow causing you issues? Also – are your calculations right? They upgraded the app due to an issue on bill calculations – and it’s caused my initial brew to have too much water (so I just boiled it a little longer). Hope you figure it out!