
Author: Marshall Schott
Oxygen and beer do not mix. Or more accurately, they shouldn’t mix, but unfortunately often do. For a chemical element that’s necessary to the existence of so many living organisms, it’s astonishing the havoc oxygen can wreak on beer, turning a malty Helles into a stale mess or a hop juicy IPA into an insipid dumper in a matter of days.
Oxidation that occurs after fermentation is complete, referred to as cold-side oxidation, has been the focus of a few of our xBmts. We first compared a beer gently transferred to a keg through the liquid disconnect from the bottom up to the same beer kegged with intentional (and painful) splashing. The presumption here was that filling from the bottom would push any oxygen out of the top of the keg, a claim commonly touted on podcasts, blogs, and internet forums. Surprising many, tasters could not tell those beers apart with any consistency. Even after an additional 100 days of warm storage, a new panel of participants could not reliably distinguish those beers.
Thoughtful readers began pointing out one plausible reason for the lack of a difference wasn’t that neither beer was oxidized, but rather that both were. In addition to neither keg being purged with CO2 prior to filling, undeniably introducing some oxygen to the beer, both were also cold crashed in primary, which creates a vacuum that sucks environmental air into the beer filled fermentor.

Having kegged using these methods without experiencing problems for so long, my interest in cold-side oxidation was admittedly spurred by the hazy NEIPA movement, namely the odd tendency for these beers to take on a purplish tint paired with a sickly sweet flavor just days after packaging. To test whether oxygen was the culprit, I made two beers from the same batch of wort and took every effort to reduce cold-side oxygen ingress in one as much as possible. Lo and behold, the beers were different as determined by both appearance and a panel of blind participants.

Commercial breweries invest a lot of energy and money to keep oxygen out of their beer, not only to prolong shelf stability, but for the sake of product consistency and customer satisfaction, which is always good for business. Unfortunately, such resources are cost prohibitive for most homebrewers, leaving us to come up with our own methods.
7 Methods For Reducing Cold-Side Oxidation
Cold-side oxygen exposure is most likely to occur either in the fermentor prior to packaging or during the packaging process. While the tips provided here are intended to address both, some of the methods will be more or less relevant depending on one’s process, for example, whether they package in bottles or kegs.
NorCal Brewing Solutions CO2 Harvester
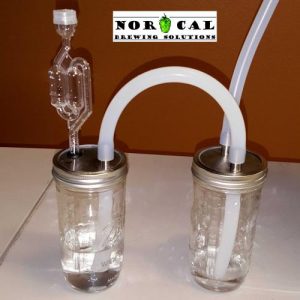
During fermentation, a rather substantial amount of CO2 is produced, usually exiting the fermentor through an airlock and leaving a thick blanket of protective gas atop the beer. However, for those who prefer cold crashing in primary, a problem arises where the cooling of the beer creates a vacuum in the fermentor, sucking back not only the liquid in the airlock, but a surprisingly high amount of ambient oxygen. Some have claimed the impact isn’t very big, but with sensitive styles like New England IPA, any reduction in oxygen is good, and NorCal Brewing Solutions out of Redding, CA came up with a very clever product that promises to keep exposure to a minimum.
The NorCal CO2 Harvester goes between the fermentor and the airlock, collecting CO2 produced during fermentation in a mason jar. Once fermentation is complete and the temperature of the beer is reduced for cold crashing, the CO2 in the jar gets sucked back into the fermentor instead of oxygen from the surrounding environment.

Both Jake Huolihan and I have used NorCal CO2 Harvesters a number of times, they work as advertised and really are a clever solution to the suckback issue. However, the amount of harvested CO2 contained in the jars isn’t enough to ensure no oxygen gets pulled into the fermentor during packaging, another proposed vector of oxidation.
Package Before Cold Crashing
When I learned about cold crashing, it was almost always spoken of as a method for dropping particulate out of solution such that the beer was clearer at packaging. For this reason, it was viewed as somewhat of an advanced method, if only because it required external intervention that often took the form of a temperature controlled freezer or refrigerator.
While the method certainly works, the potential for oxidation caused by the suckback discussed earlier may not necessarily outweigh the benefits of this step. For those who aren’t interested in adding more gear to their homebrewery, perhaps the simplest solution is to package when the beer is still warm then proceed with crashing and any other clarification steps.
By skipping the cold crash step, the headspace in the fermentation vessel is filled with CO2 produced during fermentation and ostensibly remains there while the beer is transferred out of the fermentor.
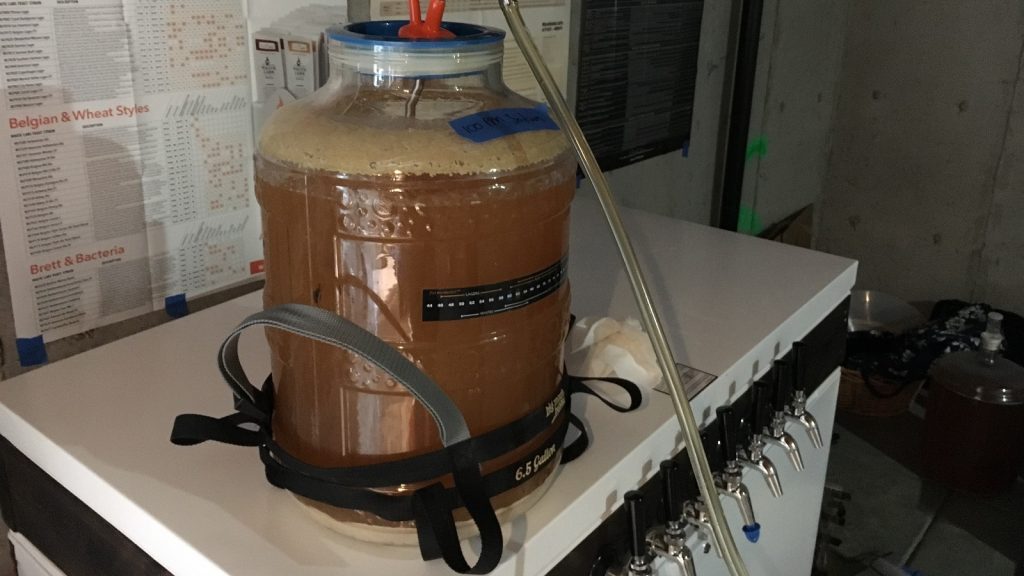
Ferment In Kegs
There are numerous reasons kegs make for good fermentation vessels, one of which is that they can be completely sealed at any point in the process. As fermentation finishes, samples can be pulled directly from the liquid post to measure FG, then once confirmed, all one has to do is remove the blowoff tube from the gas post to fully seal the keg.
Given the durability of kegs, the beer can be cold crashed without concern of implosion, while the seal keeps out all unwanted oxygen. The cold beer is then transferred under pressure to a clean serving keg.
The biggest drawback to this approach is the fact most homebrew corny kegs are only capable of holding 5 gallons/19 liters of beer, which when accounting for trub and kräusen, limits batch size to about 4 gallons/15 liters. Another recommendation for those considering fermenting in kegs is to reduce the length of the liquid diptube by approximately 2 inches/5 cm so that it’s above the trub line, making for easier transfers.
All in all, fermenting in kegs is a solid method for limiting oxygen exposure that’s been used quite extensively by contributors Matt Del Fiacco and Jake Huolihan. If only someone would market a keg designed specifically for fermentation that’s capable of holding 7 gallons/26.5 liters of liquid…
Capture CO2 In Vessel For Reuse, or The BrüLoonLock
A few years ago, contributor Ray Found and I tossed around ideas for avoiding the oxygen ingress that occurs as a result of the vacuum created during cold crashing. We agreed that an ideal solution would involve capturing the CO2 produced during fermentation in some other vessel, which would then get sucked back into the fermentor during cold crash instead of oxygen-rich air.
After some speculation based assumptions as to how large the CO2 capture vessel would have to be, we moved on to other things and ignored the idea. Then, after sharing the results of the xBmt on cold-side oxidation in NEIPA, I was reminded of this idea and figured it was finally time to try it out for myself.
My wife was heading to the dollar store to buy some stuff for a Valentine’s Day event at my kids’ school, so I asked her grab me a couple mylar balloons while she was there.
No longer using the diptubes that came with my Ss Brewtech Brew Buckets, I repurposed them as CO2 conduits, inserting one end into the lip of the balloon and securing it tightly in place with multiple wraps of masking tape. An old 3-piece airlock with the outer portion cut off would work just as well as the stainless tube. The other end of the tube goes into a rubber stopper and voila, you have yourself a rudimentary CO2 capture device, aka BrüLoonLock, that cost maybe $3 to build.
Note: mylar balloons often have a built-in valve that must be removed prior to inserting the tube. Scissors did the trick for me!
How does it work? We haven’t done a formal xBmt testing out the BrüLoonLock (yet), but I have used mine on a number of recent batches and have come up with a process that seems to be working well. Since we know oxygen is present in the fermentor prior to pitching yeast, I always start by using a standard airlock then swapping it out 24-48 hours into active fermentation, presuming any oxygen has been expelled at that point.
Depending on how active fermentation is, which is largely contingent on the OG of the beer, the balloon will fill with CO2 at varying rates, potentially building up enough pressure to pop off the fermentor. For fun, I attached mine to a fermenting Wee Heavy less than 24 hours after pitching yeast, it was very active, and the empty balloon would completely fill with gas every 2.5 minutes– this visual representation of how much CO2 is actually produced during fermentation really surprised me. Ultimately, when to attach the BrüLoonLock requires some degree of guessing.
One thing I’ve tried that works great is filling a balloon, or even two (I’ll get back to this), during the active part of fermentation then swapping out an airlock for the BrüLoonLock and placing some tape over the opening to retain the gas. Once fermentation is complete and it’s time to cold crash, I remove the tape and put it back on the fermentor. I’ve found that cold crashing a 5 gallon batch results in what looks to be about 90% of the CO2 in the balloon going back into the fermentor. Crazy to think that’s usually plain old air.

The reason I mentioned filling a couple balloons with CO2 is that during packaging, air gets pulled into the fermentor while it’s being emptied. While opinions vary on whether this negatively impacts beer, a BrüLoonLock is a cheap and easy way to ease anxieties.
With the balloon size I used for my builds, I go through about 1.5 BrüLoonLocks of CO2 when kegging. Since I have multiple CO2 canisters, I find it easier to refill my empty BrüLoonLocks from those rather than holding onto 4 full ones until fermentation is complete.
It’s not the most set-it-and-forget-it solution – it requires a small amount of monitoring and full balloons do take up some space – so it may not be for everyone. But I love it! What started as sort of a joke has ended up becoming a normal part of my process. For the person who desires a less hands-on approach, I’d suggest going with another option.
Application Of External CO2
For my first attempt at keeping air out of my fermentation vessel during cold crash and packaging, I rigged up a fun little doohickey influenced largely by what I’d heard others were doing. Using an extra CO2 tank and regulator I had lying around, all I basically did was attach a piece of tubing then secured the other end to the inner piece of a 3-piece airlock. Since the airlock fits into any size bung, all one has to do when fermentation is complete is swap out the airlock on the fermentor with the one connected to the regulator, set the pressure to 1 psi, then open the valve to let the CO2 flow.
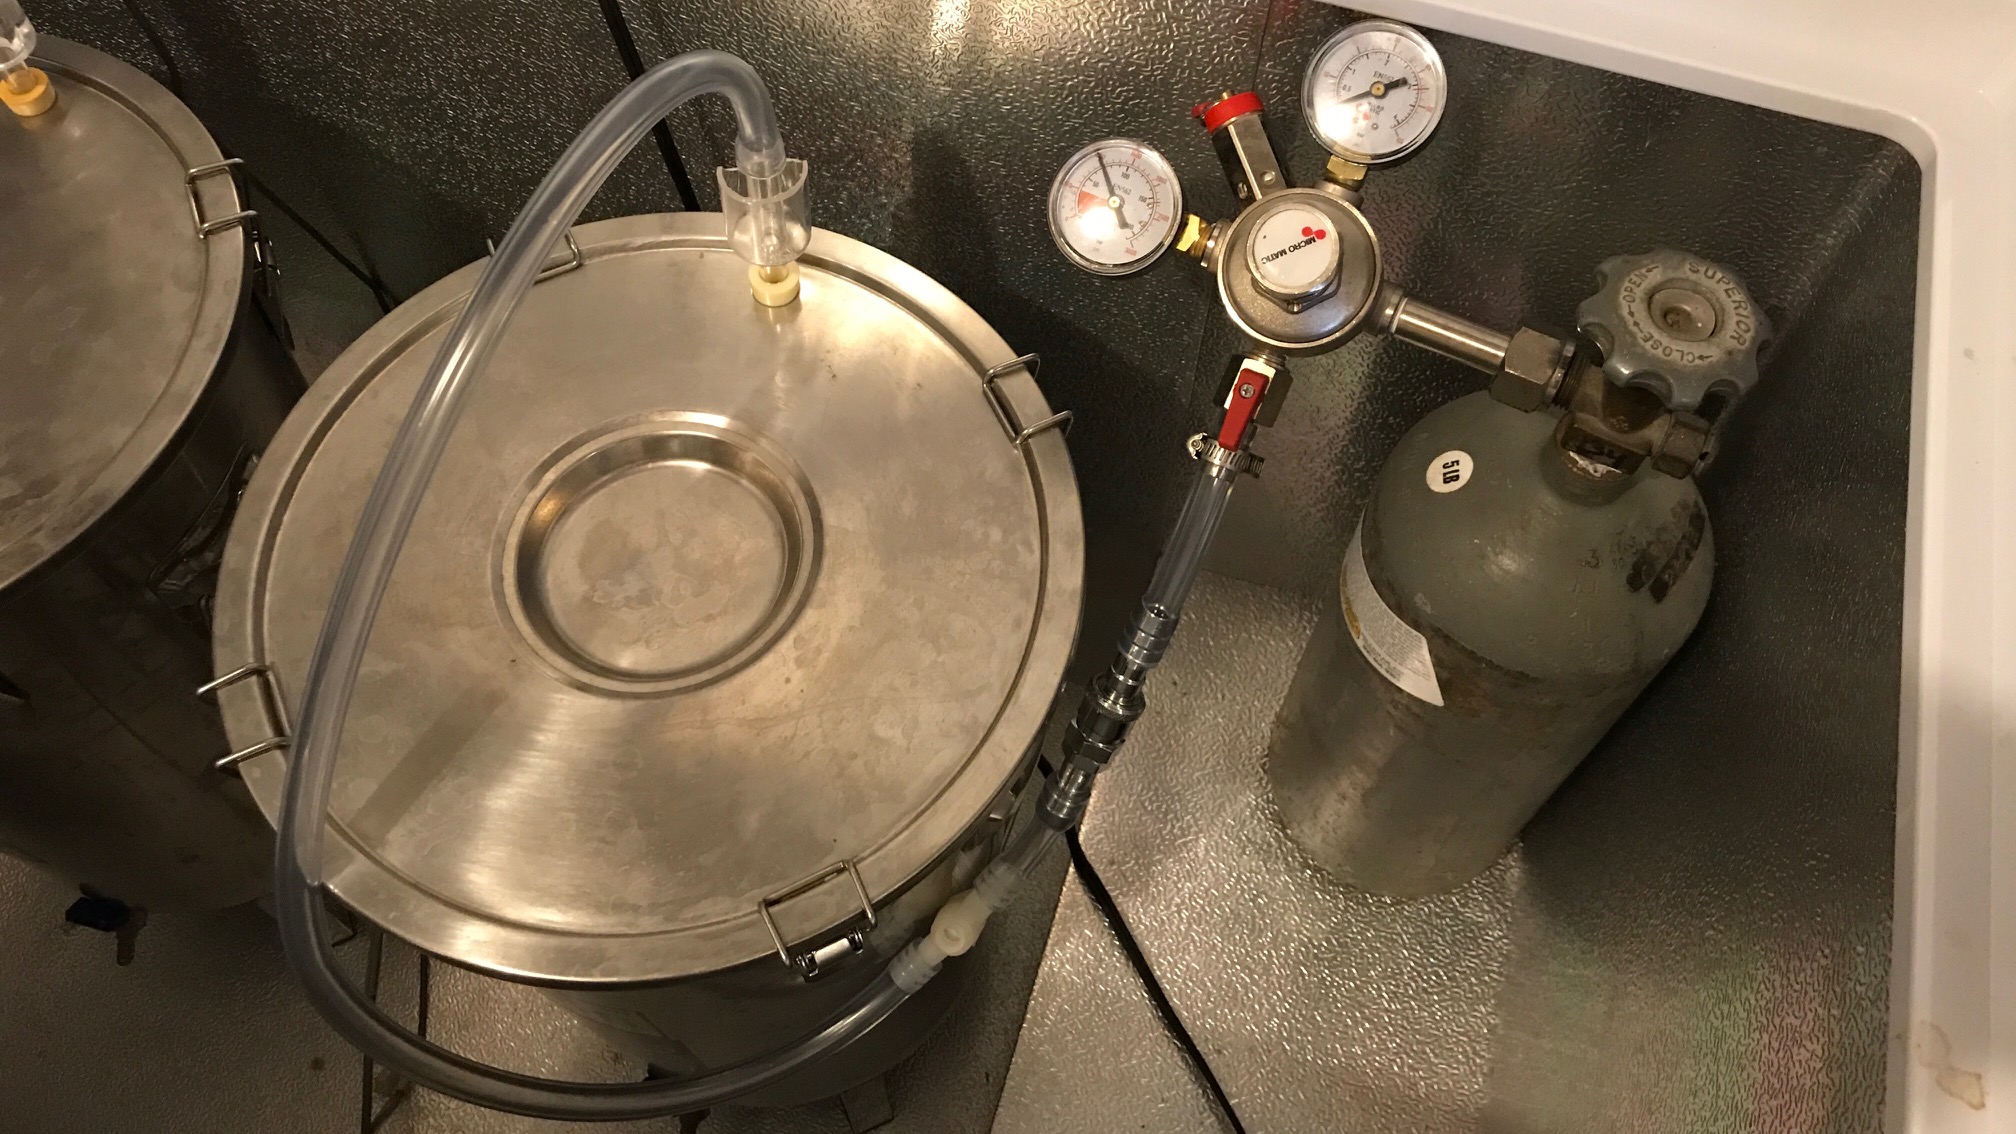
The biggest limitation to this method is that many fermentation vessels aren’t rated to hold pressure, which can lead to various problems, the scariest of which is an explosion. Just make sure to check with the manufacturer of the fermentor you use, and most definitely do not pressurize glass carboys. Also, regulators can be pretty inaccurate at lower pressure. For example, even though my Ss Brewtech Brew Buckets are rated to 1 psi, I’ve noticed a very slight hissing coming out from under lid when using this method, indicating more gas is flowing than the gauge says.
Following a period of cold crashing, simply keep the gas attached to the fermentor when kegging to ensure no oxygen makes its way to the beer.

In fact, depending on the fermentation vessel, this setup can be used to pressure transfer beer without moving the fermentor, just connect the proper length of tubing from the valve to the keg and let ‘er rip. I still prefer gravity, but to each their own.
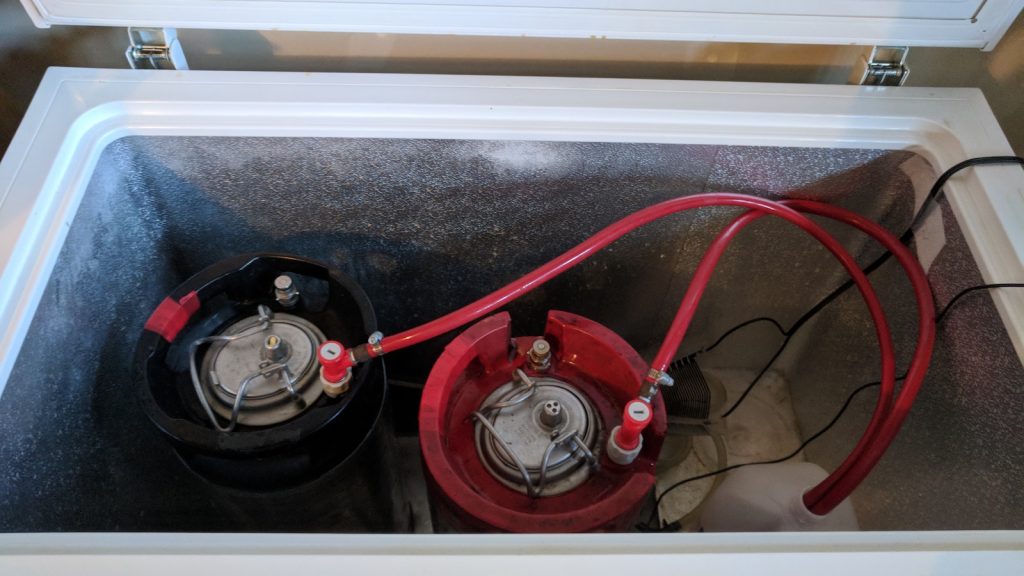
Purge Serving Vessel With CO2
So far, we’ve covered various ways to reduce oxygen exposure during the cold crashing and packaging process, now we’ll address an issue that’s a major concern of professional brewers and has been getting more attention by homebrewers– oxygen exposure in the package.
The popularly held idea that filling a keg from the bottom up forces oxygen out while any agitation from racking leaves CO2 in the headspace, resulting in little if any oxygen exposure, seems entirely plausible at first thought. I certainly bought into it and have kegged hundreds of batches using this approach, most of which were good, some even doing well in competition.
As good as those beers might have been, and as convinced as I was they weren’t oxidized, recent xBmts and experiences led me to question these beliefs. Truth is, it wasn’t until recently I actually compared beers packaged both ways, and countering my expectations, I’ve perceived some differences.
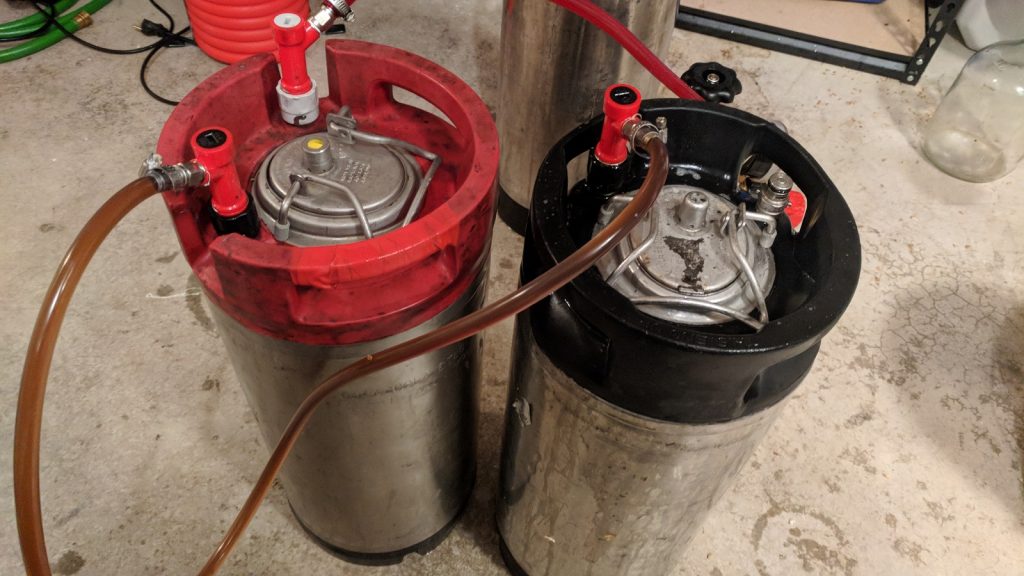
The method I’ve adopted for purging my kegs of oxygen is by no means novel or unique, and while it does add another step to the packaging process, it’s really not that bad. I start by filling a well cleaned keg with Star San solution, getting as close to the bottom of the gas diptube as possible. After putting the lid in place, I connect the gas, fill the headspace with CO2, then purge the headspace 4 or 5 times to flush out as much residual oxygen as possible. With the gas connected and the regulator set to about 5 psi, I attach a liquid disconnect that has a length of tubing secured to the barb, placing the open end in either a second keg or a bucket. The sanitizer begins to flow out of the keg, leaving nothing but CO2 in its place.

Once CO2 is blowing out of the discharge tube, I give the keg a gentle shake to make sure most of the sanitizer gets pushed out before turning the gas off. Then I proceed with kegging as usual, using a BrüLookLock, of course.
In addition to adding an extra step in the kegging process, the biggest complaint I have about this method is that it requires the amount of CO2 used to serve a full keg, meaning if I purge every batch I serve, my tank life is cut in half. CO2 isn’t that expensive, but filling or swapping out tanks is an annoying chore. Still, as someone who wants to make the best beer I can, it’s worth it for me.
A less complicated approach practiced by many is to fill the non-purged keg from the bottom up then immediately flush the headspace multiple times with CO2. I know of many brewers who swear by this method, contending that any exposure to oxygen during the keg filling process isn’t enough to impact the beer before the headspace is purged. It made enough sense to me that I did exactly this for years, though I’ve since moved to fully purging with CO2 first.

Closed System Bottling
The bottling process is inherently rife with points of potential oxidation, from transferring the finished beer to a bottling bucket through racking to bottles. It’s true that re-fermentation during the conditioning process scrubs some oxygen, but reducing ingress as much as possible during the packaging process may very well positively impact beer.
The problem is, most homebrew bottling setups don’t consist of the gear required to package in a truly low oxygen manner, as both bottling buckets and bottles are impossible to purge without a source of CO2. However, for those who aren’t quite ready to jump into kegging, or who simply prefer bottle conditioning, but want the security of knowing their beer is less likely to be impacted by oxidation, there is a way!
There are a few pieces of gear required to make this happen:
- 5 gallon corny keg (pin lock or ball lock)
- 1 liquid disconnect (pin lock or ball lock)
- 1 gas disconnect (pin lock or ball lock)
- 5/16″ tubing
- Counterpressure bottle filler w/ CO2 flushing (e.g., Blichmann Beer Gun, Fermentap)
- CO2 tank
Not a terribly cheap endeavor, though less expensive than a full-blown kegging setup and it could be viewed as sort of in-between. Anyway, the process…
First, use the method discussed above to purge the keg of oxygen, but before filling, gently open the lid, pour the hot priming sugar solution in, then replace the lid. Run some CO2 into the keg and let it sit for a few minutes before releasing the pressure to flush out oxygen introduced when adding the priming sugar.
Next, rack the beer to the purged keg through the liquid post so it fills from the bottom up; this will require the simple addition of a liquid disconnect to the end of the racking tube. Placing a gas disconnect on the gas post will relieve the pressure in the keg, allowing the beer to flow smoothly. Once filled, I recommend giving the keg a few good swirls to fully incorporate the priming sugar, which is nothing to worry about since it’s full of just beer and CO2.
Finally, use the counterpressure bottle filler to first flush each bottle with CO2 then fill them up, capping each immediately.
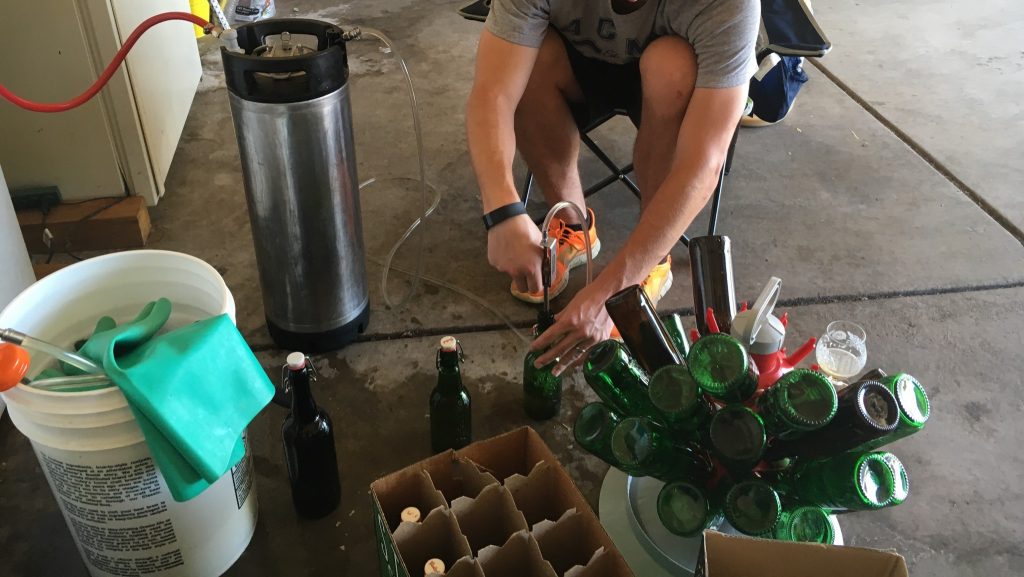
With so little oxygen present in the beer, the yeast has only that which was introduced when the filler wand was removed to deal with. Or you can just condition in the keg for a couple weeks, throw it in the fridge or some ice, and serve it through a $4 picnic tap. Whatever works!
And there it is, a list of relatively simple ways to reduce the risk of cold-side oxidation. I trust some out there are shaking their heads and rolling their eyes at the idea that such measures can improve beer, which is totally cool, so long as they’re happy with what they’re making. For brewers who have been having issues with beer discoloration, staling, or shelf stability, perhaps one of the methods discussed above will be of some help. Either way, do what works, drink what’s good, and always think beer!
If you use a method for reducing cold-side oxidation that wasn’t addressed or have any other thoughts, please leave them in the comments section below.
Support Brülosophy In Style!

All designs are available in various colors and sizes on Amazon!
Follow Brülosophy on:
FACEBOOK | TWITTER | INSTAGRAM

If you enjoy this stuff and feel compelled to support Brulosophy.com, please check out the Support page for details on how you can very easily do so. Thanks!


69 thoughts on “7 Methods For Reducing Cold-Side Oxidation When Brewing Beer”
As a fellow o2-reducing fanatic – I love this post! I’ve used the keg/priming solution/beer gun method to bottle several bottle conditioned beers and it works great. One suggestion- to ensure mixing of the priming solution and beer, (after you’ve filled the keg with beer) attach the co2 to the beer out post and bubble co2 up through the bottom – this effectively mixes the solution as well as giving it one last o2-scrubbing co2 blast.
Also, one product worth mentioning is a co2 racking kit. These work great for plastic or glass carboys that many of us use. https://www.love2brew.com/Brewer-s-Essentials-CO2-Powered-Racking-Cane-Kit-p/rck010.htm
“Thoughtful readers began pointing out one plausible reason for the lack of a difference wasn’t that neither beer was oxidized, but rather that both were. In addition to neither keg being purged with CO2 prior to filling, undeniably introducing some oxygen to the beer”
I purge the keg with CO2 following a formula I found on HBT: Pressurize the keg with CO2, purge the pressure, repeat 7 more times, which theoretically removes almost all of the oxygen.
And like you, I siphon in through the liquid-out port, but I also have a quick disconnect on the gas-in port with a short hose that empties into a 2 liter bottle. I place something under the keg to tilt it towards the gas-in side so that as the keg gets filled, the beer goes out the gas-in port and into the 2 liter bottle.
Disconnect everything, tip the keg back to plumb, and you have a full keg with very little head space, and enough room between the gas-in tube and the top of the beer that you don’t have to worry about beer getting pushed back into the lines.
“both were also cold crashed in primary, which creates a vacuum that sucks environmental air into the beer filled fermentor.”
I found a small rubber bung – drilled – that fits in the mouth of a one-piece airlock. I also found some stainless tubing that fits that drilled hole. I stick a mylar balloon on the stainless tubing coming out of the bung, wrap the connection with a rubber band, and stick the bung in the airlock. Fermentation then fills the mylar balloon with CO2, providing plenty for the suckback that happens during cold crashing.
Hello!
First, thank you for those great tips! 🙂
Actually I use this method to ferment at home :
http://i.imgur.com/o4NRiqe.jpg
This is a random image from google, but I do pretty the same.
So my question is, can I just let everything like this and do a cold crash or do you think that I will have some issues?
Thanks!
That’s just a standard blow off tube, correct? Cold crashing that will probably suck the liquid back up into your beer.
Exact, so I should go with the first method if I want to cold crash and it should be fine.
Thanks Jared 🙂
Nice write up there, Marshall! One remark: Blichmann’s Beer gun is not a counterpressure filler. Cheers!
Good point, I could have made that more clear. I’ll make an edit to clarify.
After transferring to the keg while minimizing oxygen exposure, couldn’t you add DME to the beer to self carbonate in the keg? the yeast activity during carbonation would consume any oxygen in solution.
Great summary of the methods.
Couple of questions:
Aren’t the Mylar balloon and the NorCal CO2 harvester different versions of the same method, or two distinct methods?
Also, you mention that the biggest drawback to the purging keg w CO2 method is the amount of CO2 wasted. How about using the CO2 that comes out of the keg that’s being filled w beer to purge another keg filled w StarSan. That way you have a new CO2 purged keg ready to go for your next brew.
Can take it a step further and save the StarSan into a third keg. Keg#1 (purged w CO2) gets filled w beer and pushes CO2 to Keg#2 (full of StarSan) which gets purged w CO2 and pushes StarSan to Keg#3 (empty) which gets filled w StarSan. which has At the end of all this Keg#1 is full of beer ready to serve. Keg#2 is full of CO2, ready to be the new Keg#1 in your next batch. Keg#3 is full of StarSan, ready to be the new Keg#2 in your next batch. You need a fourth keg (empty) to be the new Keg#3 in your next batch.
Fermenting in a keg does not require that you conduct the whole fermentation in a keg.
I transfer my beer from the primary to a purged keg (filled with Star San which is forced with CO2 to another keg) before fermentation is complete. That leaves enough space between the bottom of the dip tube and the trub, that I’m not getting more than a pint of cloudy beer when I tap the keg.
The keg gets pressurized during the final few days of fermentation, so cold crashing just reduces the pressure slightly and does not pull in oxygen.
Like in wine making: Add an antioxidant. A crushed campden tablet to the keg. Problem solved. Long shelf life!
Haha. Never tried, but from those I know who have, it’s not an ideal solutions.
You dont talk about unitank, such the fermentasaurus. Under pressure fermentation to serving without any transfert and oxygen! I would like to see more exBEERiments with unitank 😉
May have to try some out!
I recently tried out a “Bottle-Spunding” technique to reduce dissolved oxygen. The beer was a Saison at warm room temperature, OG 1.064, FG 1.003 after 2 weeks of fermentation, primed with 150g table sugar. It was quite cloudy so presumably there was a lot of suspended yeast present. I placed the caps on the bottles but didn´t crimp them. One bottle received a balloon which after 4 hours inflated to an estimated volume of 100mL. The bottles caps were then crimped. The idea is that purging the headspace by about 4 times its volume of CO2 will greatly reduce the oxygen. I plan to do the same with a hoppier beer, half the bottles capped normally and half “bottle-spunded”. Verifying the reduction with a DO meter would be interesting as well. I think it´s important not to cold-crash the beer first, because putting the yeast to sleep could turn the 4 hour delay into several days, and make this technique totally unfeasible.
Carbon dioxide is 1/4 times heavier than oxygen. if oxygen gets pulled into the fermenter during a cold crash, it should just float on top of the carbon dioxide which shouldn’t effect the beer.
So as long as you transfer carefully to a keg that’s been well purged with carbon dioxide, there should be little oxygen in contact with the beer.
Gases mix.
Yes this is quite right. It’s a common misconception that heavier than air means what we imagine it to mean as this mercury vapor video demonstrates.
https://www.youtube.com/watch?v=lpZF88fqrl8
Yes, diffusion is significant. Migration from higher concentration to lower concentration counter the buoyant forces. That’s why plants and animals can thrive at the same elevation and we don’t have to climb mountains to get above the CO2 layer (when there’s no wind stirring things up).
To purge kegs I put 2 liters of star San in the bottom and then bubble CO2 through it buy sending it down the beer post. When the bubble start coming out the opened keg lid I close it then close the purge and let it build pressure. One keg that is probably oxygen free and I always have star San about if I need it. I do this when I wash out kegs then empty them using a party tap before filling.
Another approach that may be worth considering
I use a 1/2” blow off tube thats about 3.5 feet long that goes into a pitcher of star san. I have noticed that liquid will move up the tube after cold crashing but its not even half way up the tube. I don’t think im getting oxygen sucked back (co2 is in tube from fermentation) or star san liquid in my fermenter as the vaccuum effect when cold crashing does not suck the liquid up to the fermenter.
When racking I use a closed loop system as shown in this video I made: https://youtu.be/RVilNE_ewo0
Basically I purge an empty keg of oxygen by blasting 12 psi of co2 in it, letting it out and repeating atleast 5 times. I then do it one more time but leave the keg a little pressured. I hook the gas end of the keg up to the top of my fermenter and the pressure left in keg enters the top of fermenter, i then rack into liquid post of keg, whatever co2 that escapes the beer within the keg will get sucke back into the fermenter. I have done this with a Fastferment which technically cannot handle any pressure and it was fine. I now have a Spike conical that can hold up to 15 psi can handke pressure changes.
I cold crash and fine with gelatin, as per the Brulosophy example, all the time. Since the first xBmts about the possibility of oxygen being sucked back into the fermenter, I’ve paid very close attention to my liquid level in the airlock. Not much, if any movement of the liquid. It would be nice to know how much volume of O2 could be potentially sucked back in and how much would be needed to cause a reaction with the green beer.
One thought: When I ferment, I do so in a closed GE freezer. The whole thing fills with CO2 to the point that if I open the lid quickly, I get blasted in the face by it. Since I cold crash in the primary in the same freezer, I’m guessing that any air being pulled back in would be mainly CO2 anyway. I’m also very careful not to stir up the CO2 when I add the gelatin. Now that I think about it, prior to packaging, my whole fermentation setup ends up being bathed in CO2.
RE: Fermenting in kegs
If one were to add a floating diptube then there is no need to transfer and thus zero risk of oxygen ingress. I have both the ClearBeer version & Fermentasarus – both work equally well.
Regarding the size “limitations” — the size of the corny is actually perfect for split batches and cold side exbeeriments. I brew 6.5 gal batches and when chilling split between two separate kegs using a scale to get equal weight (~35lbs ea). I can then compare yeast, hops, fruit additions, etc
Once I fill a keg, I run CO2 into the liquid post and gently bleed pressure with the pressure release valve on the lid, In a matter of seconds, foam comes flowing through the pressure release valve. My assumption is that the foam has completely filled the head space and effectively displaced a majority of the oxygen. This is similar to the logic used when capping on foam during bottling.
Nice post,
It could be possible atach a ball valve in the airlock hole and close it while cold crashing in stainless steel fermenters like brew buckets?
Cheers
I’ve thought about spraying in a layer of gas from one of the wine preserver cans into my keg before filing from the bottom up. My only concern is whether that protective layer would blow off when burping the keg or would prevent/delay proper carbonation.
Two situations I haven’t found the perfect solution for:
1. Oxygen free dryhopping. The best solution I have found so far is to dryhop with a few gravity points left hoping that active yeast scrubs the O2. Sometimes I’d like to dryhop later though.
2. Oxygen free addition of gelatine solution.
1. Some people add hops to serving vessel prior to purging in an effort to reduce oxygen influx. The might use dental floss to hang a mesh bag of them and run the floss thru the lid opening. Others have strainers on dip tubes with the thinking that free floating hops provide better hop utilization. I use floating dip tubes. Regarding hop utilization, I sometimes lay the keg on its side and roll it slightly every once in a while in an effort to extract more goodness (unverified effectiveness).
2. I’ve seen some people use syringes to inject gelatin solution thru the gas port rather than open lid.
What, if anything, do you do to sanitize the inside of your BrüLoonLock?
Nada. Hasn’t been an issue… yet. I do squeeze as much air out of the balloon as possible before storing.
I am planning to use your method with the balloon. But I do priming in the bottles. When I use a calculator to get the right amount of sugar to obtain the desired CO2 level, I need to add the final fermentation temperature. In my case is 22C right now (well controlled and stable), but using the balloon I will send an unknown amount of CO2 back to the beer. Do you have any idea of the sugar I should reduce from the calculation to avoid over carnonation? Thanks a lot.
Oh man, I honestly have no clue and wouldn’t want to steer you the wrong direction.
Understood. I will think it that worth the risk right now, otherwise I will use the method when I buy my kegging equipment. Thanks a lot for the fast response! Best Regards.
SOMEONE PLEASE HAVE A READ AND MAKE SURE I’M NOT MISSING SOMETHING IMPORTANT. IT HAS BEEN A WHILE SINCE I HAVE HAD TO DO ANY CHEMISTRY.
ASSUME:
(1)CO2 is the only gas in the headspace (due to being the only gas product of fermentation, displacing all other gasses in the headspace, and the airlock preventing other gasses from entering.)
(2)Fermenter pressure is atmospheric standard, or at least a constant (for simplicity) NOTE: Pressure inside fermenter is typically above outside pressure, which may also vary from standard atmospheric, however it is assumed these variances are negligible.
The solubility of gasses in liquids is an equilibrium reaction based on temperature and pressure. Note, different gas and liquid combinations have different solubilities for a given temperature and pressure.
Therefore residual CO2 in Beer in the fermenter is a function of temperature alone (pressure is constant, see Assumption 2).
The balloon of CO2 will not directly add more CO2 to the beer, it will serve only to maintain a constant pressure in the fermenter while maintaining a fully CO2 atmosphere as the temperature drops.
THEREFORE: The tables (and calculator tools) for dissolved CO2 for given temperatures are still accurate when using the BruLoonLock(TM).
NOTE: The temperature used would be the beer temperature post-cold-crash, not your 22C final ferment temperature, provided suitable time was allowed for the dissolved gas to reach equivalence.
FURTHER: I would posit that cold crashing with a standard airlock, allowing some of the outside atmosphere to be sucked into the fermenter would reduce the percentage of CO2 in the headspace. Then we have to get into looking at the equilibrium reaction with a mix of gasses and use partial pressures and solubility of the gasses to determine exactly how the gasses will dissolve, meaning the tables (and calculator tools) will be less accurate (though probably negligibly so) when determining residual CO2.
TLDR: You should be good to use the same amount of priming sugar.
Dear Marc, thank you for the detailed explanation. It seems reasonable and it makes a lot a sense now. I will give a try on my next batch! I will come back and write the results here.
Understood. Thanks for the fast response. I will probably skip cold crash and CO2 balloon until I have a kegging system to use.
Hey Marshall, have you tried the clear beer draight system? Instead of crashing before packaging just xfer to serving keg (with finings if desired in keg). This device draws from the top. So you can basically just crash in the serving keg. There’s even a hop screen accessory for dry hopping. Hops can be thrown loose in the keg.
I like this device over dry hopping or crashing in the fementer since the keg is a sealed low O2 environment.
Btw… I’ve been using your quick lager method for some time now and it works amazingly! I do the quick ramp up, but I forgo the cold crash and use the abovd method
You’re blog is by far my favorite online homebrewing resource. Thanks for your contributions and for making us more innovative brewers not afraid to question convention!
I got a CBDS for this purpose (transfer to serving keg with hops, purge, then cold crash) happy with the results.
But like Thomas above, I still dont have a truly oxygen free way to dry hop or add gelatin.
The problem is without that initial cold crash I’m transferring over beer with particulate matter (especially if I did a first round of dry hopping). So when I’ve tried to transfer via a quick disconnect and liquid post they clog. So I’m forced to transfer with a silicone hose slipped onto the bare post nub, thenscrew on the post, then attach the qd and then purge like a mad man.
A far as adding gelatin to the keg prior to cold crashing – I hear the significantly reduced the effectiveness of the dining agent. Also, using the syringe onto the gas post is a good idea – but you can only do that with nearly zero pressure in the keg so as soon as that syringe opens up that post, you’ll have oxygen ingress.
So all that to say, I’ve spent so much time thinking about these issues and I think there is no perfect solution!! Ah!! But using the methods listed out here are all great and I’m sure help quite a bit!
I’d thought of balloons but then thought I was crazy! Then thought of bubbling into an inverted bucket in a bucket of water as the co2 resovouir and then thought fookit I’ll just use kegs.
I don’t think it’s much of a worry for most malt based styles for a homebrew timescale, but if you’re storing aging or making hoppy stuff is the biggest thing, way more important than temperature control, within reason.
If you’re making neipa, don’t even bother without it.
Also good for protecting against infection.
Anyone try purging your keg with the Co2 from fermentation? Just run your blow off tube to your out post on your keg and purge every once and a while. Based on the authors observation of filling multiple balloons you should be able to fully purge a keg in a couple days. Might help offset some of the cost of Co2 used in purging. Waste not want not.
For your full keg purge when you rack:
What if you connected your airlock during fermentation to another keg? The keg should be able to be left alone and, potentially, saves you the gas of purging it later since it collected the five gallons of volume in co2? If that keg will store that beer in the near future, it doesn’t seem like a waste of resources. What do you think?
Hello Brülosophy! I have a quick question regarding the SS Brewbucket. I just purchased the 90 degree blowoff valve and it dawned on me I will not be able to insert an airlock when it comes time to coldcrash! Would it be safe to plug the hole or am I just asking for an explosion? Thanks for any help in advance! Love your site and experiments.
First time trying the bruloon lock idea lol, didn’t had a stainless steel tube laying around so used a plastic straw and some more plastic to make it thick enough to fit in the airlock. Was wondering… How likely is it that any infection can occur? In theory since the beer is finished it should not be something to worry about right?
Thoughts on the BruLoonLock(TM):
Would you be able to have a BruLoon and a standard airlock working in parallel? Since a standard airlock holds a small bit of pressure, I’d think the balloon would mostly fill before the airlock started bubbling, and then the balloon would feed the fermenter before anything got sucked back through the airlock.
You would likely have to work with just the airlock for a period so fermentation pushed all the air out of the headspace before attaching the BruLoon so you didn’t fill with air, but from there it should almost be automatic.
From there you could add a check valve to the airlock as a safety to prevent backflow during depressurization.
And add a ball valve to the BruLoon so you can have it closed for the first bit of fermentation, then open it up once the heaspace was cleared of air.
And then upgrade to an electronic valve for the BruLoon on a timer so you can set a time when you estimate the heaspace will be only CO2.
And then add a CO2 meter to control the valve so it automatically opens at >90% CO2 atmosphere or so
And then manufacture and sell these fancy units to anyone who wants to cold crash but is super concerned about cold-side oxidation.
And then profit?
We can talk about a business partnership later 😉
Check this out:
https://www.brewhardware.com/product_p/ccguardianv2.htm?Click=9411
I’m using the Cold Crash Guardians on my fermentors and I’m very happy with the results so far. I’ve added a gas ball lock connector to mine so I can connect it to a purged keg when I’m ready to transfer. That way I connect the Cold Crash Guardian to the gas inlet of the keg, and then connect my Brew Bucket valve to the liquid out of the keg, and do a closed, gravity transfer from fermentor to the keg – no need to pressurize with CO2.
I just finished drinking a batch of NEIPA that I brewed about 6 weeks ago and it was bottle conditioned with great success. I filled the bottles to about a 1/2 inch from the top as opposed to the standard headspace you get with a bottling wand. To test the difference, I filled one bottle from about the middle of the bottling process with the normal amount of headspace. I then took that bottle and the next one I bottled and put them at the back of the refrigerator (after conditioning of course).
The difference was very apparent, both in appearance and in flavor. I can’t believe it worked as well as it did, but it did. If you can’t keg, I suggest giving this a try.
I know this may not be an option for everyone, but I purge my keg with dry ice (solid CO2). The advantage over regular CO2 purging is that the gradual sublimation of dry ice results in very efficient O2 removal. Just open the pressure relieve valve as the dry ice turns into gas and the %CO2 keeps increasing.
Comment: I am a beginning home brewer and having some success. Leaning to primary only and I bottle at this time. The only thing that concerns me is the oxidation possibility while cold crashing. The simplest solution seems the Mylar balloon filled with CO2 attached to the vessel during the temperature reduction. The lower temp reduces the air pressure and sucks the CO2 into the vessel instead of atmospheric air (21% O2). Problem is getting the CO2 into the balloon. Attaching the balloon to the vessel during fermentation and collecting the gas seems to be the most popular. Why not buy the balloon filled with helium and use that during cold crashing, much simpler. He is more inert than CO2, it is the first of the noble gasses, elements with a full outer electron level and completely nonreactive.
Is there any reason why you could not use a cask breather to replace co2 into the headspace as the fermenter is emptied (https://beerandbrewing.com/dictionary/3qvzokTqO1/). These are designed to work with cask ales to introduce co2 into the cask as beer is drawn off (rather than air). I think it works like a scuba regulator and delivers gas as required rather than proving constant pressure.
Just listened to episode 093.
Is there anything to watch out for if fermenting under pressure/pressurizing a keg with fermentation co2 when it comes to fermenting a lager or pilsner at cooler temps?
Please make a video of your keg CO2 harvester. I would like to use this system to ferment. Appreciate all the good info. Cheers
Great advice Marshall
A few things I do to reduce O2 ingress in packaged beer-
Fill the keg completely (until it spills out of the opened lid) with starsan before pressure transferring to another keg
Pour the priming solution for bottling down the beer post of a keg with a funnel, then the beer, then pressure transfer to bottles.
I also then purge the headspace of my bottles by having my finger on the end of a gas line connected to the keg with residual pressure inside.
I definitely need to try the bruloonlock for cold crashing next.
Cheers for all the exbeeriments🍻
Have you had success with connecting gas? Was there concern with the additional residual CO2 before kegging? Or is it minimal?
Great tips. 10 gallon eyewash kegs are my go to. I’ve got a few tips for you to help with your 4 gallon limit on that 5 gallon corny.
Step 1: Build a Burton Union.
A 1 gallon square sided P.E.T. gives you plenty of remote headspace and will return the blown off beer less settled yeast. You can now fill it close to the rim with wort. You can get plastic 3/8″ barb to 1/2″ NPT plumbing and buna-n o-rings for a song at better hardware stores
Step 2: Don’t put trub in your fermenter.
No, you don’t need to filter. If you know how much trub to expect, you can adjust the draw height inside the kettle. Wait :20-:30 for the trub to settle (after chilling), then decant clear wort above the trub line. I leave about 2 gallons, and adjust my recipes as such. I figure better to waste wort/grain than finished beer.
Step 3: Use higher floc yeast when possible
Step 4: Stop cutting dip tubes. Now that your solids are just (mostly) high floc yeast you can cold crash it into cement.
Pull your poppets on fermenting kegs. Use functional ball locks to airlock, and gutted ball locks to rack out. I’ve found that by racking painfully slow (like 1 psi), it creates a pocket in the cemented yeast cake of a cold crashed keg, and seems to suck less (or equal at least) shmang than constantly vacuuming the lower floc yeast from above with a cut tube.
You can slowly increase pressure once the pocket is set, and you still want to dump the first pint or so (until it clears) before you jump it to the gelatin fined serving keg, which also purges oxygen from the jump line. Double bored ball lock jump posts from brewhardware are perfect for this purge.
Racking from blind keg to blind keg is no mystery if you put the empty rackee on a scale of decent precision. A pint a pound. Check the scale occasionally for volume reference. When you approach end volume, watch the jump line, and pull when it starts to get cloudy. Gelatin finings clear what made it in
These practices result in a loss of around 1/2 gallon or less according to the scale method. It may be ridiculous and specific to my system, but it adds up over time and works for me
By the way, they already have a 7.75 gallon fermenter that goes by the name sankey keg. If you don’t know what a 2″ triclover can do for you, check out brewhardware’s pressure fermenting option. Racking is just as easy on sankeys. It’s fun to spund!
Keep up the great work! …….and maybe a pressure fermenting experiment?
The gas that is sucked back into the barrel is the atmospheric air, which is an approximate mixture of 78% N2, 21% O2 and 1% others, including CO2. The mixture of these gases is a homogeneous mixture and there is no separation of phases due to their densities (mass / volume), that is, the O2 in the air will not float over CO2, because it is lighter. The gases will diffuse slowly in the barrel and the O2 contained in the mixture may diffuse into the beer.
I know this is an old article. But one thing I can’t wrap my head around is whether or not this variable matters that much when bottle priming via bottling bucket and wand. I feel like the yeast would scrub out the oxygen as they ate the priming solution. I see the setup you propose but can’t help but wonder if it is overkill. Have there been any exbeeriments related to bottle priming and cold side oxidation specifically?
If you want to maintain a CO2 blanket without pressurising the container https://rlbs.ltd.uk/rlbs-cask-aspirator-breather-valve.html
Grahame, I have been looking into using a cask breather like the one you linked to to counteract the negative pressure during cold crashing without over-pressurizing my fermentation vessel. Co2 cannister plugged into the IN port and the OUT port run straight to the end of my blow-off tube. Have you actually done this and did it work ok?
Hi Mike, sorry just came across your question, yes it works fine, the pressure is very little, enough to push water about a foot up a tube, fwiw a much cheaper alternative is a gas regulator, the type used on a gas bottle for a BBQ, the pressure is very similar.
So i thought the idea of a balloon to catch the CO2 was fab – and rather ran with the idea to create reusable quick connect interchangeable balloons – using straws and insulating tape. Thank you lots.
https://www.thehomebrewforum.co.uk/threads/how-to-balloon-co2-collection-bruloonlock.89874/
@ Mike Ballard Hi Mike, sorry for late response, yes I’ve used it as you describe but not on a glass fermenter, I now use pressure fermenters so it has become irrelevant for fermenting, I use it for real ales now, on the gas in port on a corny keg.
Dear all, which is the best beer temperature when transfer to bottles for reducing oxidation?
At the end of cold crash, is preferable to bottle immediately or wait for the temperature to rise?
I’m not a chemist, but I imagine that beer temperature can affect the amount of dissolved oxygen, right? Thank you!
If you’re going to connect CO2 to your SS Brewtech Bucket but are concerned about the maximum pressure, why not include a T-piece and spunding valve? Set the valve to 1 PSI, set your gas to however fast you want to be able to transfer / bottle. I know it’s a tad wasteful, but it’s better than a lid in the face.
My last method was not cold-crashing and flushing the bottles with CO2 prior to each fill.
The result was vastly improved, however towards the end I had problems with the bottle filler becoming stuck with trub. This was incredibly annoying.
I plan to try some sort of balloon method for cold crashing this time.
> No longer using the diptubes that came with my Ss Brewtech Brew Buckets
Why is that? I searched the site and didn’t find a post that talks about this…
Because I’ve found the valve hole is high enough on its own to leave behind most trub after cold crashing.
For preparing the keg I’ll do following..
1. Clean the keg
2. Fill it up with starsan
3. Connect the keg to the active fermenter
4. Use liquid side to transfer the star san to the keg nro.2
So I use the CO2 from the active fermenting prosess to purge the keg..
Sorry if this was already posted and discussed here.. Thought it was my own invention 😀
Any opinion this kind of method?
I ferment in keg, so one approach I’ve employed is to use two kegs. Run a line from the gas connection of the fermenter keg to the liquid connection of the serving keg. Attach a spunding valve to the gas connection on the serving keg. As the fermentation procedes, it pushes CO2 into the serving keg, from the bottom up, slowly purging the serving keg. When you’re ready to transfer to the serving keg, remove gas lines, purge pressure from the serving keg, jumper the liquid ports, and use gravity, the 12-15 PSI in the fermenter, and a little blast of CO2, as needed, to transfer to the serving keg. It saves Starsan and especially CO2.
I’ve also taken to just serving straight out of the fermenter keg, without issue.