Author: Ray Found
A while back, I put together a collection of DIY brewing utilities that included a pump-based keg washer and sanitizer. After using it many times, I came to the conclusion it fell short in a few ways– it required a ton of water, the spray pressure wasn’t high enough to sufficiently remove all trub, and it only worked with kegs, not carboys. I’d heard good things about another popular keg and carboy washer, which seemed like a great solution, but being famously impatient and enjoying the DIY side of things, I set to the task of designing my own version that proved simple, effective, and fun. We’re calling it the…
BrüBlaster Keg & Carboy Washer
The purpose of this article is to share with others how to easily build this efficient tool for themselves. To keep things as simple as possible, I’ve broken the DIY down into 3 sections focused on acquiring the necessary parts, assembling the washer, and putting it to use. If you have any questions or find yourself confused with a step, please do not hesitate to ask in the comments section below and I’ll respond as soon as possible!
| PARTS |
What follows is a list of the parts I’ve found work well for this keg and carboy washer. While I list specific dimensions, please keep in mind I went with the sizes that worked for my intended purposes, which may vary depending on the type of carboys you use or pump you go with. This washer is incredibly easy to adapt to whatever size best suits your needs, there’s no reason to rigidly adhere to what I’ve done if you’ll be using it to clean different gear; however, by following along, you can be assured the washer will work beautifully with PET carboys and cornelius kegs. Also, hardware store inventory on fittings varies, seemingly by the hour, so you may need to substitute to accomplish the same goals.
I included links to as many parts as possible for those who prefer purchasing online. However, nearly all of the PVC parts for the BrüBlaster can be purchased individually at big box home improvement stores at a lower price.
Submersible Utility Pump
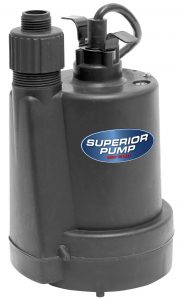 The pump used in the popular commercially available keg washer may be enough to get the job done, but since I already had a much more powerful (~3x) pump on hand, I decided to put it to use. While more powerful pumps cost more, the increased pressure blasts away trub with ease, plus an added benefit is they usually feature standard garden hose threads. Less powerful pumps will certainly work, I wouldn’t recommend anything under 500 gallons per hour, and be sure to pay attention to type/size of the outlet adapter on whichever one you choose.
6 Gallon Plastic Bucket
A cheap 5 gallon bucket from the hardware store will work fine as a basin for the washer, though I’ve been using a 6 gallon fermentation bucket I had lying around– no reason to buy something I already have. Plus, with the large pump, the additional depth makes for more room for the fittings.
Bucket Lid
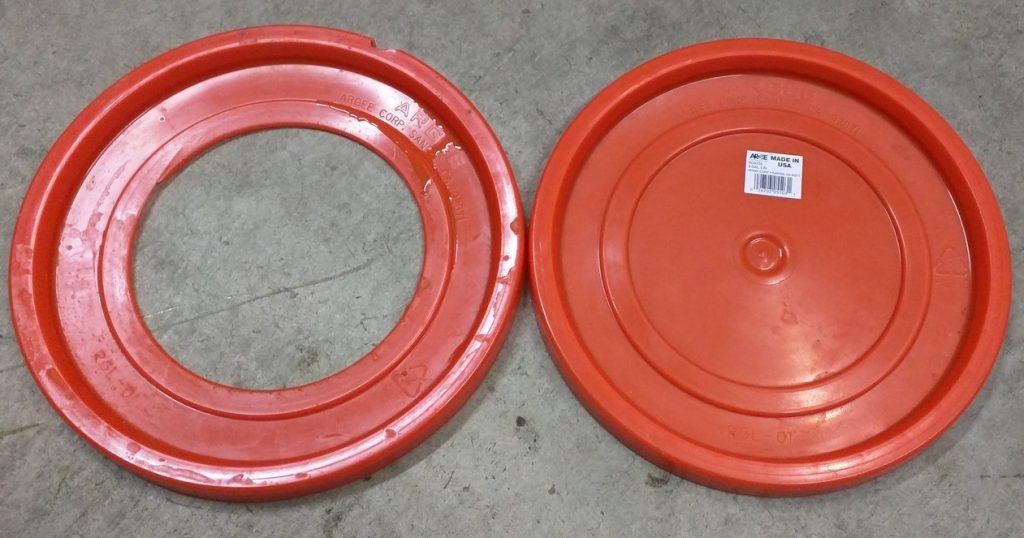
For the top of the keg and carboy washer, you’ll need a lid that you’re comfortable cutting up– if you plan to continue using your fermentation bucket to make beer, consider picking up a bucket lid from your local big box retailer. I’ve found I actually prefer the “Homer” lids over the the “nicer” options because they’re cheap, easy to snap on/off due lacking a robust sealing lip, and the raised circular ridge is conveniently the perfect size for most carboys and corny kegs!
Spray Wand Parts
Too avoid as much confusion as possible, I’m going share the exact parts I used to build my washer. Similar to other commercially available keg and carboy washers, I originally designed mine to have a single spray wand. It worked great for kegs, but I found one shortcoming when it came to cleaning my PET carboys– the diameter of the pipe occupied so much space in the carboy neck that the cleaning solution was unable to quickly drain back out. Since this wasn’t an issue for kegs, my solution was to put together a separate spray wand specifically for cleaning carboys that could easily be interchanged for the larger keg spray wand. This has worked out great!
The following pieces are made from PVC, so be sure to grab yourself some PVC cement to ensure solid seals between the non-threaded connections.
Keg Spray Wand
- 3/4″ Female NPT x Female HT Swivel PVC Fitting (Home Depot | Amazon)
- 3/4″ Female Slip to 3/4″ Male Pipe Thread Adapter (Home Depot | Amazon)
- 2″ piece of 3/4″ PVC Pipe (cut from 2′ pipe listed below)
- 3/4″ Slip Tee x 3/4″ Female NPT branch (Home Depot | Amazon)
- 3/4″ x 2′ PVC Pipe (Home Depot | Amazon)
- 3/4″ PVC Slip Cap ( Home Depot | Amazon)
- 3/4″ Male NPT Hose Nipple (Home Depot | Amazon)
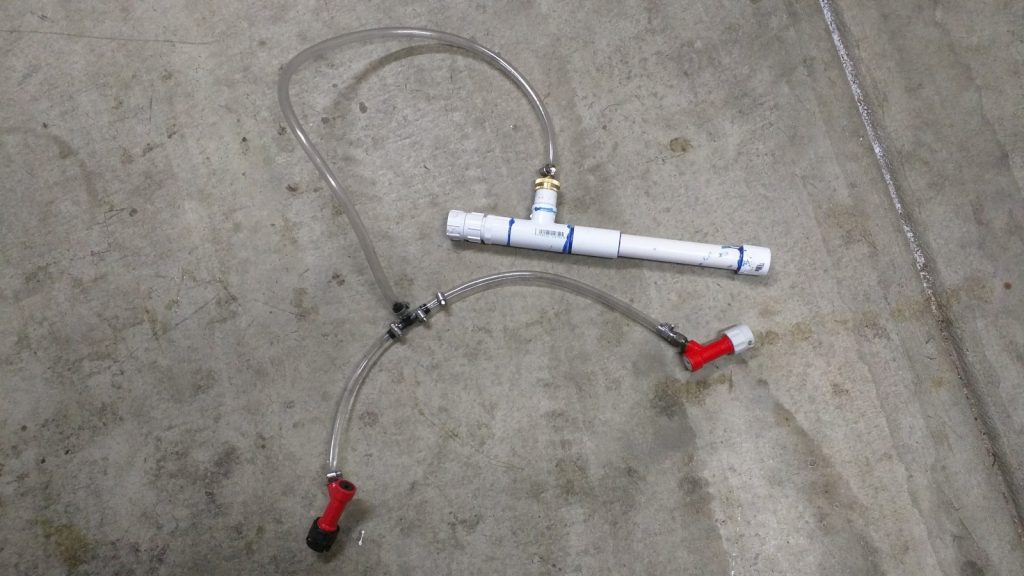
To ensure keg posts and diptubes are adequately cleaned, I fashioned a simple solution that requires the following parts:
- 3/8″ Female Hose Adapter (Amazon | MoreBeer)
- 40″ of 3/8″ ID vinyl tubing (Amazon | MoreBeer)
- 3/8″ PVC Tee Fitting (Home Depot | Amazon)
- Barbed Gas Disconnect (Pin Lock | Ball Lock)
- Barbed Liquid Disconnect (Pin Lock | Ball Lock)
- (7) Small Hose Clamps (Home Depot | Amazon)
Carboy Spray Wand
- 3/4″ Female NPT x Female HT Swivel PVC Fitting (Home Depot | Amazon)
- 3/4″ Male NPT to 1/2″ Female NPT Reducer Bushing (Home Depot | Amazon)
- 1/2″ Female Slip to 1/2″ Male NPT Riser (Home Depot | Amazon)
- 1/2″ x 2′ PVC Pipe (Home Depot | Amazon)
- 1/2″ PVC Cap (Home Depot | Amazon)
| ASSEMBLY |
With all the pieces gathered, it’s time to put the puzzle together. To start, you’ll want to prepare the wash basin by first cutting out the center of the bucket lid matching the inside diameter of the corny keg handles, which is a piece of cake if the lid has a raised ridge, as it can easily be traced with a Dremel tool or sharp utility knife.
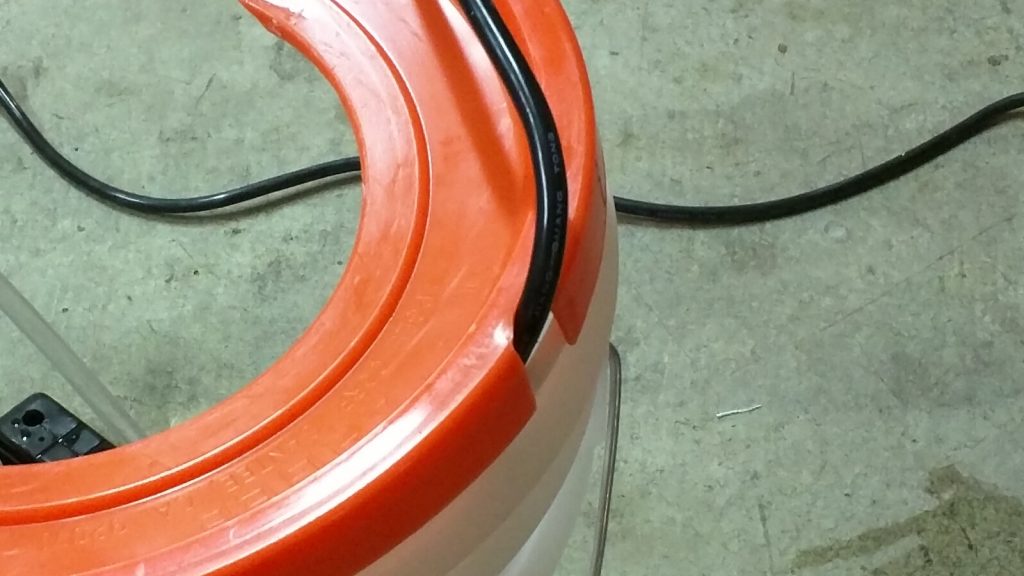
Then cut a small notch at the rim of the lid for the submersible pump cord.
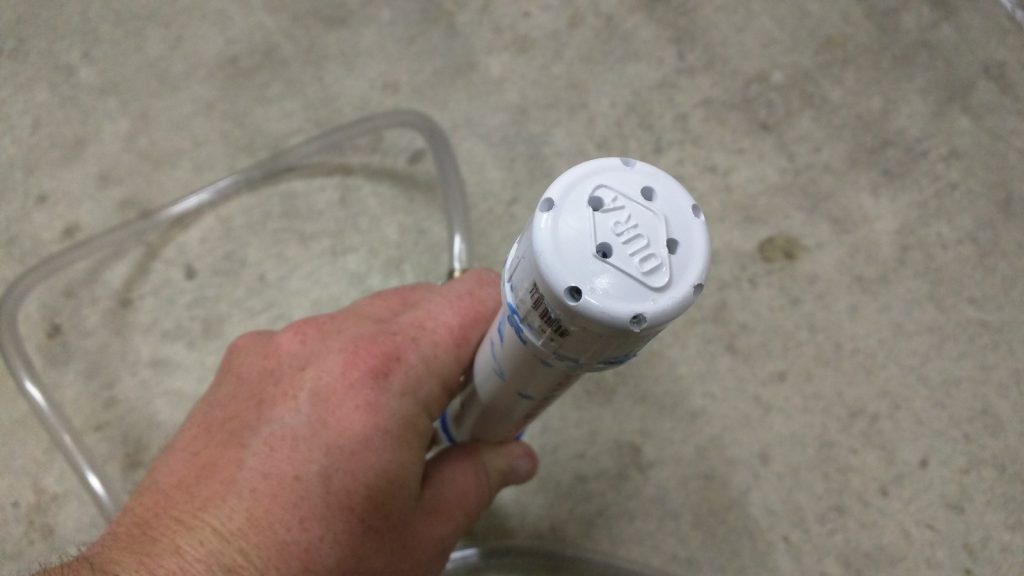
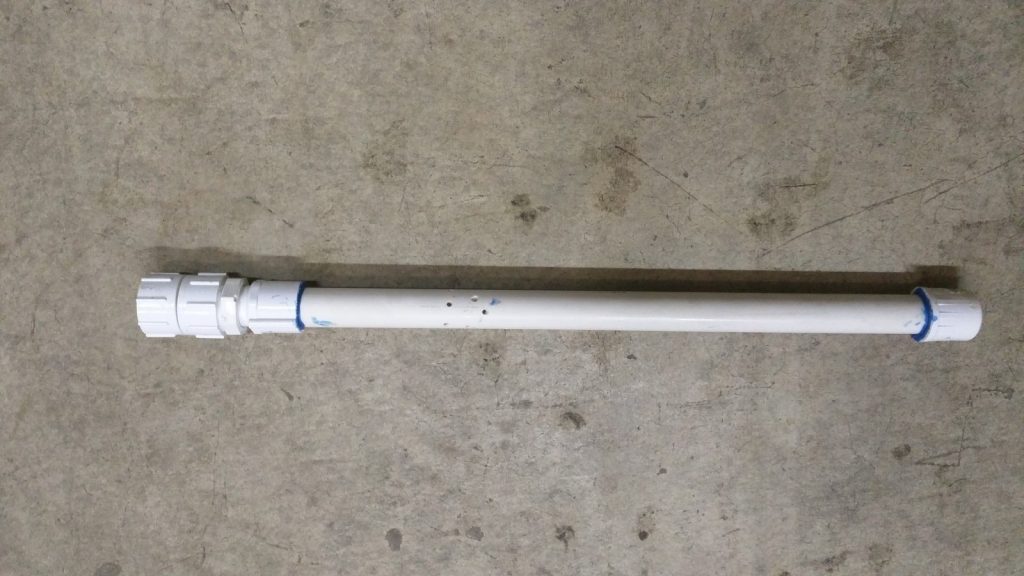
Now we can move onto constructing the spray wands. While it can be accomplished once all glued together, it’s probably best to do all the drilling first, before glueing it together. To start, use a 1/8″ drill bit to drill 8-10 holes in the caps for both the keg (3/4″) and carboy (1/2″) wands.
Next, you’ll need to drill a series of holes around the perimeter of only the carboy spray wand (unless you ferment in kegs). We want high-pressure streams of cleaner to be pointed directly at the area kräusen tends to collect, which for me is at the shoulder of my 6 gallon PET carboys; this will vary depending on the type of fermentor you use and should be taken into account before you start drilling. I ended up drilling a series of a dozen 1/8″ holes in a 2″ wide band around the pipe.
With these holes drilled, all that’s left to do is glue and reconnect the fittings for each part. Threaded fittings can be connected without tape since minor leaks aren’t a big deal for this application, but don’t forget to apply PVC cement between each non-threaded slip connection.
Keg Post & Diptube Washer
Start by attaching the two 12″ lengths of vinyl tubing to both the liquid and gas disconnects, securing each to the barb with a hose clamp. Insert the 3/8″ tee fitting into the open ends of the tubes and securing them in place with hose clamps. Attach one end of the 18″ length of tubing to the perpendicular barb on the tee and clamp it into place, then secure the other end with a hose clamp to the barbed end of the 3/8″ female hose adapter. Set this part aside for now, we’ll return to it in just a bit.
Keg Spray Wand
Before we start putting this piece together, cut a 2″ piece of the 2′ PVC pipe off using a Dremel or hacksaw, it will be used to connect 2 other pieces. Once that’s done, screw the 3/4″ female NPT to hose adapter fitting onto the male end of the 3/4″ threaded adapter. Apply PVC cement to the female slip end of the adapter then insert the 2″ chunk of pipe you cut off from the larger pipe. Apply some cement to inner part of one side of the 3/4″ tee and insert the other end of 2″ tube. Next, simply insert the longer PVC tube into the other side of the tee* then slip the hole-drilled cap with on the end, remembering to use cement for each connection.
*I made a mistake when initially building my keg spray wand that required me to use a coupler between the tee and longer pipe; this is unnecessary with the parts listed.
Finally, attach the 3/4″ threaded hose nipple to the open branch of the tee then to the other end attach the hose adapter from the already built keg post and diptube washer. Voila, this piece is ready for use!
Carboy Spray Wand
The carboy spray wand is a little easier to construct since there’s no tee fitting involved. First, attach the 3/4″ female NPT to hose adapter fitting onto the 3/4″ male end of the reducer bushing, to that attach the male end of the 1/2″ slip to riser fitting, then apply some cement to one end of the PVC pipe and secure it in the slip. After applying cement to the open end of the PVC pipe, slip on the drilled cap and you’re all set!
| USING THE BRÜBLASTER |
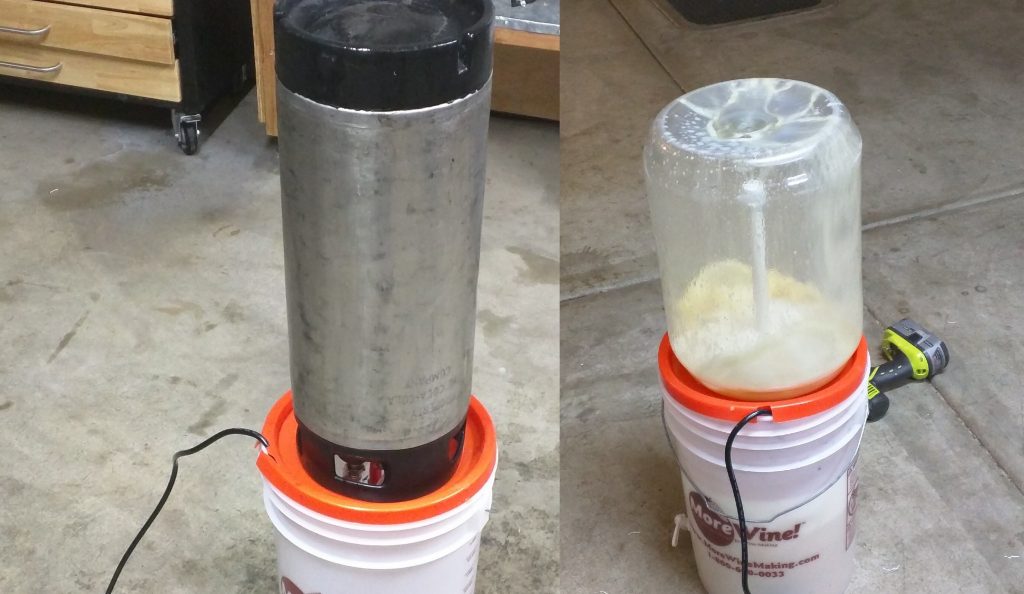
The BrüBlaster is super easy to use and takes little effort to setup.
- Add approximately 2 gallons of hot water to the wash basin
- Add the proper amount of your favorite cleaner– CraftMeister Alkaline Brewery Wash works great!
- Attach the spray wand of your choice to the pump
- Place the pump in the cleaning solution in the wash basin and attach the lid
- For cleaning kegs, connect the disconnects to the posts and invert the keg on the basin lid, making sure the disconnects are in the hole.
- Turn the pump on and let the BrüBlaster run until for 10-15 minutes
When cleaning carboys, I dump the trub before placing them on the BrüBlaster, though I skip this step with kegs. I’ve also found that rotating the carboy a few times while it’s on the unit helps to remove all of the kräusen ring.
Since I’ve usually got multiple dirty kegs at the same time, I like to wash them all first then dump the cleaner, fill the basin with Star San solution, and repeat the process, storing each keg or carboy with a little sanitizer in them.
| THE VERDICT |
In a word: Freakingawesome!!! My kegs come off of the BrüBlaster sparkly clean in no time flat. Due to the stubborn nature of kräusen, carboys can be a bit more challenging, occasionally requiring a light soak, but generally the high-pressure of hot cleaning solution gets the job done just fine.
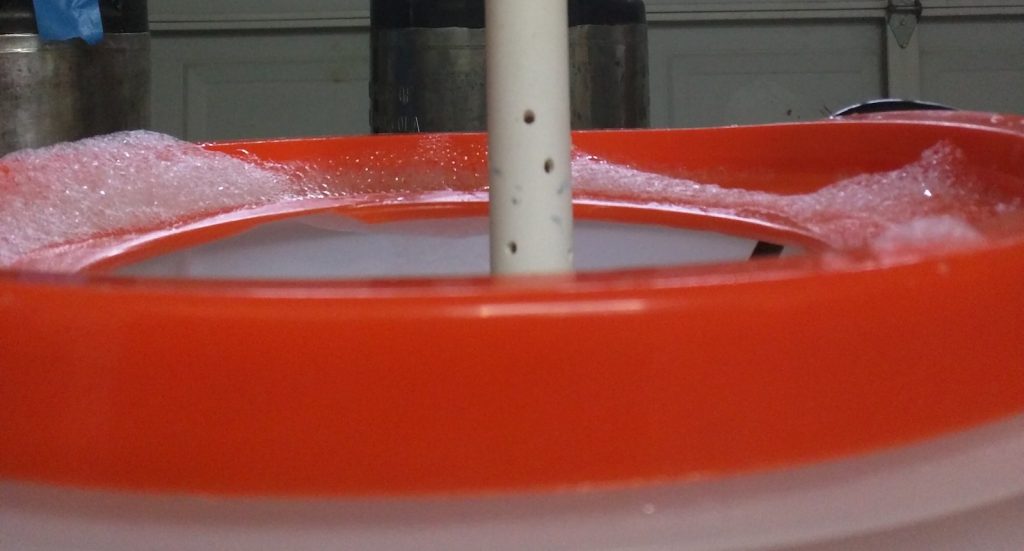
The only real drawback of the BrüBlaster comes when using it for sanitizing. My preferred sanitizer of choice being Star San, the constant agitation can make the foam grow out of control. It still works, but it is a little messy, so once my Star San is gone, I’ll be picking up some Saniclean, a non-foaming alternative.
And that’s how you build the BrüBlaster keg and carboy cleaner, an inexpensive and efficient tool that I trust will come in handy to any brewer interested in spending less time engaged in the worst part of this hobby. If you build a BrüBlaster, please report back with your experience, we’d love to hear how it works for you!
Support Brülosophy In Style!
All designs are available in various colors and sizes on Amazon!
Follow Brülosophy on:
FACEBOOK | TWITTER | INSTAGRAM
If you enjoy this stuff and feel compelled to support Brulosophy.com, please check out the Support Us page for details on how you can very easily do so. Thanks!




44 thoughts on “BrüBlaster Keg & Carboy Washer | Do It Yourself”
Loving this build. What keeps the keg from tipping over?
Keg balances fine upside down on lid. It doesn’t tip because the hole in the lid allows the posts to fit through, so just the flat handles on the keg are sitting on the bucket lid.
I am excited to get this built! Any suggestions for the single handled Corny kegs, I have? Thinking of using a 10″ to 6″ PVC reducer in the bucket lid hole.
I built a very similar carboy and keg washer and found that it works even better with the addition of an inexpensive ($20) clean in place (CIP) ball purchased from Amazon. The rotating CIP ball really cuts through crud and doesn’t miss any spots other than the neck.
same here, I initially tried the drilled cap (and still have to use that for small-mouthed glass carboys) but the rotating 304SS spray ball works better for everything else. just have to wait a couple weeks for shipping from china
Which CIP ball fits in the glass carboy. I saw 40 & 45mm ones, but didn’t think they’d fit. I just built this. What a great DIY project. Thanks!
Did you ever find one small enough?
Did you decide to go with 2 different wands only to apply maximum pressure to either lip of your carboy or the bottom of the keg? Do you think that combining holes at both points into one wand would be too weak?
I think he uses the narrower 1/2″ wand for the carboys because with the 3/4″ water wouldn’t drain out fast enough.
In the link you gave for the pump, it looks like for $8 more, you can get a 1/3 HP which has double the output at 10ft. Do you think this is overkill and/or could damage the kegs or carboys at this pressure given that the output pressure is being increased by forcing it through the small drilled holes?
The 1/6HP is perfectly sufficient. More pressure than needed really.
Cool. Thanks for the input. I built a washer with a weaker pump and just a straight piece of PVC a while ago. It’s Ok, but certainly not a BRÜBLASTER!
This one is going on the DIY list for sure!
Yikes, hopefully the 1Hp pump I ordered wasn’t totally overkill lol. They were just SO much cheaper to order from amazon.com than amazon.ca. even with shipping and duty
eyeballing the parts, I see ~$60 in PVC, keg connectors, etc, then $50 for the pump, which will put this at a little more expensive than the commercial washer linked early in the article (depending on whether or not you have some of this stuff laying around, of course).
This washer obviously is more powerful and has better utility though.
Personally I think I’d have a hard time justifying spending $100+ on a tool like this when filling the carboy/keg with water and oxyclean and letting it sit seems to work.
Nowhere near $60 in pvc… closer to $6-10 per wand. Don’t buy these parts on Amazon… HD has each of the fittings for $0.50-$1
Funny you post this now – I just finished my version a couple of days ago. The selection of PVC isn’t very good around here (Toronto, Canada) as it isn’t used on the water supply side.
Used a 1/6hp 1200gph mastercraft pump C$60 on sale, and a couple of bucks worth of 3/4″ low flow irrigation pipe and fittings, some I had sitting around from a different project, and bought an extra T (outside fitting), and hose barbs that I needed. Works pretty well indeed, and uses almost no water/pbw/oxi compared to the previous fill and soak method.
Should have built it a while ago, makes cleaning a bunch of things a low effort affair now. Now to find a little more time, and create a bottle washing adapter/version of it.
A couple pics: http://imgur.com/a/EPFdB
Maybe gold plated PVC? I made one a couple of years ago, 1/2 pipe and a smaller pump. Works wonders but I would go with the 1/6 hp this time. I don’t swap out the whole wand just the top. One of the tops I built has a liquid post on it so I use that to clean my draft taps. Push some tubing over the spout and return it to the bucket.
I also cut my lid so the keg fits IN and rests on the T that goes to the posts.
Excellent build! I made one of these recently and absolutely love it! I added a PVC shut off valve at the base of the wand and mounted a universal keg post to the lid (with a line similar to the keg cleaning lines already there), so it can also be used as a tap tower cleaner too! It definitely makes it worth it to me for triple duty cleaning!
Hahahaha…. well, there was one additional part of the build that didn’t get fully tested in time for the article…
http://i.imgur.com/WXFgZ0q.jpg
A 5-line backflush tap and line cleaner.
What is the ID of the hose you connect to the tap and how hard do you have to work to attach the hose? Do you worry about the pump pressure in this type of connection?
@anthony – It’s all 3/8″ tubing, attached to growler fillers, which slide right into the taps. I use a couple zip ties on each to prevent from the pressure pushing them back out. I can “throttle” the pump with the ball valve in line.
Any chance you could post a 15 second video of this thing in action in a clear carboy? I struggle with understanding how much pump pressure translates into usable cleaning impact and a video of that system in action would be infinitely useful. Thanks!!
Addition of a few drops of an anti-foaming agent will keep Starsan and Oxyclean or PBW suds to a minimum. I use silicon-based (polydimethylsiloxane) anti-foaming agents available from most brew shops. Also, letting the pump run for a while gets the water nice and warm which helps speed the cleaning of subsequent fermenters or carboys.
my version ( a little cheaper but effective ) here :
https://drive.google.com/folderview?id=0B589BDMUck3EYXNDUmV1c3o4U2s
Doesn’t seem to work with glass carboys. The opening isn’t large enough to accommodate the slip cap.
Not intended to be completely prescriptive… should be able to size down to smaller pipe for glass carboy no? Tough to find wmaller than 1/2″ PVC, but PEX might work.
Not intended to be completely prescriptive… should be able to size down to smaller pipe for glass carboy no? Tough to find smaller than 1/2″ PVC, but PEX might work.
Ray,
Thanks for yet another great write-up. I’ve been trying to come up with something similar to clean draft lines and I saw the picture from the earlier comment. My question is what are you using on the other side to connect the pump to the quick-disconnects? I’ve been looking for something like a corny-post with a barb on what would be the inside of the keg so that I can attach a tubing line to it. I’ve tried a few work arounds but in the end they all suck.
Also, nice coffee grinder! =)
Prost!
To clarify, I’m looking for something like this: https://www.mcmaster.com/#standard-barbed-tube-fittings/=160ucem to thread into the post and then I can attach tubing to the other end of the barb; note the lack of correct thread size (19/32-18). If this was a one-time assembly I could just teflon tape it up or just ram it in there and not care about the thread damage but I’m hoping to pull the actual posts off of my kegs.
Hi Matt,
Get your self a Cornelius Keg Posts 1/4″MPT x 19/32″-18 adapter like this one:
http://www.chicompany.net/index.php?main_page=product_info&cPath=376_1_3_260&products_id=1146
Then you can put a post on any thing with a 1/4″ FPT like your standard swivel barb.
If you don’t have a spare liquid post you can also pick one up:
http://www.chicompany.net/index.php?main_page=product_info&cPath=376_1_3_260&products_id=1401
All the best.
Anthony, Thank you! That is exactly what I was looking for but was unable to find!
I don’t! I just remove the screw from the post and take spring/poppet/gaskets and soak in a small glass of the cleaner separately. then just dangle the open disconnects into the bucket.
Just a heads-up: the Home Depot link to the 1/2″ Female Slip to 1/2″ Male NPT Riser is actually a FPT, not a slip. In-store nor on the website am i finding a slip female piece.
That got me too. Heading back to Home Depot today for the correct part, which I think is this: http://www.homedepot.com/p/DURA-1-2-in-Schedule-40-PVC-Female-Adapter-C435-005/100343506
That is indeed the correct part. This is a great guide, but should be updated with the non-threaded adapter instead of the threaded riser fitting.
Updated. Thanks!
Do you know how hot your water is with the alkaline cleaner? I’ve usually used 150F water to mix with pbw and rinse afterwards. But the pumps manual in your suggestion list says nothing more than 120F.
The HD links for a couple of parts take you to the wrong item:
3/4″ Female Slip to 3/4″ Male Pipe Thread Adapter
1/2″ Female Slip to 1/2″ Male NPT Riser
I made one of these with a CIP spray ball to clean my kegmenter with 4″ TC opening and it works perfect! I have found the heat generated by the pump also keeps the solution between 110 and 130 while cleaning .
I built one very similar to this one, with the same pump. I found that over time, especially with the cleaning chemicals we use and the heat, that the lower seal fails. These pumps are filled with mineral oil. This does terrible, terrible things to the kegs and the beer you might put in it.
I ended up using this pump:
https://www.amazon.com/gp/product/B01CGAD986
With a rotating spray ball it has plenty of oomph to get the kegs sparking clean.
Bishop, that pond pump is not rated for hot water. It will only withstand 0-95F. My hot tap water ruined one of these pumps in about two days when experimenting with a warming method similar to glycol chilling. I use that exact pump for my glycol chiller. It did not work with 110F water that was kept warm with a fish tank heater.
Interesting: I just popped in here to get the specs they used: but the oil situation makes me nervous.
I find my marks2 to be a bit underwhelming when it comes to the dip tubes, so this was appealing.
What size CIP did you end up using?
Did I read this correctly? Ball lock qd in 3/8 id tubing? Isn’t the tubing a bit large?
I agree, the tubing is much larger than the barbed post. I will be trading the barbed QD for a threaded QD and heating the tubing in hot water before I attempt to clamp it again.
Has anybody else found this was a problem?