Author: Moritz Gretzschel w/ translation assistance from Andreas Krennmair
Introduction by: Marshall Schott
There are few brewing methods that have caused the rift decoction has, with one camp claiming it imparts unique character unattainable with single infusion or step mashing, while on the other extreme reside those who view decoction mashing as a remnant of brewing’s less advanced past. As strong as my love of history and appreciation for those who enjoy traditional practices is, my obsession with efficiency and simplification of process is slightly stronger– I’ve never performed a decoction, not even for the sake of experience. Unfortunately, this has been interpreted by some to mean I don’t think decoction makes a difference, when really I’m inclined to hold off on judgement until I see some data demonstrating it produces a qualitative difference. Regardless, I’m definitely interested in the method!
I was recently contacted by a German brewer named Moritz Gretzschel who shared with me a translated version of an article on decoction mashing he wrote for the popular German beer publication, Brau! Magazin, which he offered to allow Brülosophy republish. Thanks to the help of Andreas Krennmair of the Daft Eejit Brewing blog for translating the article to English. Given linguistic idiosyncrasies, some interpretative freedom was necessary in order for the translated version to make sense– for example, the title was noted as being untranslatable despite being a German pun. Finally, Moritz made it clear the purpose of the article about decrypting and understanding the decoction method, its history and influences, and making it easier for homebrewers.
Decoction:
Always Something Cooking
Decoction Mashing Made Easy
By Moritz Gretzschel
In Defense of Decoction
Everything could be so simple: the vast majority of homebrewers employ so-called infusion mashing where the mash is slowly heated through a predetermined, ascending order of temperature rests, during which the individual enzymes display their optimal effects. This is easy, uncomplicated, and understandable for everyone.
But then there’s also this bizarre decoction process, which, in comparison, seems like confusing witchcraft involving parts of the mash being drawn off multiple times in a strange choreography, brought to a boil individually (destroying the important enzymes!), then mixed back into the mash. Why would anybody do this when even most commercial breweries employ infusion mashing?
When I bring a decoction beer to homebrewing meetups, I often receive comments from people like, “you’ve got too much time on your hands.” When I give brewing seminars, people struggle to believe this complicated and seemingly confusing decoction process is the older and more original method here in Germany. This got a very good reason.
A Brief Review
An important aspect of brewing is consistently bringing the mash through a precise sequence of temperature steps. In the case of infusion mashing, one primarily requires two instruments– a thermometer and a timer. Curiously, both of these devices were invented at the end of the 16th century by the same genius, Galileo Galilei. If you believe the dates on the beer labels of some Upper Bavarian breweries, beer was being produced consistently many centuries before that. The first temperature scales were only developed in the 18th century, and the use of thermometers in breweries only became widespread as part of the industrialization in the middle of the 19th century.
Decoction mashing elegantly solves the consistency problem by replacing temperature measurements with volume measurements– a boiling mash, at least at sea level, will always have a temperature of 100°C. And if you mix certain amounts of cold and hot mash, you will hit a specific temperature. All without the need for a thermometer.
Additionally, another problem is solved by using this method– metal containers were hard and expensive to produce in the middle ages, especially in the sizes required for brewing. Wooden tuns, on the other hand, were readily available at a fraction of the cost. In a decoction mash, the mashing could be done in an unheated wooden tun and required a relatively small heated kettle for boiling the mash that only needed to be about 1/3 the size of the total volume.
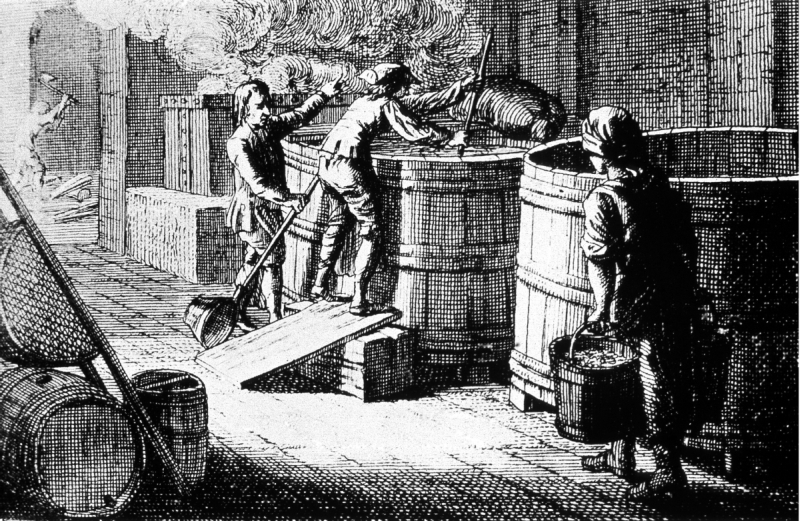
The image below depicts such an original, medieval ladling brewery. In the large tun in the center of the image, the mash is being stirred with a paddle, beside which you can see a worker with a large ladle.
This explains why the mash paddle and ladle are two of the tools depicted in the traditional symbol of the brewers guild. In the background, you can see the boil kettle made from riveted metal plates, from which steam clouds from the boiling mash swell.
But then how was the full volume of wort boiled in the end? I suspect some beers weren’t originally boiled, such as traditional styles like Berliner Weisse that were unboiled well into the 20th century. Or maybe a parti-gyle method was employed where the wort was collected in three fractions and boiled one after the other. The first gyle could have been a strong beer for special holidays, the second gyle a beer for the brewer’s own table, and the third gyle a small beer for the servants. Some monasteries still do this nowadays.
And yet another argument for decoction– anyone who has ever tried to maintain a precise mash temperature, e.g. 62°C, in a direct fired metal kettle knows how difficult it is to hit and hold the temperature without suppressing the fire or completely removing it. However, in a decoction mash, the flame can burn for the whole time without any need for regulation.
Most important components of decoction mashing:
- Temperature measurement is replaced by volume measurement
- More process-driven than time-driven
- No accidental overshooting of temperatures
- Undermodified malts are broken up better
- More intense in time, work and energy
- Suitable for direct firing with solid fuel
- Stronger coloration through Maillard reaction
- More robust beer flavor
- Greater extraction
- Specialty malts mostly unnecessary
The Special Case of Mash Rests
If, however, the fire was kept burning, how did the brewer prevent scorching the almost empty kettle after mixing the boiled mash back in? It’s likely the kettle was never fully emptied and a certain amount of mash remained. Ultimately, the process of ladling portions of the mash became more tedious as the kettle became emptier. Basically, there was always a tun of resting mash and a kettle with boiling mash, the brewer only ever moving partial volumes back and forth between them. These mash rests are even characteristic of the original Pilsner brewing method, which is still used today with directly fired copper kettles. According to Narziss, this process results in the low attenuation of Bohemian Pilsner due to the enzymes being scorched more.
Through Thick and Thin
The number of partial mashes that are drawn, boiled, and mixed back in determines between single, double, and triple decoction mash methods. The partial mashes are drawn either as thick or thin mashes:
Thick mash contains as much solid matter as possible, including coarsely crushed malt, which are broken down by the boiling process not just enzymatically, but also physically and mechanically. In times of fluctuating malt quality, this was yet another argument for decoction mashing, as it dealt with the issue of undermodified malt. On the other hand, thin mash (the liquid sitting atop the mash) or even mash drawn from underneath the false bottom doesn’t contain much starch, but instead the majority of the enzymes dissolved in the liquor.
This explains the procedure of drawing the first decoctions as thick mashes in order to make as much starch available as possible while preserving the enzymes. The last decoction, however, is drawn from a thin mash as it serves only to raise the temperature for mash-out. In this step, the goal is not to make more starch available (which cannot be properly converted at this stage), but instead deactivate the remaining enzymes.
Thick mashes are more applicable when:
- The malt needs to be physically solubilized by boiling to make starch available (past motivation)
- The flavors typical for decoction shall be produced (modern motivation)
- Enzymes in the remaining mash shall be preserved
Thin mashes are more applicable when:
- Only a temperature raise is needed without physically solubilizing the mash
- No more starch shall be made available
- Enzyme activity isn’t needed any further
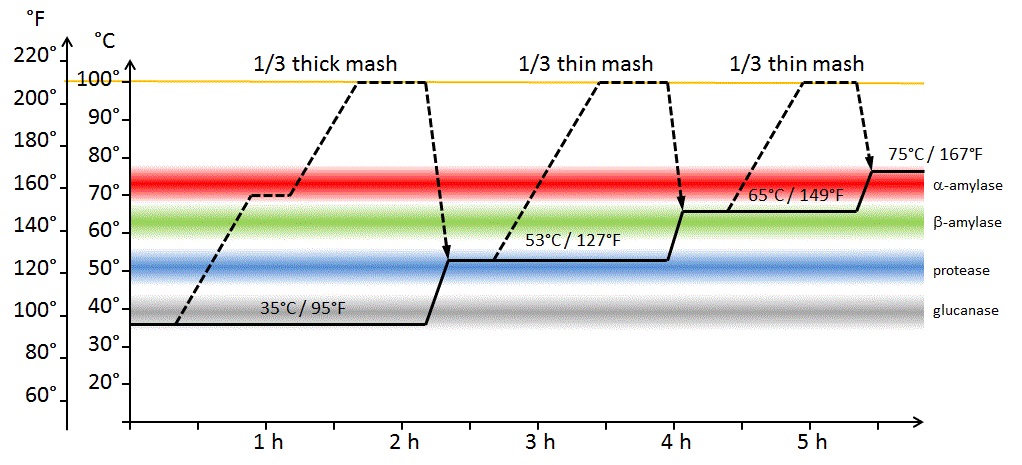
The figure below shows a triple decoction mash being performed in a manner typical what’s traditionally been used to brew central European lager beers. Three partial mashes, each of them about 1/3 the overall mash volume, are boiled.
The total duration of 5.5 to 6 hours may seem very anachronistic these days, as well as the extremely long protein rest. With modern, well modified malts, this process is not only unnecessary, but even counterproductive for foam stability.
A Shortened Double Decoction Mash
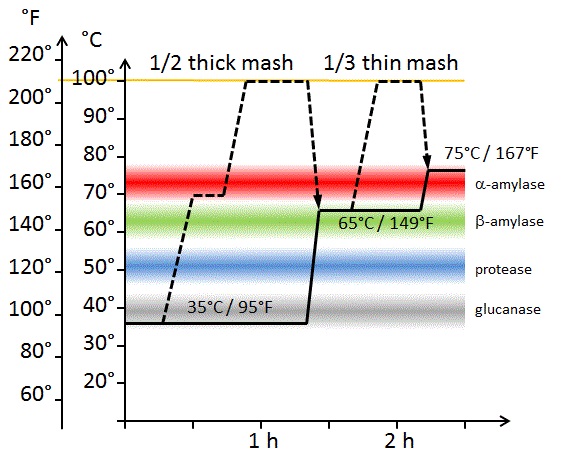
In principle, a virtually endless amount of decoction recipes are possible by modifying dough-in temperature as well as the number, consistency, and size of the decoctions. For me, the following strategy has yielded positive results: by completely omitting a protein rest and working with higher heating rates, a double decoction method can be done within 2.5 hours. This is barely more than some sophisticated infusion mashes.
By initially boiling a thick mash of 50% of the total volume, the beer will take on a strong decoction character. While heating up this first portion of the mash, an optional short rest at approximately 70°C will encourage alpha amylase to produce a larger amount of dextrines. When the boiling mash is combined back into the main mash to achieve a temperature in the standard saccharification range, the beta amylase in the original mash goes to work on the dextrines to produce maltose– in using this method, the amylase enzymes work in the “correct” order compared to a rising infusion mash.
And How Does This Work In Practice?
What does a homebrewer need in order to perform the decoction process? Actually, only a well insulated mash/lauter tun with a lid that allows as little temperature loss of the mash as possible. An ideal solution for this is a Thermoport food container [insulated stainless MLT] in which a typical mash will lose less than 1°C over the course of an hour. The mash can be moved between tun and boiling vessel using a large measuring cup if a mash pump is unavailable. Volumes can be easily determined by creating measurement scales. Combined with the scoop, one has triple control of the volume!
But how do we determine the exact decoction amount to be drawn in order to reach a specific temperature? This can be done most easily through the Pearson’s square equation:
Or reordered to get the actual decoction volume:
A specific example: to get from 65°C to 75°C would require a decoction of…
(75°C – 65°C)/(95°C – 65°C) =
…1/3 of the total volume. There are also many calculators on the internet available to simplify the calculation of decoction volumes.
Why did I use a boiling temperature of 95°C instead of 100°C? Very simple– it’s not just the mash temperature that needs to be increased, but also the temperature of the mash tun. Additionally, there will always be some heat loss when moving the mash back and forth between vessels. Now, this could all be calculated very precisely (if the thermal mass of the mash tun is known), or more simply assuage concerns by assuming a lower boiling temperature. This works rather well in my 38 liter Thermoport vessel, but those using different brewing systems may eventually need to work with some other empirically determined value. For one’s initial attempt or if a brewer is unacquainted with the system they’re brewing on and thus doesn’t trust their calculations, I would recommend pulling slightly over-sized decoctions and leaving behind small amounts of mash as described above– simply stop ladling as soon as the target temperature is reached. The small amount of mash left on the bottom of the kettle can wait for the next decoction or, following the last decoction, cool off then be added back to the main mash. This also eliminates the hassle of having to scrape the last bits from the bottom of the kettle every time.
If this all sounds mysterious and intimidating, rest assured– decoction mashing is not an exact science! On the contrary, I find it’s much more “instinctual” compared to infusion mashing where every rest needs to be monitored closely to ensure the precise temperature and duration. In the case of decoction mashing, all the right temperatures are reached at some point, some even multiple times, and the boil takes care of the rest. To this extent, it is a surprisingly robust method– if a rest is ±2°C, it doesn’t really matter, whereas with a single-step infusion mash, the same difference in temperature can completely change the character of the resulting beer.
However, with just a little experience, it becomes easy to hit target temperatures exactly. One annoying factor has to do with the dead-space under the false bottom, as it can skew overall volume calculations. I usually remedy this issue by drawing a beaker full of wort from underneath the false bottom and mixing it back to the top, which has the added benefit of cleaning out the dead-space and making the vorlauf quicker later on. Ultimately, lautering systems with as little dead space as possible, such as a braided hose setup, are ideal.
To Stir Or Not To Stir?
Homebrewing takes many forms, from monk-like meditative mixing of the mash with a paddle to sophisticated automated stirring systems as a hobby within the hobby. Truthfully, those who use highly automated systems likely won’t be particularly fond of decoction mashing, as it would require a pump to move the mash as well as measuring mashes of different consistencies. Not impossible, but multi-step infusion is easier to keep under control under such conditions.
 Automated stirring mechanism or stir by hand with a paddle? Among homebrewers, this is almost a question of faith. In decoction mashing, there’s no argument against mixing by hand, in fact it’s quite the contrary. An automated stirring device would get in the way when moving portions of the mash back and forth, hence it would need to be removed beforehand. If you again look at the medieval brewery in the image above, you’ll notice that manually stirring worked surprisingly well even with astonishingly large mash tuns. And really, there are only two phases of the decoction process requiring stirring– while heating up the first thick mash to get to saccharification temperature then when mixing the boiled portion of the mash back into the main mash, the purpose being to achieve a consistent temperature. It’s not at all necessary to stir during the rests (it is called a “rest” after all), just be sure to leave the lid on the mash tun to prevent the mash from losing heat. Following the first saccharification rest, even the coarsest thick mash will liquefy to the point of being easily boiled in a kettle without any further stirring and no risk of scorching. Witnessing this form of liquefaction is something I find very exciting!
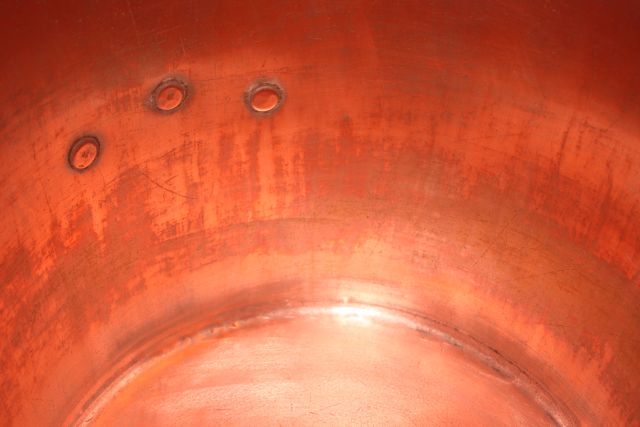
Kettles with thick tri-clad bottoms are ideal for decoction because they more evenly disperse heat, or even better is a massive copper pot in which the mash can be boiled and caramelized without stirring or risk of scorching. Allegedly, large, directly-heated copper kettles are a major contributor to the unique character of Pilsner Urquell.
Not A Matter Of Duration
It’s also important to rethink rest durations. With an infusion mash, the time spent at each of the various mash steps is a critical component, in addition to the temperature of each step. Decoction, on the other hand, is less time driven and more process driven– once a certain event takes place (e.g., decoction has come to a boil), the next step can be executed. The rest temperatures arise from the process and tend to be rather long. Also, due to the constant “up and down,” most rest temperatures will be hit multiple times. The more critical components in decoction mashing are different– the number and relative ratios of decoctions, and their respective boil durations. The lengths of the rests then unfold themselves…
I’ve found a short rest of 10-15 minutes between adding a boiled decoction back into the main mash and drawing the next decoction to be sufficient. After combining a decoction back to the mash tun, I like to wait until the full mash has settled so that I can more easily draw a clearly defined thick or thin mash.
The length at which individual decoctions are boiled is dependent on the style of beer being brewed– darker beers commonly receive 30 or even up to 45 minute decoctions, which requires replacing liquor lost to evaporation so that the overall volume of the decoction mash remains large enough to hit the target temperatures. With pale beer styles, it’s common to perform a 10 to 20 minute decoction in order to limit coloration and tannin extraction from the grain husks.
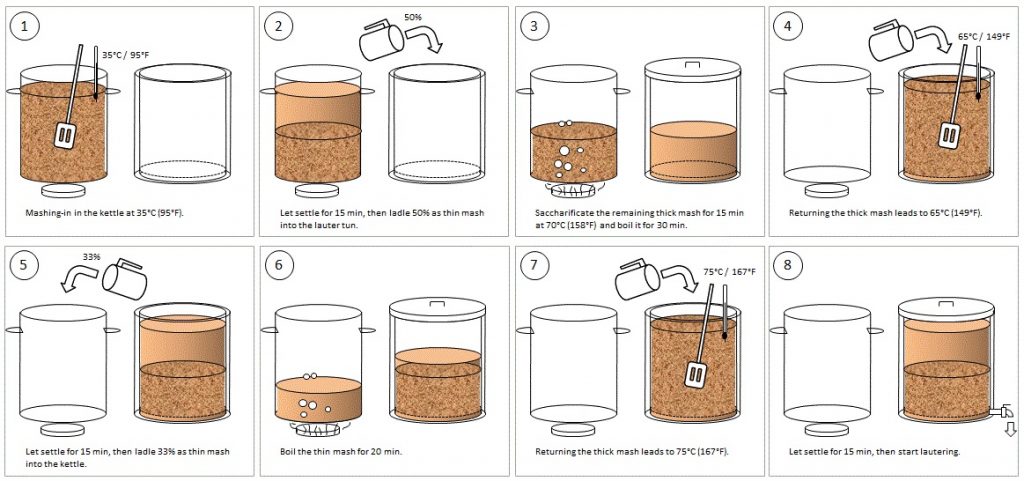
Easy Tutorial in 8 Simple Steps
Back again to pulling off thick and thin mashes– mash tuns in commercial breweries have valves at different levels that allow the brewer to draw mash of specific consistencies once it has settled. Of course, this isn’t feasible on the homebrew scale. However, getting thin mash is easy as skipping from the top of the mash while thick mash needs to be removed from the bottom of tun using something like a slotted spoon or colander. While this isn’t as complicated as it may sound, there is a simpler way…
Performing a “reverse” dough-in in the kettle rather than the mash tun, everything from the kettle that isn’t supposed to be in the first thick mash can easily be removed, resulting in a nice thick mash already in the kettle. After adding a boiling decoction back into the mash tun and allowing it to settle, the thin mash at the top can be easily skimmed and moved to the kettle. Exactly how it should be. This results in a very simple double decoction mash where the thin mash needs only to be moved twice.
For Which Beer Styles?
First off, decoction may not be suitable for subtle and elegant beers as it can lead to coloration, caramelization, and high tannin extraction from the malt. For Anglo-American ales, it simply isn’t stylistically warranted.
But for more intense, malt-forward and not very pale beers, decoction is a perfect fit, especially Bohemian Pilsner, Märzen, and Munich Dunkel. Even for German wheat beer, decoction is absolutely according to style, in fact some of the greatest examples are brewed using a single or double decoction method. Additionally, a low dough-in temperature can be combined with a ferulic acid rest or glucanase rest. Decoction can even be adapted for beers consisting of unmalted grains, which only needs to be added to the first boiled mash for gelatinization to occur.
My absolute favorite recipes are so simple they don’t really deserve to be called recipes– a Märzen of 100% Vienna malt, or a Munich Dunkel from 100% Munich malt, brewed using a double decoction mash as described above. Even without specialty malts, these beers present with good mouthfeel and complexity. With an infusion mash (a most extreme case being the Anglo-American single infusion mash), specialty malts are often the only option for increasing a beer’s complexity. Just look at the high percentage of caramel malts included in so many single infusion mashing recipes…
I dare to say classic continental European beers, brewed with classic base malts and the decoction method, are a tad more interesting, believable, and authentic than those that attempt to imitate such styles using specialty malts. Caramel malts in particular are often used to simulate decoction character using the simpler, quicker, and cheaper infusion mash process. Why not try “the real thing?” Even if just for one the reason that decoction is fun and can be highly addictive! Apparently, there are some homebrewers who, after having tried it, use at least one decoction step for every brew…
 About the Author
Moritz Gretzschel, although a native of Munich, Germany, got into homebrewing through his father-in-law in a wine region of Southwestern Germany of all places. A three-year stay in Michigan for work was all that was necessary to get him excited about craft brewing. Since then, he regularly brews at home, preferably using decoction methods. He works as a college professor for mechanical engineering and electromobility in Aalen in Württemberg, Germany.
Support Brülosophy In Style!
All designs are available in various colors and sizes on Amazon!
Follow Brülosophy on:
FACEBOOK | TWITTER | INSTAGRAM
If you enjoy this stuff and feel compelled to support Brulosophy.com, please check out the Support Us page for details on how you can very easily do so. Thanks!





24 thoughts on “In Defense Of Decoction | A Purist’s Perspective On An Age-Old Method”
Brilliant! One of my friends uses decoction mashing on a pretty regular basis. I will definitely give this a try. There could be a single malt Marzen in my future.
Decoction is a system that I like to use, but one should have a simple RIMS system or a well-insulated mash tun to keep the temperature of the main mash constant while doing the decoctions.
Excellent article! I agree in all respects, except for the insinuation that infusion mashing is more finicky – modern malts are so easily converted that infusion mashing is every bit as forgiving and robust as decoction mashing was 200 years ago. But I don’t want to steal any thunder from this; it is very well written (translated) and you will see all the same points addressed in the next edition of How to Brew. It would have been nice to have read this before I revised the decoction section, but that is life.
One key point to bear in mind whenever you are debating the use of decoction is to remember that it is a technique that was developed to address the type of brewing equipment at the time, and the more difficult to modify barley of the time ~400 years ago. Boiling helps solubilize the starch. The Maillard Reactions that contribute to malty flavors are real (in my opinion) but they are not the purpose of the technique, they are a side effect, and one that could easily be mimicked by the use of melanoidin malts or an extended boil with a portion of wort from infusion mashing.
And another thing while I am thinking about it, tannin extraction probably happens more from decoction than infusion but one thing about tannin extraction is that more and larger tannins tend to settle out more easily than small tannins and polyphenols, so decoction plus lagering means clear, non-tannic beer.
Cheers!
John, what an honor reading a comment of yours!
Regarding the main question:
Does decoction still make sense with modern malts?
In my opinion: Yes and no!
Only yesterday, I came across some early malting results of German year 2016 barley, harvested recently.
On one hand, it is so highly modified that you just have to “show to it some warm water” in order to convert it fully.
On the other hand, the starch gelatinization temperature is now as high as 149°F and has therefore already passed the optimal temperature of the beta-amylase…
If you go for a rising infusion with 144°F and 162°F rests (very common in Germany), you will have highly active beta-amylase during the first rest, but the starch grains won’t be solubilized fully. During the second rest, the starch will be liquefied, but the beta-amylase won’t be active anymore. Surprisingly poor attenuation might be the result with 2016 malt.
I don’t dare to say that decoction is required again. But you still have more freedom to cope with varying malt properties.
And, as I wrote: Decoction is fun! At least for me…
Moritz
With most of my brews I do a simple one temperature infusion mash. But if the Fall I do a couple of Altbiers, and in the Winter several lagers. With these I do a one step decoction that is even easier than the author’s method. I start with a 145-147 infusion, and after 10 minutes take 3 qt. thick decoction from my 5G Denny-style cooler mashtun. I raise the temp. of the decoction to 157 for 10 minutes before boiling it. Boil for 10 minutes for my lighter beers (Alts, Vienna, Marzen) and up to 30 minutes for my Bock. Adding it back to the main mash raises that to 157 which I hold for 20 minutes before mashing out. Simple, and only adds 15-30 minutes to the total mash time. Does it make a difference? I don’t know for sure because I have not done any side-to-side comparisons, but I do believe the result is a little maltier, and my mash efficiency does increase from 70-75% with my infusion mashes to 75-80% with the decoctions.
I think that’s the best explanation of decoction I’ve ever read. Makes me in danger of trying it out.
100% agree
Prost! Thank you both for your contributions! This was a fantastic read!
Form follows function. And it is apparent in the development of the decoction method. So, I really appreciate the overview on the origination of the process, that puts a lot into perspective and certainly helps to demystify the “witchcraft.” Furthermore, the pragmatic approach that you illustrated appears easy to follow and is very well articulated. I look forward to attempting this very soon, especially as the cold weather approaches for lagering.
I also look forward to the xBmt that is soon to follow….amiright!?
Though I’m not sure how you would approach this one. 100% base malt (Vienna), decoction method vs. 96% base malt/4% specialty malt, single infusion? Or, straight up, 100% base malt, decoction vs. infusion?
THIS!^^^
Beer experiment decoction v. non decoction?
It’s on the list!
Thanks for posting.
Until recently (last year) I felt the same way as you did, that doing a decoction was more work and hassle for little benefit. But having brewed for 15 years I figured it was time to give this traditional method a try. I performed a simple single decoction that I documented in a youtube video. It wasn’t that hard! It didn’t even add much time since the hour I would have normally been letting a single infusion mash rest was spent pulling and heating the decoction, boiling for a short time, then adding it back to the mash tun.
Did it make a difference? I made a Helles, a style I’ve made many times with a single infusion mash. While I can’t say with certainty that the decoction version was better, it might have been. It turned out great and certainly wasn’t worse. The satisfaction of having executed this historic method (finally!) was some of its own reward.
“While I can’t say with certainty that the decoction version was better, it might have been.”
That’s a very good way to put it – in my opinion!
“It turned out great and certainly wasn’t worse.”
So, I ask why do it….
“The satisfaction of having executed this historic method (finally!) was some of its own reward.”
Oh… Hahaha. I agree. I find it oddly cathartic as well – having that attachment to historic traditional processes even if just for the nostalgia.
Excellent article! Any chance we can get this in PDF to review before trying this method out? I’ve also never done a decoction but have always been intrigued. Especially after talking to a local brewmaster about his “best homebrew ever made”… a dopplebock that was rich and dark using only single pale malt bill and employing a decoction method. I plan on doing something similar using a new “local craft maltsters grain” similar to Vienna and going 100% as suggested by the author. Wish me luck!
What a great article! I absolutely have to give this a try, at least once!
I have devised a kind of pseudo decoction that I wrote up in the March/April, 2010 Zymurgy. I was inspired by the traditional American cereal mash. In it, I mash 1/3 of the malt perhaps 20 minutes at ~65°C then boil it for about 30 minutes. I prefer to put the malt in a pot which goes in a pressure cooker to avoid scorching, and the 115°C temperature increases the melanoidin production. Meanwhile, I mash the remaining 2/3 at 62°C for 30-40 minutes, then add the boiling pseudo decoction, which boosts it to ~70°C, and rest this another 30-40 minutes. This gives greater efficiency and melanoidin production than infusion mash, though not as much as full decoction, and is much simpler. I especially like the results in Dunkles, and my recent Rauchbier turned out great as well.
Jeff Renner, I use a similar approach, but bring the thick mash immediately to a boil without first doing a rest. Conversion takes place later, when I add it back to the rest of the grain. In your opinion, is there any advantage to doing the rest before-hand?
This is the best explanation of decoction I’ve ever read. The reverse dough in is genius.
A couple of remarks:
* If your pH is correct, then there is not very much coloring, see Kai Troester’s Youtube video’s on decoction
* If your pH is correct then there won’t be much tannin extraction either. You need both a higher temperature and a bad pH, see Beer and Wine Journal for an explanation of this
* There is a typo in the picture of the decoction: in step 7 it is probably meant to say “returning the thin mash”
About the possible tannin extraction: as a beginner (only started since Sep last year) I did three beers with decoction, and they were all alright. On the other hand, I did two beers with infusion (my very first and an another one), where the causes were clearly the lautering, with too much carbonates in the first case, and too hot at the end of the lautering, where my grist pH was probably already too high.
However, a nice article about a method which I like to do (like someone other said: brewing is a catharsis), and with a nice explanation to do it in a shorter time. I mostly brew on Friday evening, between 5 PM and 10 PM, and rather not much longer, so this would give me a better process to do decoction (on those styles which need it: bock, weizen(bock), and I also like to use it for a Leffe-like beer of my own design).
And another question: what about ferulic acid rest at 111°F (44°C): probably best to do this in the kettle?
If I aim for a ferulic acid rest then that is my dough-in strike temp. Then, depending on which type of decoction schedule I’m performing, my next step is either protein, or a saccharification rest. Then usually a mash out.
For hefeweizen I no longer perform a step at 111F (44C) and I strike at my sacch rest temp, often 148F (65C) and perform a single but aggressively boiled decoction for a mash out.
Perhaps I should test the impact of an acid rest and see if it is in fact perceivable.
piqued my interest
Stay tuned 🍻
I have read the original article in the brau!magazin, nice to see it here in a translation. Tomorrow my friends and me are giving it a go for the first time, and to get a deeper insight into the effects, we will parallel-brew the same recipe (a Bohemian pilsner) with our normal method and with decoction.