
Author: Marshall Schott
The first beer kit I ever made included a small baggie of what looked like nose-snow with instructions to dump it into the boil. The label on the bag read “gypsum,” which sounded mystical to me. Perusing the homebrew shop a week later to pick up ingredients for my next batch, I asked the guy staffing the place what this powdery substance was, “Brewing salts used to make the beer taste more like good beer,” he said. Who was I to question this apparent expert? I proceeded to haphazardly sprinkle gypsum (nothing else) into the next few batches I made, they all turned out okay. When I really began taking the hobby seriously and transitioned to all-grain brewing a few years later, I started to question the importance of using these salts, ultimately forgoing any mineral additions and sticking with just filtered tap water. I did this for a couple years and produced some great beer, even a few award winners. I had all but forgotten about water manipulation and seemed to be doing fine until I made a Dry Stout that failed to meet my expectations. I recalled reading about how Guinness’ brewing water was “hard” and that, for some reason, this contributed to the overall character of the beer. This started me down the path that ultimately led me to where I am today.
A few things first…
1. In no way do I consider myself an expert on the subject of water (or anything else, really). I’m a homebrewer who makes beer often and appreciates learning by experience. Most of what I’ve chosen to do in my brewing process has been hugely informed by stuff I’ve gleaned from practical experience, heard on brewing podcasts and interviews with professionals, or read in popular brewing books and internet forums. I accept very little as absolute truth and have fun putting proposed fact to the test. What I discuss in this post is what I do because it works for me, things will likely be different for you, please consider this as you think about your own brewing procedure.
2. This post is pragmatic in nature, meaning I’ll be approaching water manipulation from a practical, real-life perspective where the focus is on how I determine what to do with my water to get my beer where I want it to be. If you’re interested in learning more about the scientific underpinnings of water in the brewing process, I very highly recommend you pick up the book Water: A Comprehensive Guide for Brewers by John Palmer and Colin Kaminski.
3. I really do believe great beer can be produced without water manipulation and strongly recommend homebrewers attend to a few other aspects of their process before investing much energy in this issue. You can nail a specific water profile and have a mash pH in the perfect range, but it won’t do much to save a beer that is significantly under-pitched and fermented in a 90°F garage. I tend to view water manipulation as more of a final step in a homebrewer’s development where already tasty recipes are taken to the next level by honing in on a specific water profile. Water is a polishing agent and you can’t polish a turd.
| GETTING EVERYTHING TOGETHER |
Before we can start effectively manipulating our brewing liquor, there are a few things we’ll have to do/buy to ensure everything is in order. It’s important to remember that mineral and acid additions have an impact based on the composition of your brewing liquor in its unmanipulated state– if the ion concentrations in your source water are different than mine, so too will (should) be your additions. How does one go about determining the quality of their source water? There are a few ways, the first being the easiest: taste it! If you can barely stomach a glass of your home’s tap water because it tastes like a rusty pipe, pond water, or a swimming pool, it’s probably not the best stuff to be using for making beer. When your tap water is this bad, source your brewing water from somewhere else, it may add additional cost, but usually not much and at least your beer won’t suck. If you use purified, distilled, or reverse osmosis (RO) water form the store, you can usually find their mineral concentrations online.
I’m fortunate enough to have surprisingly delicious tap water with only the subtlest whisper of chlorine, which is easily removed using a carbon filter. One way to determine the mineral concentrations in your water, at least if it comes form a municipal source, is to do an internet search for “[your city] water quality report” then comb through the report. I’ve been able to find fairly adequate water quality reports, usually in PDF format, from a number of cities. The cool thing about these reports is they include data regarding much more than just the important brewing minerals, it is a great way to learn what your water district uses as a disinfectant*, whether there are high levels of other elements (like iron) that may produce off-flavors in your beer, and to see where your water is coming from. One downside to these reports, especially if you live in a more populated area, is that they are very general and usually report averages from different areas of the same city that may receive water from different sources. The best way to get around this issue is to contact your local water district and ask for the specific information you’re interested. I did this a few years ago and found the person I spoke with to be almost excited that I cared about my water quality. In a matter of a few minutes, he was able to provide me with the exact source of the water that flows into my house as well as more precise levels of all of the stuff I was interested in: calcium (Ca), magnesium (Mg), sodium (Na), sulfate (SO4), chloride (Cl), bicarbonate (HCO4), and pH.
*If your water is treated with chloramines, use potassium metabisulfite (Campden) to remove it so you don’t end up with band-aid beer– Read more about this here. If it’s treated with chlorine, a filter or overnight rest in the kettle prior to brewing should help.
When a water report from you local water district isn’t precise enough, or if your water comes from a well, a great option is to have your water analyzed in a professional environment. Ward Labs offers a popular Brewer’s Kit where they analyze a sample of your water and send you back a detailed report, providing exact mineral concentrations and pH level of your brewing water (update: for a few bucks less, you can get their W-6 package with most of the same info; thanks Denny!). However, there are some downsides, the kit costs close to $30 and requires you to ship the company a bottle of your water. Another potential drawback is that many homes receive water from different sources at different times throughout the year. I recently learned, for example, that when the water reserves are running low in my city, I get water from another source that has different ion concentrations; I can always tell when this is the case because the alternate water makes for a very milky StarSan solution. If you know your water source changes throughout the year, you can always send in multiple samples for analysis. Below is the report I received from Ward Labs over 3 years ago, they may look different now, but it will contain the same information.
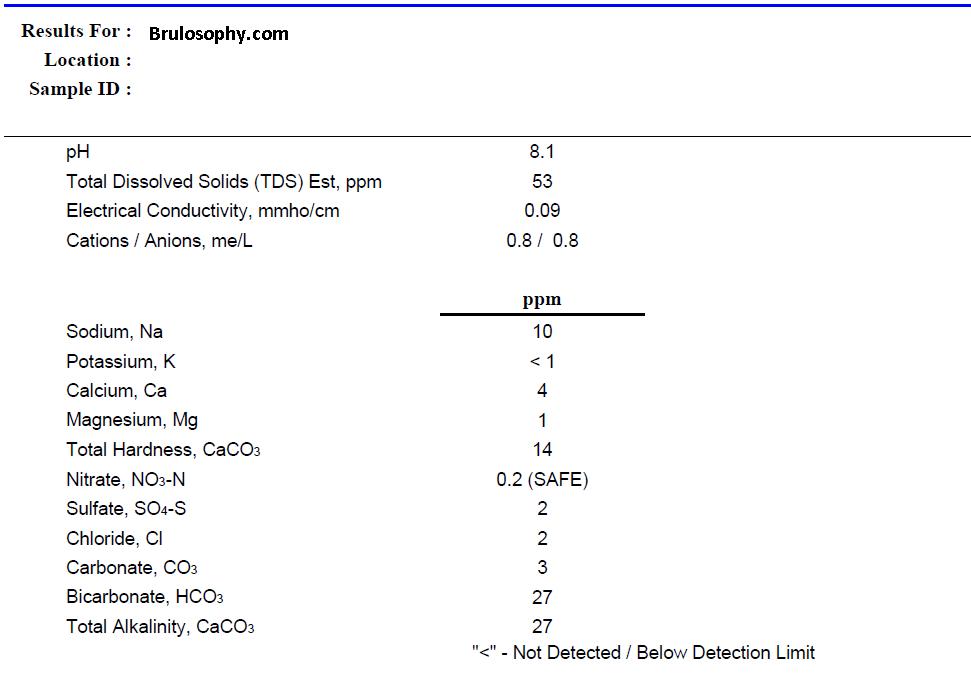
For comparison, here’s the info I received from my water district:
Ca: 3.6
Mg: .95
Na: 12
SO4: 7.1
Cl: 1.9
HCO3: 21
pH: 9.1
Impressively similar on most levels, though you may have noticed a fairly drastic difference in the sulfate level between the lab and local water reports. Take a look at what is reported by Ward Labs and you’ll see SO4-S, which I believe is a measure of sulfur levels in soil samples. To get a more accurate sulfate (SO4) level, all you have to do is multiply the SO4-S level by 3, bringing the lab result up to 6 ppm SO4, much closer to my local report.
Once you’ve got your water quality data all squared away, you will need to get your hands on the minerals used by brewers, the most common of which include gypsum, calcium chloride, Epsom salt, and chalk. There is some evidence chalk is incapable of dissolving under the conditions us brewers put it through, so some have taken to using baking soda to achieve higher bicarbonate levels; if you do this, make sure to keep an eye on your sodium levels, it can get out of whack pretty quick. All of these minerals have a different impact, some help to emphasize hop character, others maltiness. Here is a chart from John Palmer’s How To Brew that offers brief descriptions of what you can expect each to do to a beer.

While brewing salts will have an impact on the pH of your brewing liquor and mash, it is likely you will still require adjustments for certain styles to get your it in that prime zone of 5.2 to 5.6. Probably the most popular methods employed to achieve this are using either acidulated malt or a liquid acid like phosphoric or lactic (my personal preference). As interesting and useful as this information is, the truth is, it’s not totally necessary to have a rote understanding of all the details, there are calculators that’ll take care of most of the work for you. If you’re the type who prefers to know more about what is really going on with your beer, again, snag Palmer’s and Kaminski’s Water book, it contains a ton of details.
| NOW WHAT? |
We’ve got our water quality report and gathered all our brewing salts, all that’s left to do now is determine a desired water profile and build our water up to match it. This would be a terribly daunting task if it weren’t for the relative automation provided by water profile calculators such as Bru’n Water, my personal preference. Besides being a great price (free), it includes a plethora of information on water, minerals, pH, and how they all work together to impact our beer. I won’t go too deep into how to use Bru’n Water, Martin does a fine job himself in both the Instructions tab, but I will share a few comments on each section.
Water Report Input: this is where you’ll enter your water quality information, simple enough. If your bicarbonate (HCO3) and carbonate (CO3) are reported in CaCO3 units, you will need to do a simple calculation to get the accurate parts million.
HCO3 = CaCO3 x 1.22
CO3 = CaCO3 x .60
If, like me, your sulfate is reported as SO4-S, don’t forget to multiply it by 3 to get an accurate SO4 concentration.
Sparge Acidification: this can be sort of confusing for those who are new to all this water junk, but it’s actually really easy, trust me. The idea here is that you want your sparge water fall somewhere in the range of 5.5 to 6 pH, which is lower than most drinking water. One way to reduce the pH is by adding acid to the water, 2 popular options for homebrewers being lactic and phosphoric acids. I prefer the former mainly because it is much stronger so I use less; for small batch brewers, phosphoric acid may be easier to measure out due to its lower strength. A quick riff on pH meters…

This is the pH meter I use, well, used… I abused the poor thing and it eventually died on me after 2 years. Before it went kaput, I compared the meter’s readings to what Bru’n Water predicted numerous times and the numbers were always incredibly close, we’re talking within ±.01, which was fine with me. I became so confident in Bru’n Water, in fact, that I often skipped using my pH meter and the beer still came out fine. However, they do provide a sense of security and will help you dial your numbers in more precisely. For those on a budget, consider an inexpensive meter like the one I used, it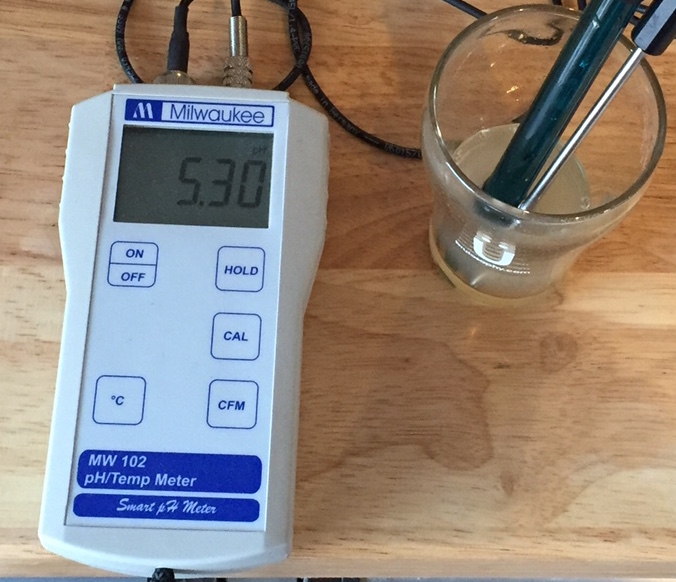 may not last as long as more expensive models, but it will get you by. I now swear by my Milwaukee MW-102 pH meter with ATC, which is considerably more durable and really badass, but more expensive. With good care, this meter should last your entire homebrewing career. Regardless of the meter you go with, you’ll want to grab some calibration solution to ensure your meter is providing an accurate pH reading, you can even use the pH 7.0 solution to store your probe when not in use.
Water Adjustment: all of numbers in this section make it look much scarier than it is. This is where you get to select a desired water profile then build your own water to match it. Stare at the page for a few minutes and it should become pretty self-explanatory. You’ll notice there are quite a few selections in the Desired Water Profile drop-down. Since listening to an interview where Martin discussed the fact most breweries in all the classic beer brewing cities likely manipulated their water, I haven’t used a city water profile. Rather, I prefer the particular style profiles (e.g., Pale Ale) or those toward the bottom of the list specifying a color and direction of balance (e.g., Yellow Hoppy, Amber Malty, Brown Balanced). This has been working very well for me. If you’re really into brewing traditional styles with traditional water, make your selection and have at it!
Mash Acidification: enter your grain bill and see if your mash pH using your adjusted mash volume is within range. If not, you can either play around with how much acidulated malt you’ll need to bring the pH down or go back to the previous tab and adjust with liquid acid (toward bottom of Water Additions section). I’ve done both and tend to prefer using liquid acid only because acid malt does seem to impart a particular flavor to some beers, it’s not strong, just noticeable. I’d use it in a pinch. If your mash pH is too low, you can tweak chalk and/or baking soda additions to bring it up.
Adjustment Summary: my favorite thing about this tab is the comparison of your water profile to the profiles of historic brewing cities. Cool stuff.
I’m a committed user and advocate of BeerSmith, it’s easily the most useful brewing software I’ve come across. While it does have an integrated water calculator, I don’t use it very often only because it’s missing a pH component. For those only interested in adjusting their ion concentrations to a particular profile, BeerSmith works beautifully, it even has an option to calculate all of the mineral additions for you, which is killer. I do like to enter my mineral and acid additions into my recipe so it’s easy to view when measuring everything out. Unfortunately, there doesn’t seem to be a way to distinguish sparge additions in BeerSmith, so I just mark them as boil additions. The night before brewing, I measure out the minerals (in grams) for the mash and sparge separately using an an inexpensive blade scale. I usually throw the mash salts on top of the grains and, unless I’m using chalk, add the sparge salts to the pre-measured sparge water. Any liquid acid I use to reduce the pH gets added directly to the mash and sparge water. For those desiring more precision, you might consider adding acid directly to the mash and taking regular measurements with a meter until your desired pH is reached.
I’d imagine many people wonder if the impact of water manipulation is noticeable, if I’m being totally honest, I’m not sure. I believe I’ve perceived some noticeably positive differences in my Stout and hoppier beers compared to before I used minerals, but I’ve yet to do a side-by-side. Something I do know is that since making this change, I’ve experienced a consistent increase in my brewhouse efficiency– I used to waft between 68% and 72% but now regularly hit 78%. Cheapest bump in efficiency I can think of at pennies per batch in minerals and acid. Not bad. I do plan to perform an exBEERiment on this in the near future, but until then, I consider it a cheap way to potentially improve the quality of my beer.
I hope this inspired a couple folks to consider messing around with their brewing water, it’s just another way to dig your fingers deeper into the hobby. If you have any questions that don’t require a Ph.D. in water chemistry to answer, please don’t hesitate to ask.
Support Brülosophy In Style!

All designs are available in various colors and sizes on Amazon!
Follow Brülosophy on:
FACEBOOK | TWITTER | INSTAGRAM

| Read More |
18 Ideas to Help Simplify Your Brew Day
7 Considerations for Making Better Homebrew
List of completed exBEERiments
How-to: Harvest yeast from starters
How-to: Make a lager in less than a month
| Good Deals |
Brand New 5 gallon ball lock kegs discounted to $75 at Adventures in Homebrewing
ThermoWorks Super-Fast Pocket Thermometer On Sale for $19 – $10 discount
Sale and Clearance Items at MoreBeer.com
If you enjoy this stuff and feel compelled to support Brulosophy.com, please check out the Support Us page for details on how you can very easily do so. Thanks!


16 thoughts on “A Pragmatic Approach to Water Manipulation”
Yet another very informative and great write up! I have one quick question. If you biab and only squeeze with no sparge, what and when is your recommendation on adding salts and liquid acids?
Would you just throw it all in with the grains and adjust as needed?
Thanks!
Yet another very informative and well put post. Quick question for you, if you biab with only squeezing and no sparge, what and when is your recommendation for adding the salts and liquid acids? Do you just add them all in with grains and adjust as needed?
Thanks again!
When I BIAB or No Sparge, I only adjust for the mash per my normal process and leave all the sparge stuff alone.
very fun write up. that is one of the things I planned on doing right from the get go (just like making starters) I figure it is alot like making a a router table, could you do most of the wood working without one? sure! but your finished product will be that much better with it.
I am not afraid of a bit of learning 🙂
I agree with Brun’water. very easy to use and fun to play with.
For the issue with with chalk and how fast it dissolves, I learned on some forum somewhere you can use pickling lime, or Calcium Hydroxide to as a third option to address your chalk vs. baking soda false dilemma. It’s sold at Walmart in the canning section. Supposedly it works quickly, and I like that it only adds Calcium. Martin even has a row for lime on his spreadsheet. The forum also said to be careful when handling it, because it’s caustic.
Good tip, I’ll have to try it out. Thanks!
Wow….. is that your tap water? I am jealous! That is practically RO water:) Thanks for the great write ups and experiments you do. Lots of great info.
I consider myself fortunate… just 5 miles south and the water is crap.
Great article, Marshall. One thing I’d like to pint out is that you can get test W-6 from Ward Labs for about $17. It provides you with all the info you really need and is only about 1/2 the price of the Homebrewers test/
Thanks Denny, great point! That’s actually the one I got, I thought they replaced it with the brewer’s kit. I’ll update the post in a bit.
**Just checked… it’s now $21**
The way most pH meters work, they will only last a year or two anyway. At least the probe portion. Without going into much detail, there’s a special reference salt solution on one side and the wort on the other side of the gap and you measure the electrical potential between these two solution as they try to get giggy with each other. Over time the reference solution drifts farther and farther from nominal. You should probably replace your pH probes every 2 years (or when they take more than 1 minute to reach a stable reading).
I have a Milwaukee 102 and that $12 yellow deal you linked. I took them both to work where I have access to a lab grade pH meter that we send out for calibration. After calibration, both read a set of 3 of random solutions accurately enough for me to use for brewing. Furthermore at $12, I’ll buy a new one every year and it’s still less than 1/2 the cost of replacing the 102’s probe every other year.
Wow, that is very low ion concentration water. With my water, I was able to tell an immediate improvement in my brews, but that may have been because of my extremely high (200+ ppm) carbonate concentrations (so high I have to add acid for all but the darkest of beers I brew). I have become quite an advocate of taking your beer to the next level by using water treatment, and wrote quite a few posts on it.
– Dennis, Life Fermented Blog
How closely do you try and match your desired water profile? Are you able to nail all of the key minerals or do you usually end up short/over one or two of them and call it good?
I focus mostly on SO4, CaCl-, and pH and try keep my Ca levels between 50-150.
Since I read about no sparge brewing here and now do it. Do you make any adjustments to the inputs for sparge or any of the inputs to offset for using full volume mash? Thanks.
Nope, I just put the full volume of liquor in the mash box.