Author: Matt Del Fiacco
From cheap plastic buckets to stainless conicals that emulate the pros, the fermentation vessel options available to brewers these days is quite vast and can lead to some difficult decision making. While higher end vessels offer myriad features such as the capacity for closed fermentation and pressure transfers to avoid oxidation, they cost upwards of 25 times more than their less expensive counterparts that don’t have all the bells and whistles.
I started brewing when I was a college student, a time when both space and money were rather limited. Having embraced the importance of fermentation temperature control, I repurposed a mini-fridge as a chamber and brewed smaller batch sizes because I couldn’t fit anything larger than a 3 gallon/11 liter carboy. As I brewed more, I learned about the perils of cold-side oxidation and found appealing the options afforded by some of the new stainless fermenters on the market, but I couldn’t justify dropping that kind of cash given my situation at the time.
Fairly soon after my introduction to brewing, I transitioned from bottling to kegging my beer. I didn’t build a fancy keezer with a bunch of expensive faucets, but rather picked up the bare essentials that would allow me to skip the hassle of bottle conditioning– a CO2 tank, regulator, gas and beer line, picnic taps, and of course, a few used corny kegs. It was around this time I read of someone who had adapted a corny keg for use as a fermentation vessel. Constructed of durable stainless steel, capable of holding relatively high amounts of pressure, and outfitted with gas and liquid posts to allow for closed transfers, this seemed an ideal alternative to the stainless fermenter options at the time.
After making some minor adaptations to a keg, I gave it a shot and was immediately hooked. I’ve been fermenting in kegs for nearly 4 years at this point and often receive questions from folks interested in doing the same. My hope in penning this article is to cover both the very simple process of converting a corny keg to a fermentation vessel as well as thoughts and recommendations based on my personal experience, and discuss.
CONVERTING A CORNY KEG TO A FERMENTER
The beauty of fermenting in a corny keg is that the process of putting it together is less about actual building and more about adapting what’s already there, which doesn’t take much. The first and most obvious step is to get a corny keg, of which there are two main types– ball lock and pin lock. While ball lock kegs are more popular among homebrewers, I went with pin lock because they’re less expensive and have easily distinguishable gas and liquid posts. I prefer buying used and reconditioned kegs, as they cost markedly less than new kegs, plus you can get packs that further reduce the price, and having more than one keg fermenter is very convenient.
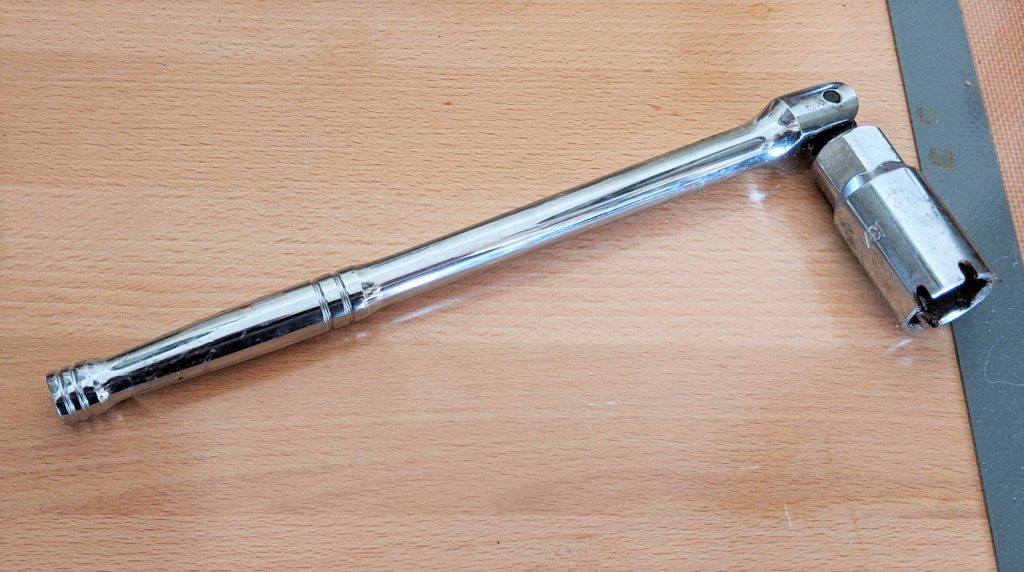
Once the keg is acquired, it’s important to disassemble it and give it a good cleaning. Removing the posts is quite difficult without the right socket, there are both pin lock and ball lock versions that make removal a cinch.
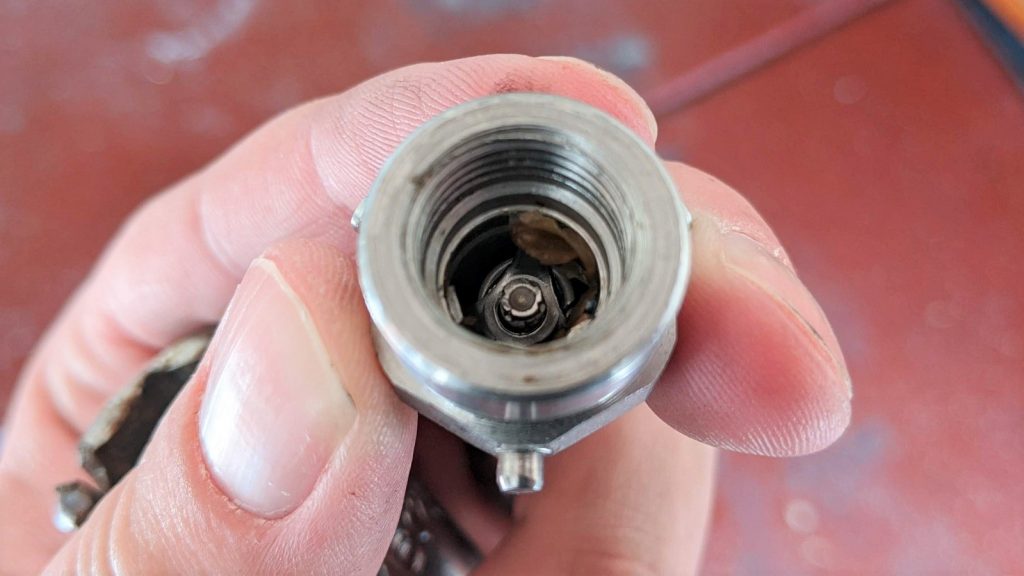
It may take a bit of force at first, but the posts will eventually loosen up and easily unscrew from the keg, at which point they can be soaked in the cleaner of your choice and scrubbed to remove any icky bits.
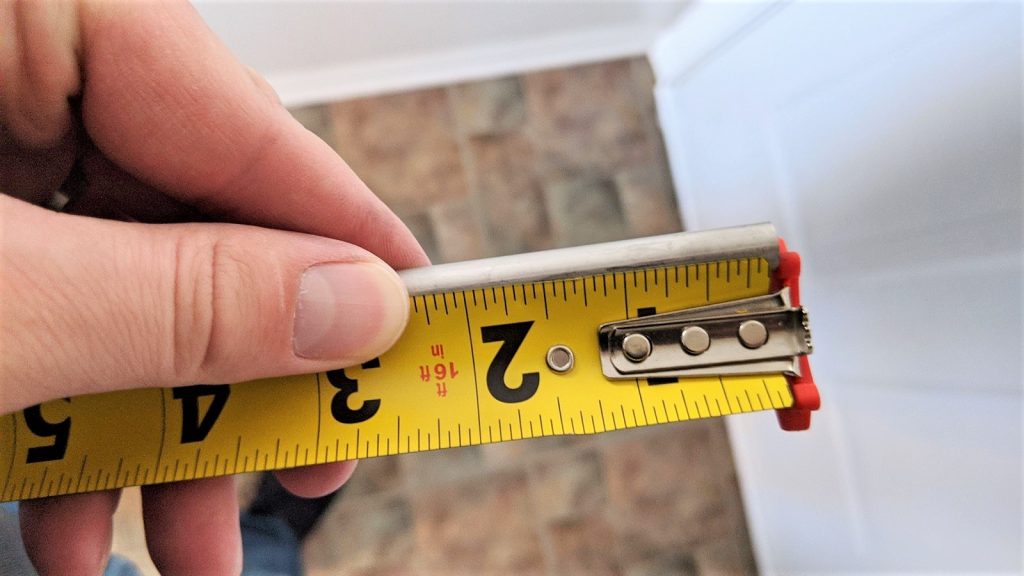
With the posts removed, the long liquid dip tube can be pulled out of the keg in preparation for the next step. In order to lower the risks of clogging during transfers, it’s important to reduce the length of the dip tube by about 1 inch/25 mm so that the bottom rests above the trub line.
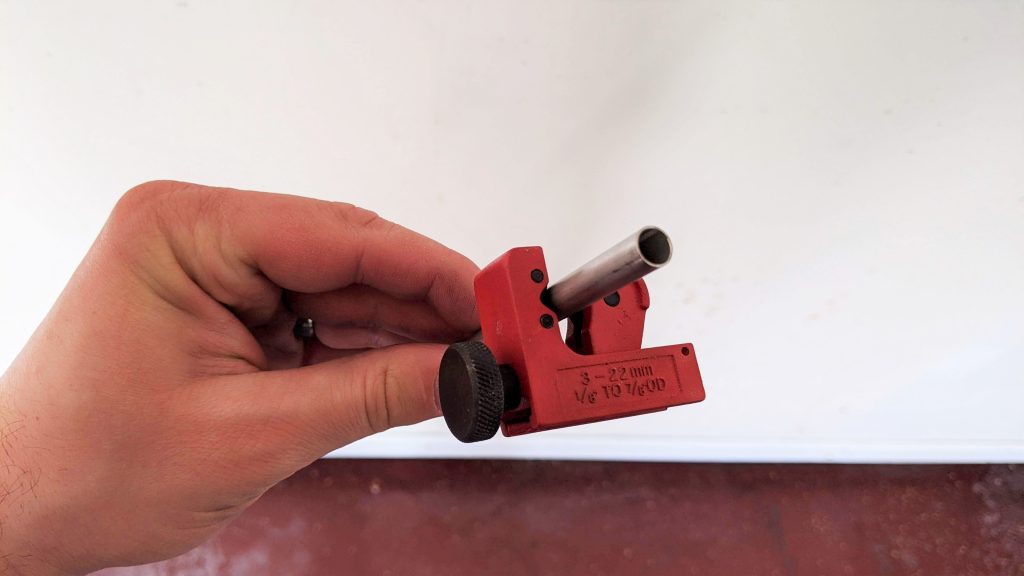
While the tube can be cut with a hacksaw or Dremel, an inexpensive stainless tube cutter makes the task incredibly easy and clean, so I recommend it for those who might be making multiple fermentation kegs.
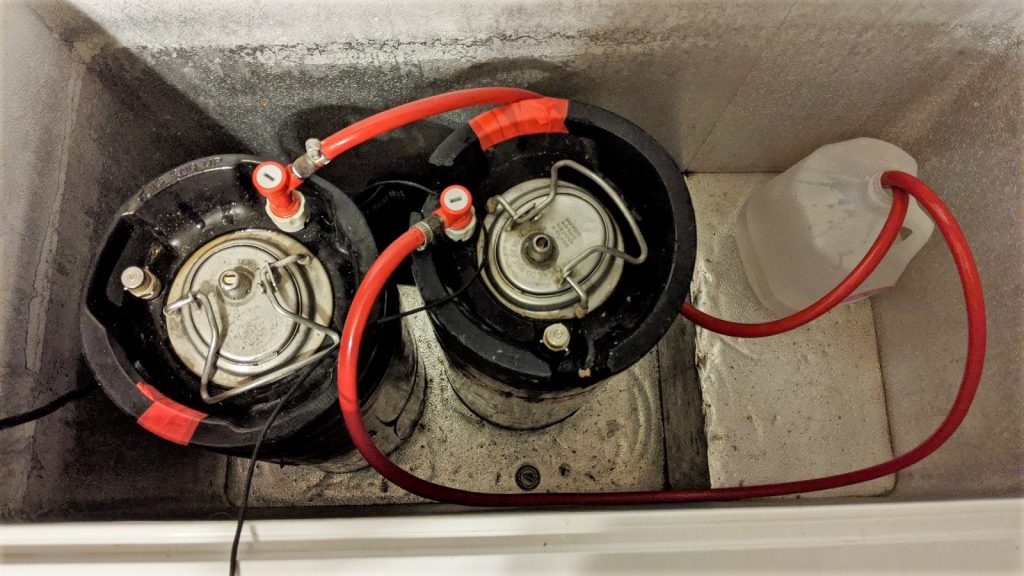
After cutting the tube and cleaning all parts of the keg, simply put it all back together, making sure everything goes in the proper spots. I like to mark the kegs I’ve converted to fermenters by wrapping the handles with electrical tape.
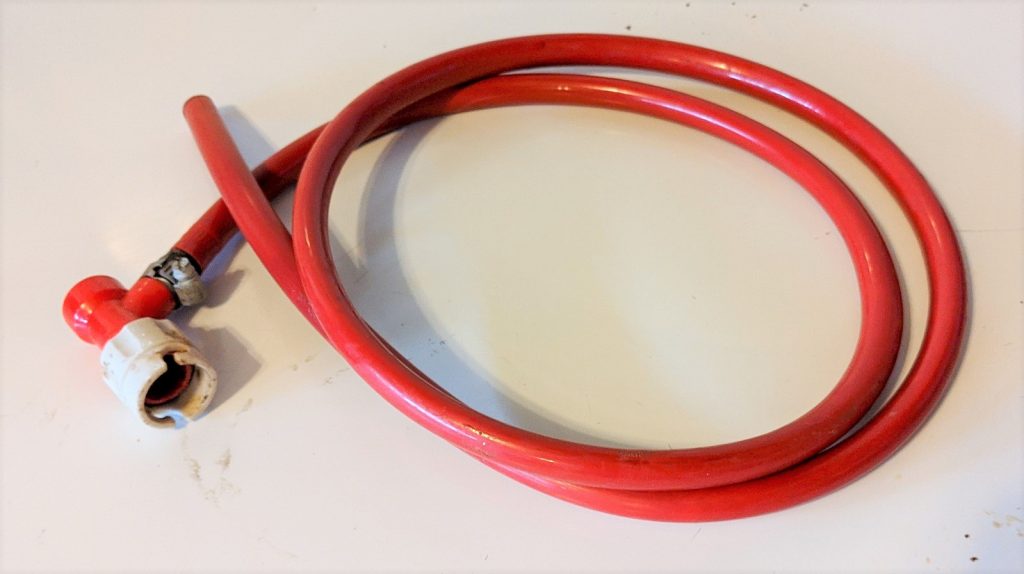
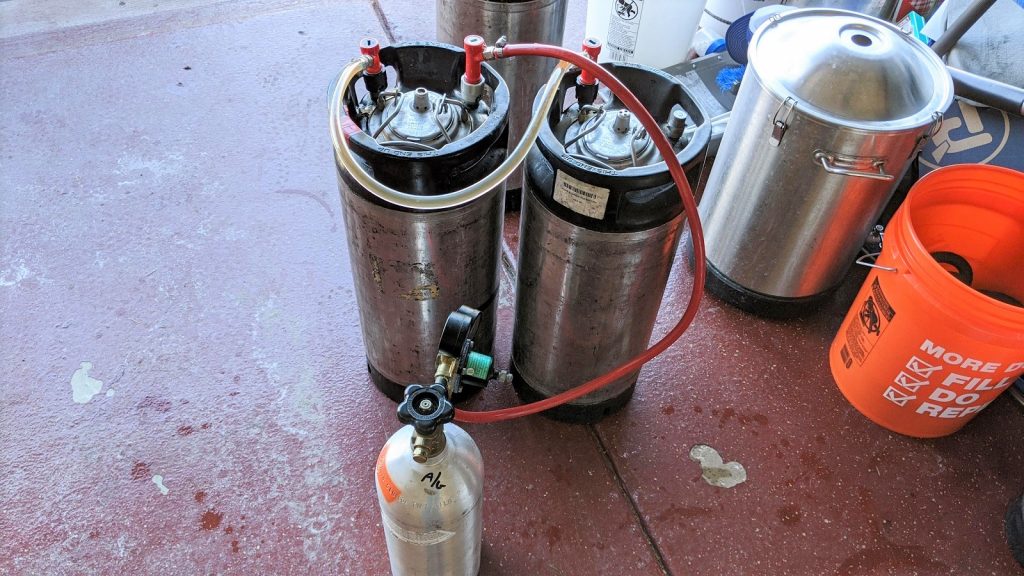
As every brewer knows, yeast produce CO2 during fermentation that needs to be released from the fermenter. Since fermentation kegs are completely closed with no airlock hole, you’ll need to fashion a blowoff tube using a 4-6 foot/1-2 meter gas line and a gas disconnect (make sure to get ball lock if that’s your jam).
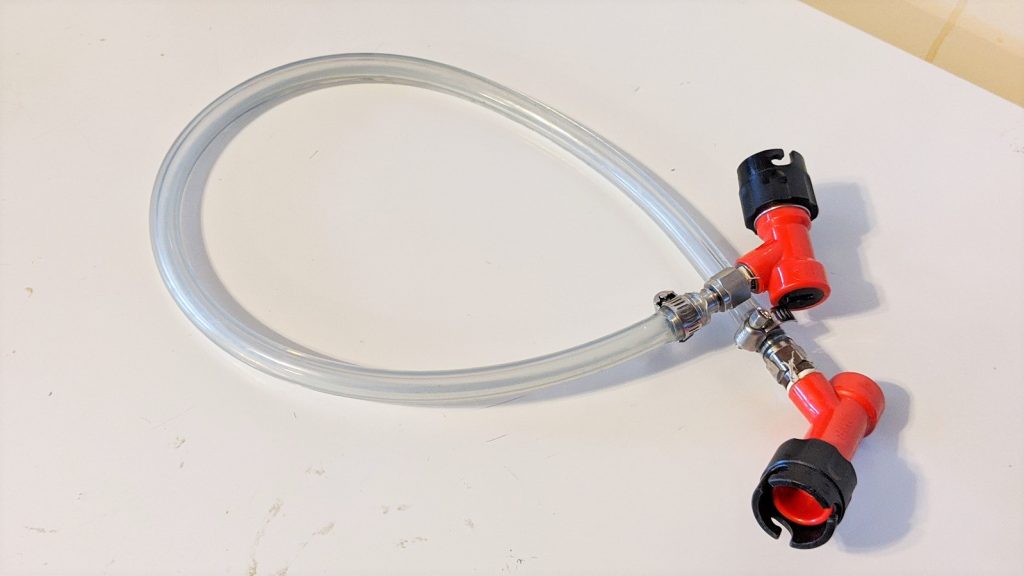
Finally, in order to transfer the beer out of the fermentation keg and into a new keg, you’ll need to make a jumper using two liquid disconnects (again, ball lock if that’s what you’re using) and a 15 inch/38 mm length of beer line.
And that’s all it takes. The keg is now ready to be used as a fermentation vessel.
FERMENTING IN A CORNY KEG
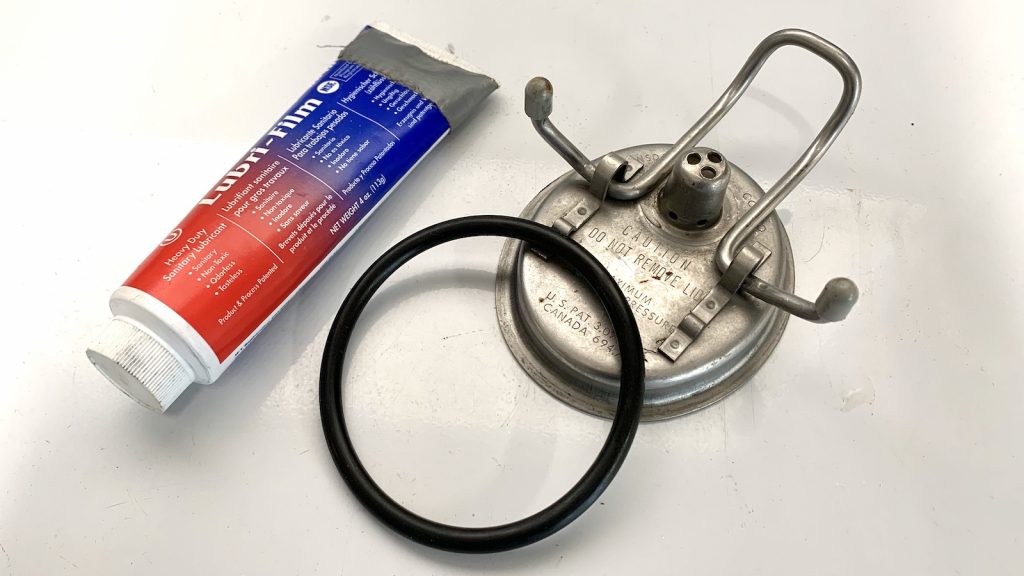
Prior to using a fermentation keg, it’s crucial to ensure the lid o-ring isn’t dried out or cracked, as this can result in CO2 leaking out of the keg lid. I always start by applying a small amount of keg lube to the o-ring to ensure a good seal.
The beauty of stainless is that it’s very difficult to melt, so if you’re into no chill brewing, you can rack hot wort directly to the fermentation keg and allow it to cool before proceeding. Regardless, once the wort is racked to the sanitized keg and the yeast is pitched, the lid gets attached, the fermentation keg gets placed in the chamber, and the blowoff tube is put in place with one end submerged in clean water or sanitizer.
Once fermentation is complete, the beer can be cold-crashed if one so chooses, after which it gets pressure transferred to a fresh serving keg. With the liquid jumper line going from the fermentation keg to the serving keg, a small amount of pressure from a CO2 tank pushes the beer from one to the other.
One thing I love about fermenting in kegs is the ability to naturally carbonate the beer toward the end of fermentation, a method referred to as spunding, which involves racking the beer to new a keg when it still has a bit of fermentation to go then attaching a spunding valve.
After racking the beer out of the fermentation keg, I give it a good cleaning by removing the posts and dip tube, soaking them and the keg in cleaner, then rinsing and leaving to dry. It couldn’t be easier!
| The Verdict |
I’ve been fermenting in corny for years and absolutely love it. In addition to being a very affordable alternative to higher end fermenters, it opens up a bunch of options including closed transfers to reduce cold-side oxidation, purging the serving keg of oxygen using naturally produced CO2, and spunding for natural carbonation. Kegs also have a smaller footprint than most other fermenter types, though they are a bit taller, something one should consider based on their chamber dimensions.
One noted drawback to fermenting in corny kegs, seeing as they only hold 5 gallons/19 liters of beer, is that the maximum recommended batch size is 4.5 gallons/17 liters, which is definitely worth the trade-off for me. Also, while one could figure out a way to siphon out of a keg, the process of transferring beer is a lot easier with external CO2, which requires a tank and regulator. While it is an added expense, even with the keg, it’s likely cheaper than other stainless options.
One question I’ve received quite a bit over the years has to do with serving beer from the keg in which it was fermented. Is this possible? Absolutely, I’ve heard from a number people who have done it, but I don’t because transferring the beer off the trub to a fresh keg is so easy.
Corny kegs remain my fermenter of choice and I truly believe they’re an excellent option for brewers interested in reducing the risk of cold-side oxidation, or even the newer brewer looking to upgrade fermentation vessels in an expensive way. Cheap, simple to use, easy to clean, and effective. What else could a brewer ask for in a fermenter?
If you have any thoughts about this DIY fermentation keg or have experience fermenting in kegs yourself, please do not hesitate to share in the comments section below!
Support Brülosophy In Style!
All designs are available in various colors and sizes on Amazon!
Follow Brülosophy on:
FACEBOOK | TWITTER | INSTAGRAM
If you enjoy this stuff and feel compelled to support Brulosophy.com, please check out the Support page for details on how you can very easily do so. Thanks!





93 thoughts on “Using A Corny Keg As A Fermentation Vessel | Do It Yourself”
Yeast harvesting? Would you pour the yeast cake into a sanitised container via the lid hole and proceed as normal? Thanks.
I have 2 x 15 Gal corny kegs that I have been fermenting in for years…they are the best!
I use a stainless steel carbonation cap for a growler that has a barb on the end of it…I pop that on the end of the transfer hose and harvest yeast right into a clean vessel…couldn’t be easier!
Simplistic! I should have thought about that, thanks!
Can you explain in more detail how you harvest year using a a SS carbonation cap?
I’ve done that before (after thoroughly sanitizing the exterior of the keg) but another person responded that they replace the shortened dip tube with a long one post transfer, pour in pre-boiled cooled water, and then transfer the slurry out. Seems safer.
Water? Why not use wort?
You mean leave a little beer to swish it all up and then harvest? I suppose but if you’re doing a closed transfer, how will you know how much you’re leaving behind? It might be too much or not enough. Plus you’re going to do a wash anyway, so why not get as much out as you can into the serving keg and pour in a known amount of water to thin it as you please?
I just mean make sure the yeast is stored under beer (or water if you like). If you scoop it out then you don’t need to mix it into a slurry. A lot of people aren’t washing their yeast anymore, just harvesting and storing as-is.
That is my question as we always harvest the yeast. I guess just turn the keg upside-down, and let her dump? The Conical SS fermenters we now use have dedicated yeast harvesting ports on the bottom.
I’ve used a long stainless steel spoon to scoop up blobs of the cake then drop them into a sanitized mason jar with good success. I make sure there’s a little beer on top for storage and leave the lid slightly loose to allow gas to escape.
The downside is that you cant make a 5 gallon batch because the corny keg has little headspace for the krausen correct?
ferment under pressure and you can fill the corny to the weld line
Not all yeast make gobs of krausen. I make strong bitters (11C) with Omega British Ale VIII in corny kegs filled to the weld. No blow off needed. Ferments are not under pressure as I use a PLAATO to monitor the ferment. Very, very flocculent yeast, fruity and makes a tight (<3 “) krausen at height of growth phase in a corny pitched with 92 grams of settled starter yeast. (~250 B cells). Do a diacetyl rest at 72F at about 1.015. It is a SLOW starter but reliable at measured at center of keg 68F. I have used 4 generations with no discernible mutation. 1.060 ferments to 1.012 reliably. I am sure their are other yeast that would reduce worries. I suspect that highly flocculant and reduced krausen are related. Just saying.
I usually transfer a gallon of wort into a 1 gallon fermenter to bottle then give away
@Mike can you explain this? I’ve actually tried a lager under pressure, and I can tell you the Krausen is trying to get out of there. I had little headspace for this, but It’s not under control at all
Another added benefit is being able to attach a picnic tap to run off any yeasty beer. Another draw back is theres not a way to measure fermentation temp without an add on like a lid thermowell which aren’t cheap. How do you measure fermentation temp?
I suppose you could pull a 1 oz sample into a shot glass to check temp? (That’s a bit of a hassle, I know)
just bungee a temp probe to the side with insulation over it. no big deal.
I ordered a garden knee pad for just that reason last week. Thanks.
I actually make a little pocket with a big band-aid stuck to the side of the metal side wall on the corny for my temp probe. I then cover that with a neoprene insulation jacket. For raising the temp I’ll put a FermWrap underneath the neoprene but not over the band aid and control it with an Inkbird temp controller connected to the temp probe. Easy and relatively cheap.
With a stainless steel keg all you really need to do is point an infrared thermometer at the side of the keg.
The low emissivity can make using an IR thermometer on a shiny keg problematic. I find just some paper sticky tape (e.g. masking tape) is adequate to get a usable reading. Permanently painting a patch to read from would be a nice solution if doing this frequently.
I use corny kegs and I measure fermentation temp a couple of ways. First, I have a small Styrofoam block taped to the side of the keg about 10 inches from the bottom that I can slide my fermentation fridge temp controller probe into. with testing, I’ve found that the temp it registers is about 1 degree F warmer than the temp inside the keg. However, recently I picked up a Tilt Hydrometer that goes inside the keg during fermentation, and measures both temp and gravity. I love it, as it gives em accurate temp and gravity readings in a completely closed fermenter throughout the fermentation. If you are spunding to naturally carbonate, you’ll know about how many points you have remaining and can therefore decide when to close the up the keg to pressurize.
Granted, the Tilt is a little pricey, but it’s a great tool.
Another item I picked up that I think was totally worth the cost is the ss Brewtech Keg Washer. I never have to disassemble kegs, and the cleaning is completely automated.
Tilt hydrometer. That’s what I use in my SS Brewtech Brewbucket.
I reckon conductivity of the steel is good enough and thermal mass low enough, that a probe attached to outside of keg and covered by an insulating pad will give a pretty accurate temp reading
I use Tilt hydrometers for temperature (and gravity).
It does need a repeater (or a bridge) to get the bluetooth signal out of the keg *and* the freezer. A small ESP32 controller can do that easily (for about 10-15$) and, with some extra setup, I can see the data from anywhere.
I just put the temp probe on the side of the corny with a piece of reflectix. I honestly think that this provides an accurate reading throughout fermentation because 1) the geometry of a tall skinny fermenter precludes the wide temp differential between the center and the outside edges found in conventional fermenters, i.e.- there is a greater surface area to volume ratio than the squat conicals which are bigger to accommodate the full volume plus a head space, and 2) stainless steel is a great conductor which transmits heat efficiently thus giving a more reliable temp feedback than plastic buckets. My ferm chamber is a fridge, once fermentation gets going, it cycles on and off regularly but not so frequently, to maintain a very tight temp difference, +/- 1° throughout. Of course I can’t prove this without opening the lid and taking temp readings but I don’t think this is necessary.
i remember jamil Zainasheff mentioning in a podcast years ago that he had done a comparison of an insulated taped probe to the side vs a thermowell and the two were close enough for his needs, less than a degree difference i think. good enough for me.
I also love fermenting in a corny. The only downside that I see that it’s harder to harvest yeast from a keg than from a vessel with a large opening. With a bucket you can just scoop out the trub and yeast. I pour the liquid out of the corny. I’m not thrilled with yeast hitting the handles as it’s poured. Other than that I think fermenting in a keg is great.
Too complicated. Get a 12″ long piece of weaker spring and alter the pressure relief valve to about 13psi (or whatever you prefer). If you need an initial blow off tube, thread a piece of tubing to fit the pressure relief value with tubing running off of it.
Thank you for this post! I have my first keg batch finishing up now. I didn’t cut the dip tubes, thinking that I would use a short hose and picnic tap to pull out yeast for future use. As long as there are no hops in there, do you think I will have any clogging problems? I plan to make 8 gallon batches, four in each keg. After fermentation I will put 5 gallons in one keg and 2.5-3 in a small keg. The biggest advantage over my shiny ss bucket is that I can lift the kegs in and out of the chest freezer without help (40 lbs vs 60.)
Space is a huge advantage, a vertical profile over a horizontal one.
Honestly, after posting the article I’m seeing some reports of people not adjusting dip tubes and being fine. Personally, I’ve experienced a clogged dip tube each time I’ve tried that. See how it goes?
We will see. At least I have been warned. Thanks!
I’ve been using cornies and no chilling for last several batches. A suggestion to those who wish to harvest yeast is to first replace the cut liquid diptube with a regular length one after transferring. Then pour a little preboiled and cooled water into the slurry and mix. Finally close the lid up and push out the thinned slurry on a little pressure. This way it’s collected as cleanly as possible without pouring it out the lid opening and having splash on the handle.
Grade A Pro Tip Mike, thanks!
When you transfer to the serving keg do you not vent the receiving keg as pressure builds?
After you finishing spunding do you transfer a second time to a serving keg? Or just serve from the spunding keg? I always worry about any particulate and yeast that drops out by the end of spunding / conditioning contributing off flavors or autolysis flavor in the long run if the keg doesn’t kick quickly.
You do need to vent pressure at a certain point, otherwise transfer will stop. I usually use a spunding valve at like 1 psi to maintain some pressure in the serving keg.
After spunding is finished, I don’t transfer again. There is some yeast settling but it is minimal, and you can pour a hazy pint or two before hitting the clear beer. I’ve never noticed any issues from autolysis, though the max a beer is in the keg for me is roughly four months.
Thank you!
There are at least 3 options:
1) pull the keg PRV periodically to release pressure
2) use a spunding valve
3) connect a CO2- purged line gas in post on the receiving keg and then connect the other end to the gas in on the sending keg. This option only works if the sending keg is at a greater height than the receiving keg, as gravity is doing the work of transfer, not the gas pressure.
I’ve had the best luck with options 1 and 2.
I’ve had success serving from the primary keg. When doing that, I start the fermentation with a floating dip tube (such as the clear beer draught system) in place so that you can draw from the top of the keg the entire time. whether you get off flavors is up to your own experience i guess and how long you take to drink it. one option is to drink off of it awhile as it is clarifying and then when you think it should be to your desired clarity throughout, transfer to a purged keg.
I’m an enthusiastic ferment-in-the-keg brewer for two years now. I installed floating dip tubes in all my kegs so I can ferment and serve directly from the same keg without transferring. Fresh, delicious beer with no risk of oxidiation, and one fewer task to complete – that’s my kind of simplicity!
Thats a great idea… they are readily available? I’ve not seen floating dip tubes before…
Also, fermenting and serving from same vessel, any chance of off flavors doing this?
I really like this idea!
Here you go https://www.aliexpress.com/item/32847023684.html
Been doing it for a couple of years
Google “clear beer draught system”
Clear Beer Draught System makes one, Top Draw is another one. There may be others. I DIY’ed a version to save a few bucks. No off-flavors that I could detect after 2 months in the keg on the yeast cake. My floating dip tube never draws up any trub or yeast from the bottom. The very last pint pours straight CO2 foam just like it does with a fixed length dip tube. I think what happens is it pulls off the top while the yeast are sinking down. By the time you get to the last 1″ of beer after 4-8 weeks, the yeast cake has been flocculating at 38F into a tight cake at the bottom. That being said, don’t move the keg around or you’ll need to wait a day or two for it to re-settle. Best to leave it in place once you start serving to avoid stirring up the yeast.
Great idea. How many pints do you typically get from a keg before the dip tube starts picking up trub? Do you typically dry hop? Thanks.
I haven’t figured out how to dry hop with this method yet. Of course you could open the lid 48 hours into fermentation to toss them in and hope the active yeast cleans up any oxygen.
I’ve also read some cool ideas using muslin hop sacks, dental floss and magnets but haven’t tried it yet
This. While I don’t ferment in kegs currently, I use a Top Draw system now after suffering from severe dip tube clogs a few batches ago.
Do the floating dip tubes get clogged at all with krausen during fermentation?
Single best thing i’ve done in my brewing process has been to move fermentation to closed end system.. i converted 1/6 pony keg that holds 8 gallons and now ferment using a sanke keg adapter with spunding valve and silicon dip tub.. Eliminates esters and fruity tones with 1/2 bars pressure when fermenting at higher temps. Love it and best of all i can use it as unitank and pitch like beers directly on top of the yeast cake without getting infections. Corny kegs are great as well but you’re more likely going to clean tubes if debris gets caught in the dip tube so you’re going to need to do more thorough cleaning of parts Granted as the author says its not about building as just adapting what you have so go for it you’ll love it.
Great write-up and timely, as I recently started doing this! I’ve tried a couple things to maximize the batch size. One is using tall pin-locks, which are 1 inch taller and hold about a quart more. Other things I have done are using a floating dip-tube, using fermcap, and cutting my gas in tube as short as I can. I’ve also used the jumper and blow-off to use fermentation co2 to purge my serving keg.
The recent podcast mentioning vorlauf has me wondering if that will further reduce the trub. I biab and have never really cared about how much trub I have until now. Any other tips to boost the volume?
Use 2 kegs to ferment a five gal batch in. Or 3 kegs for a ten gal batch. It helps if one of them is a short, 2.5 or 3 gal corny. Then you could put 4-4.25 gal in the big one and the rest in the little one. Then close transfer from both into one serving keg.
Any suggestions for dry hopping when fermenting in a corny keg?
I have seen, but never tried, a method where you take one of those SS dry hop tube for a corny keg but instead of filling it and dropping it into the keg, you drill a hole in the top just big enough for the liquid dip tube to go through and not allow any hop matter to sneak through, like a cage for the tube. Now you can throw hops directly into the keg and allow them to float around freely. The tube prevents hops from being dispensed and clogging up the dip tube and QD. Of course you would need to plan for this ahead of time and would be best if you were to serve the entire keg at once at a party instead of just having it around for a while, I would think.
Brewhardware.com carries a keg diptube filter that works great for this. Just drinking my first keg with it now and its working perfectly. I dry hopped in the serving keg. I had to trim the filter down because I have ball locks and I think it’s made for pin locks, but no big deal. I plan to go to corny kegs for fermentation and serving in the same keg with the diptube filter eventually. I BIAB 5 gallon batches but I’m thinking of going to a bigger kettle to do 8 gal batches split between 2 cornies
I took a look at that item and it looks effective but there’s two things I worry about it: 1) it’s 300 micron mesh and as long as the diptube, it would be a bitch to clean it properly although maybe I’m wrong about that. 2) the description says “You cannot fill the keg through the beer out post when the screen is installed”. Perhaps the fine mesh prevents a steady flow into the serving keg so you would have to fill through the lid opening, which would allow you-know-what to happen. Hmmm.
to anyone who’s listening, a 1/4 barrel (7.75 gal) pin lock OR ball lock keg would be the bomb. I just looked pretty hard and could not find one. if anyone knows of these being made, please drop a link.
wait, i actually found it. $200 though. maybe that’s not so bad, it has all the benefits of keg fermenting without the hit to volume. here’s the link in case anyone else is interested https://kegfactory.com/products/kegmenter-fermentation-keg-7-6-gal
I use this! I switched from fermenting in kegs after being frustrated with the size of five gallon corny kegs. Either my batch was dramatically under 5 gallons or I would lose a lot of krausen and beer in messy blowoffs during active fermentation. I tried spunding to help, but usually this sprayed beer out of the valve.
The kegmenter works great, though I replaced the chincy flexible dip tube it comes with with a clear beer draught one. This fermenter fits perfectly in a dedicated mini fridge I use as a fermentation chamber. The kegmenter is wide: too wide for my small chest freezer, which is now dedicated to lagering corny kegs.
I’ve been fermenting in cornys for about 20 brews now and haven’t cut my dip tubes. I’ve only had a stuck transfer when transferring heavily dry hopped IPA with loose pellets. Adding the pellets to one of those mesh tubes kept everything OK, but the utilization was noticeably lower so now I loose hop.
Sometimes I need to jack the pressure up to 30 psi+ to get things moving, but it eventually does. Maybe I’ve been lucky or have avoided yeasts that flocc hard? I use a plate chiller so all of the cold break makes it to the fermenter. Maybe this keeps the yeast cake softer?
For transfer I used to use a picnic tap to push out some trub and then switch to the jumper hose after clear bear was flowing. When I had the loose dry hop stuck transfer mess I ended up pulling the poppets and springs out of both the liquid posts and the connectors on the hose to get things moving again. After that fiasco I’ve leaned into that method. Now I have my transfer hose with the poppets removed and a ball valve installed inline. I remove the poppet from the fermenting keg liquid-out as well and install the hose with the ball valve closed. When transfer time comes I open up the valve and let it push out trub until I get clear beer, close the valve and connect to my serving keg (also with no post poppet) and open the valve. Let it fill and watch very closely near the end of transfer so I can quickly close the valve when I see murk in the line. Then I add the poppet back under the liquid post and put it in the keezer. With this method I can loose dry hop and don’t have to cut any keg dip tubes which keeps them all interchangeable which is a plus.
Another thing I’d recommend is to make your line long enough so that you can transfer out of primary without having to move it so you don’t stir up the trub right before transfer.
How can you use a ball valve without a poppet? Doesn’t that just leave a hole for O2 to get in?
What do you mean you have your transfer hose setup without poppets?
Would you mind posting photos? That would be hugely helpful.
Oh I overlooked the part on the ball valve, that makes sens now. Still would love to see pictures & parts list, this sounds smart.
When I’ve had clogs before it’s definitely been because trub or hobs get stuck in the poppets so it makes sense this steup would avoid that.
I’ll (try to remember to) take pictures when I transfer my next brew. (Maybe in about a week) You need the poppets removed from both the post and the connectors as they rely on each other to open.
Cool thanks! I’m particularly interested in the jump tube with the ball valve, I would like to do that.
Thank you for posting this, I’ve used a corny as my fermenter for about a year now. I’ve almost talked myself out of it, but this maybe reinforces this method. A few questions:
How do you take samples without opening the keg? I’ve done it by pushing out some beer via co2 and a picnic tap.
My concern with that method is that I’m pushing out the yeast at the bottom.. which I’m not sure if that’s an issue.
My gas post has clogged some due to blow off happening. Any ideas?
Lastly, I feel like I’m flying blind a little bit on volumes and confirming how much I have transferred in. Have you found a solution?
hey Ryan, you can take samples with a short picnic tap line. i’d recommend using a shortened dip tube or using a floating dip tube, the latter is my preference. then, you don’t need to worry about hops or yeast or anything else and the transfer is easy too.
i always attach a fat blow off tube to the keg gas inlet threaded part, it slides over the threads and then tighten it with a hose clamp until the blowoff phase is over. then put the keg post with poppet back on when the blowoff phase is over. then, hook up your spunding valve and let it finish out or crank up the valve near the end to carbonate.
another option is to take the poppet out of the gas in post and put a quick disconnect (with plastic piece removed so it isn’t blocked!) with blowoff tubing on it. The disadvantage of this is that it is even slower to change and dirtys more parts with blowoff.
For determining starting volume, just weigh the wort going in on a bathroom scale.
What equation do you use to convert liquid weight to volume?
I just use the density of water and call it good. 8.345 lbs water per gallon water. So, if you want 10 gallons of wort just multiply it by 8.345. 83.45 lbs. this is not technically accurate of course but its good enough for my needs.
You can also do a completely closed transfer using almost zero external CO2 by:
1. Jump your gas post from fermenter keg to a clean and sanitized keg’s liquid post
2. Attach a blowoff to a bucket of sanitizer from the serving keg’s gas post
3. Allow fermentation to completely purge the serving keg, and bubble out through the blowoff
4. When you are ready to transfer, set the fermenter keg above the serving keg, and hook up the liquid to liquid posts of each keg.
5. Put a small burst of gas on the fermenter keg’s gas post to start the beer flowing to the serving keg, then hook up the gas to gas jumper
6. You have now started a siphon where the beer will gently fill the serving keg, and the CO2 from the naturally purged serving keg will replace the volume in the fermentation keg
And then you have a completely closed transfer into a completely purged serving keg, and have used 0 gas from your tank! Incorporate a capped fermentation to this method and you can have a fully carbed, fully purged keg closed transfer with no external CO2!
For no-chill (which I’ve done exclusively for years), do you need to worry about the contraction of the headspace in the keg? If so, what are some good ways to configure a corny keg for the initial cooling phase of no-chill? Thanks!
When I’ve finished draining hot wort into my kegs, I simply put the lid on and store them in my already chilled ferm chamber waiting for the next day or two. The heat from the initial post boil expands in the kegs creating a positive pressure in them from the start. As they cool, the pressure equalizes to normal atmospheric pressure so there is no negative, or vacuum, pressure in them. If you are still worried, you can put a tiny bit of CO2 pressure in them, like 1-2 PSI. As the kegs cool, they will draw in the gas as needed. Then just purge and open the lid to pitch.
And aerating the wort before boiling?
Trevor- I assume you meant after boiling: I pop the lid open and pitch yeast, close it up, then attach tubing from O2 tank to a QD and oxygenate through the liquid dip tube while keeping the PRV open to release pressure. This helps mix all the yeast up as well. If you don’t have a manual PRV, just keep the lid propped open a tiny bit until its done. After that, there really is no reason to expose the wort to air. Fermentation, cold crash, transferring to serving keg is all done as a closed system. Unless you dry hop, I haven’t quite figured that out yet.
everyone should go to homebrewtalk.com and look up the lodo threads and the fermenting and serving from the same keg threads and the fermenting in a keg threads. you will get a ton of good info.
i fermented in kegs for several months for my NEIPAs. Lately, I bought two Fermonster fermentors to try as they are about 7.5G capacity so you can make an IPA and dry hop it with huge quantities and then still get a full 5G into the serving keg. Also, they have a pretty leak tight lid and you can put get fittings into the lid for pushing beer or what not. Anyway, it’s another option if you are interested in some of the features of a keg but would like a bigger capacity.
I’ve done batches (lagers and NEAIPAs) both with the LoDO method in corny kegs and in the fermonster.
I’ve stuck with lagers in corny kegs and NEIPAs in the fermonster. It’s just too much of a hassle with the huge dry hopping to do NEIPAs in 5 gallon corny kegs. I barely end up with 3.5 gallons of a finished NEIPA out of a 4.5-4.75 gallon corny keg and I hate that. Not to mention even with cutting the dip tube I’ve had clogs when transferring NEIPAs because the dry hopping charges are so big. Although, Eric’s method in the comments above with removing the poppets and adding a ball valve could fix that.
On the contrary I can easily get probably 4.5 gallons or more out of a lager batch fermenting in a corny since there’s no dry hop charge and the krausen is much less with lager batches fermented ~50-52 degrees.
yeah, that sounds like a good plan. i still use kegs for smaller batches too or if i have an experimental batch or whatever. they are awesome as fermentors, just not if you want a full 5G of IPA, as you say.
I just recently switched to corny kegs for fermentation under pressure and it’s a revelation. I just finished brewing the Carpetbagger Cream Ale recipe and it was done in 9 days. The process is cleaner and there is more control. I wish I knew of this before I bought the conical fermenters that will now sit and collect dust…
I’ve actually gone to brewing 2.5 gallon batches using this method. I ferment about 3 gallons and keg 2.5 gallons of that in a 2.5-gallon keg. Since I’m in the hobby to make beer, not to sell it for profit, I don’t mind wasting the extra quart of beer that I’d probably get out of the keg after yeast and trub were removed. I switched to the 6.5 gallon Anvil Foundry. Since I’m only brewing about a 3.25 gallon batch at the end of the boil, the 120v version heats and boils just fine. I’ve found that by programming the Foundry to have my strike water ready to go when I start, I can brew from start to finish including cleaning everything up in about 3.5 hours. The smaller equipment makes cleaning way easier, the smaller batch sizes mean I don’t have to make yeast starters in most cases, the ingredients are cheaper when I’m experimenting, and if I make something I don’t love, 2.5 gallons goes by pretty fast! 🙂 I get to brew more often and experiment more with this setup than I ever did making 5 or 10 gallon batches.
I just ordered a 6.5 gallon foundry (still waiting on it due to current shipping delays), but Im glad to hear you are enjoying it. I see you serve from a 2.5 gallon keg. Are you doing your primary fermentation in a 5 gallon corny? I noticed you said you ferment 3 gallons and finish with about 2.5. I also don’t worry about losses too much on the home-brew scale since its so inexpensive to make up the difference. If you’re doing primary in a keg, are you just cutting a pretty substantial amount off of your dip tube or perhaps using some sort of floating dip tube?
I have not read all the replies. I have ferment in corny for years and have converted half a dozen. My variation cuts the wet dip tube to the length of the dry and sleeves on silicone hose and float from fermenasaurus(or similar). Being able to ferment under pressure with a spunding valve is also hugely beneficial
I’ve been using corny kegs as fermenters for a few years, and I’ll never go back to carboys or buckets. I brew 2.5 gallon batches, so the 5-gallon corny is the perfect size for me. I leave the dip tubes as-is, and just blow out the trub under pressure before I start transferring to my serving keg.
I took the aeration stone off my O2 tank adapter and replaced it with a liquid ball-lock adapter. For the beers that I oxygenate (usually just high gravity beers nowadays), I am able to bubble it in through the liquid post.
Great idea!!! I hate the aeration hose dripping with wort flapping all over the place.
Sounds like a PicoBrew setup
Blow out trub under pressure? I have a hard time believing this will always work and never clog at the poppet.
I’ve brewed dozens of batches and only had 2 clogs with heavy dry hops. Since I started using a mesh canister for dry hopping I have yet to have another clog.
Before this thread dies, I have one more “trick” for the road. Last Xmas I got some SS straws as a stocking stuffer. I don’t really use straws but I did think it would have some kind of home-brew application someday. While fiddling around with a lid, I discovered that when I unscrewed the PRV, the straw fit perfectly in the hole and the little rubber “mouth” part kept the straw from falling in. A small funnel fits into the other end of the rubber piece. Now I had access to the beer to easily add some liquids without having to take the lid off. Examples of things I have added are gelatin finings, a tincture of vanilla beans infused in vodka and a strained, cacao nib infusion. The straw is long enough so liquids go underneath the surface avoiding the dreaded splashing. When all was done, I put the valve back and purged the keg a few times. As long as the liquid added is not too viscous, this method works like a charm.
I like the idea of closed transfers. Just wondering if it makes a noticeable difference to anyone here.
I fermented my last 3 batches in kegs and have some issues with high trub lost (1 gallon per 4 gallons batch). Instead of cutting the dip tube, I installed a floating dip tube. I always cold crash before transfering. I did 2 batches with high dry hop rate (8g/l) and 1 batch with low dry hop rate (2g/l) but trub lost was about the same.
How much trub lost do you usually have with a 4.5 gallon batch of IPA (around 8g/l dry hop) ?
Do you have any advice to reduce trub lost ?
Thanks,
If u ferment IPA ina corny u get like 3.5G of useable beer. Just double the batch size and get 7G.
Would it be possible to add Deaerated water to top up the serving keg to get to 5 gallons?
Loved this article, thanks Matt! With not being able to share homebrew as much as before, having two little kids that take precedent over brewing, and looking to move to a smaller footprint in the hopes of brewing less quantity more often, I recently bought a 6.5 gallon Anvil Foundry. I have a couple 2.5 gallon kegs already, but now have a few 5 gallon kegs that I was thinking, “what could I do with these; maybe ferment in them, I think that’s a thing.” I also have been a fan of no chill brewing, and am thinking about spunding to see the impact on the beer and, so thank you for addressing both those thoughts I had. A question I have about spunding is how much co2 is produced? Might be overthinking this, but could a 3 gallon batch fermented in a 5 gallon keg with a spunding valve be set to allow all co2 produced at first to exit to another 5 gallon keg to collect, then as fermentation slows down, be set to whatever carbonation you want the beer to be, cold crash after fermentation allowing some of that co2 back in from the other keg, and then transfer (maybe using a floating dip tube) to the serving 2.5 gallon keg? This could allow for potentially 0% cold side oxidation? What am I not thinking of?
Cheers!
How do you temperature control these without a thermowell? Just tape the probe to the side?
Jeez I wish you guys would get with the program and stop using US centric volumes, the rest of the world uses Litres, even the Brits (sort of) and your own guru’s acknowledge the benefits, Oh well.
The elephant in the room here (acknowledged in the OP) is volume, typically we brew 23Ltr to fill a 19Ltr cornie, most fridges here (Australia) hold 4 kegs (cornies) if we concede that 4Ltr’s is lost between fermenter and keg then a 19Ltr fermenter will yield 15Ltr’s, times that by 4 and you have 16Ltr’s, almost another full keg!
Consumption has a direct impact on this comment of course, I notice some folks here talking about having a keg on for months, if you are taking longer than a month or so to get through 19Ltr’s then the loss of 4Ltr’s becomes irrelevant, and the proposed process gains merit, although I would question the quality of a beverage that has sat on its yeast/trub for more than a month!.
We have a new product here in Aus that I believe is going to be/is available in the US, NO! affiliation blah, blah, etc, etc https://www.keg-king.com.au/chubby-30l-pressure-fermenter.html which I bought one of as a trial against my conical’s,
Pro’s: thermowell for accurate temp, pressure capable, floating dip tube, resistant to chemicals (you don’t put chlorine/bleach in your ss do you?) can see exactly what is going on (comes into it’s own when harvesting yeast), cheap (here at least) AND it’s 30Ltr., so headspace isn’t an issue.
Con’s: temp sensitive (no more than 50c, see my previous comment about “getting with the program” 😉 Limited life span (it’s plastic after all)
So if you are brewing 3.5 to 5.0 abv, taking a month or more to drink 15Lt’s then the OP has a great way of doing it.
If you are making bigger beers or consume more, then it becomes an issue of volume, and imho a 19Ltr’s fermenter isn’t enough
Spindels: great in theory, and if they can come up with a housing that sheds krausen I’ll buy more, till then it’s thermowell and hydrometer.
Keep safe people, and happy to discuss alternative views.
Curious what the protocol is for pulling samples during fermentation, especially when pressure fermenting. Thanks y’all!!!